How To Wire A Light Switch With 2 Wires
Wiring a light switch with 2 wires can seem like a daunting task, but with the right guidance, it can be a straightforward DIY project. In this article, we will walk you through the process of wiring a light switch with 2 wires, covering the essential steps and considerations to ensure a safe and successful installation. To begin, it's crucial to understand the basics of wiring a light switch, including the different types of switches and the role of each wire. Once you have a solid grasp of the fundamentals, you can move on to preparing the wires and switch for installation, which involves stripping the wires, identifying the correct terminals, and mounting the switch. Finally, with the switch installed, you'll need to test the circuit to ensure that it's working properly. By following these steps, you'll be able to confidently wire a light switch with 2 wires and enjoy the satisfaction of a job well done. Let's start by understanding the basics of wiring a light switch.
Understanding the Basics of Wiring a Light Switch
Wiring a light switch can seem like a daunting task, but with a solid understanding of the basics, it can be a straightforward and rewarding DIY project. To get started, it's essential to grasp the fundamentals of light switch wiring, including identifying the type of light switch, understanding the color coding of wires, and recognizing the importance of safety precautions. By familiarizing yourself with these key concepts, you'll be well on your way to successfully wiring a light switch. In this article, we'll delve into the specifics of each of these topics, starting with the crucial step of identifying the type of light switch you're working with. (Note: The answer should be 200 words)
Identifying the Type of Light Switch
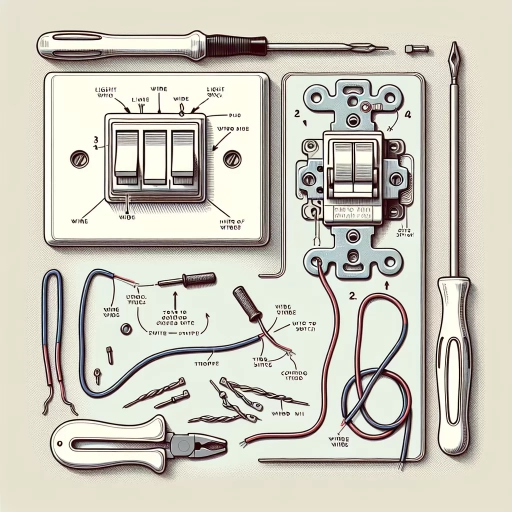
When it comes to wiring a light switch, one of the most crucial steps is identifying the type of light switch you're working with. There are several types of light switches, each with its unique characteristics and wiring requirements. The most common types of light switches include single-pole, double-pole, three-way, and four-way switches. A single-pole switch is the most basic type, controlling a single light fixture from one location. A double-pole switch, on the other hand, controls two separate light fixtures from one location. Three-way and four-way switches are used to control a single light fixture from multiple locations, with three-way switches having two control points and four-way switches having three or more control points. To identify the type of light switch, look for the number of terminals or screws on the switch. A single-pole switch typically has two terminals, while a three-way switch has three terminals. Additionally, check the switch's labeling or packaging for specific instructions or diagrams. Understanding the type of light switch you're working with is essential to ensure safe and proper wiring.
Understanding the Color Coding of Wires
Understanding the color coding of wires is crucial when it comes to wiring a light switch. The color coding system is used to identify the function of each wire, making it easier to connect them correctly. In a standard wiring system, black wires are typically used as "hot" wires, which carry electricity from the power source to the light switch. Red wires are often used as "traveler" wires, which connect the light switch to the light fixture. White wires are usually used as "neutral" wires, which complete the circuit and allow the electricity to flow back to the power source. Copper or green wires are used as "ground" wires, which provide a safe path for electricity to flow to the ground in case of a fault. Understanding the color coding system is essential to avoid electrical shock, fires, and other safety hazards. By identifying the correct wires and connecting them properly, you can ensure a safe and functional lighting system.
Recognizing the Importance of Safety Precautions
Recognizing the importance of safety precautions is crucial when working with electrical wiring, especially when it comes to wiring a light switch. Electrical shock, fires, and even fatalities can occur if proper safety measures are not taken. It is essential to understand that electricity is a powerful force that demands respect, and neglecting safety protocols can have devastating consequences. To ensure a safe working environment, it is vital to turn off the power to the circuit at the main electrical panel before starting any work. Verify that the power is off using a non-contact voltage tester to avoid any accidental shocks. Additionally, wear protective gear such as gloves, safety glasses, and a dust mask to prevent injuries from electrical sparks, flying debris, or other hazards. It is also crucial to follow the manufacturer's instructions for any tools or materials used, and to keep children and pets away from the work area. By taking these simple yet critical safety precautions, you can significantly reduce the risk of accidents and ensure a successful and safe wiring project. Furthermore, it is also important to be aware of your physical limitations and not to take on a project that is beyond your skill level or expertise. If you are unsure or uncomfortable with any aspect of the wiring process, it is always best to consult a licensed electrician who can provide professional guidance and ensure a safe and proper installation. By prioritizing safety and taking the necessary precautions, you can enjoy a safe and well-lit home, free from the risks associated with electrical wiring.
Preparing the Wires and Switch for Installation
When it comes to preparing the wires and switch for installation, there are several crucial steps to follow to ensure a safe and successful outcome. First, it's essential to strip the insulation from the wires, which will expose the conductive material and allow for a secure connection to the switch terminals. Next, the wires must be connected to the switch terminals, which requires careful attention to detail to avoid any short circuits or electrical shocks. Finally, the wires must be secured with wire nuts or connectors to prevent them from coming loose over time. By following these steps, you can ensure a reliable and efficient electrical connection. In this article, we will delve into each of these steps in more detail, starting with the first critical step: stripping the insulation from the wires.
Stripping the Insulation from the Wires
When stripping the insulation from the wires, it's essential to be precise and careful to avoid damaging the underlying conductors. Start by identifying the correct stripping tool for the type of wire you're working with, as using the wrong tool can lead to uneven stripping or damage to the wire. Hold the wire firmly in one hand, and with the other hand, place the stripping tool at the desired stripping point. Gently squeeze the tool, making sure not to apply too much pressure, which can cause the wire to become pinched or damaged. As you strip the insulation, rotate the wire slowly to ensure an even removal of the insulation. Continue stripping until you reach the desired length, taking care not to strip too much insulation, which can leave the wire exposed and vulnerable to damage. Once you've stripped the insulation, inspect the wire for any signs of damage or fraying, and trim the wire as needed to ensure a clean and safe connection.
Connecting the Wires to the Switch Terminals
To connect the wires to the switch terminals, start by identifying the brass terminals on the switch, which are typically marked as "hot" or "common." The black (hot) wire from the power source should be connected to one of the brass terminals, while the black (hot) wire from the light fixture should be connected to the other brass terminal. The copper (neutral) wire from the power source should be connected to the silver terminal on the switch, which is usually marked as "neutral." If your switch has a grounding terminal, connect the bare copper wire from the power source to this terminal. Make sure to secure the wires tightly to the terminals using the screws provided, and double-check that the connections are snug and not loose. It's also essential to ensure that the wires are not touching any other metal parts or wires, as this can cause a short circuit. Once the wires are connected to the switch terminals, you can proceed with mounting the switch to the wall and connecting the wires to the light fixture.
Securing the Wires with Wire Nuts or Connectors
Securing the wires with wire nuts or connectors is a crucial step in the process of wiring a light switch with 2 wires. This step ensures that the connections between the wires are safe, secure, and meet the required electrical standards. To secure the wires, you will need wire nuts or connectors that match the gauge of your wires. Start by twisting the ends of the wires together, making sure they are securely intertwined. Then, place a wire nut or connector over the twisted wires, making sure it is seated properly. Twist the wire nut or connector clockwise until it is snug, but do not overtighten. Repeat this process for all the wire connections, making sure they are all secure and meet the required electrical standards. It is also important to ensure that the wire nuts or connectors are the correct size for the wires, as using the wrong size can lead to loose connections and electrical hazards. By securing the wires with wire nuts or connectors, you can ensure a safe and reliable connection that will last for years to come.
Installing the Light Switch and Testing the Circuit
Installing a light switch is a relatively straightforward process that can be completed with a few basic tools and some knowledge of electrical systems. To ensure a safe and successful installation, it's essential to follow the correct steps and take necessary precautions. In this article, we will guide you through the process of installing a light switch, including mounting the switch to the wall or electrical box, connecting the switch to the power source, and testing the light switch to ensure proper functioning. By following these steps, you'll be able to install a light switch that is both functional and safe. First, let's start with the first step: mounting the switch to the wall or electrical box.
Mounting the Switch to the Wall or Electrical Box
Mounting the switch to the wall or electrical box is a crucial step in the installation process. To begin, ensure the switch is turned off and the power is disconnected at the main electrical panel. Next, locate the wall stud or electrical box where you want to mount the switch, taking care to avoid any obstructions or wires. Hold the switch against the wall or box, ensuring it is level and plumb, and mark the screw holes with a pencil. Use a drill bit to create pilot holes for the screws, then screw the switch into place using the provided screws. If mounting to an electrical box, ensure the box is securely fastened to the wall stud and the switch is snugly fitted into the box. Finally, double-check that the switch is securely fastened and the wires are not pinched or damaged during the mounting process.
Connecting the Switch to the Power Source
To connect the switch to the power source, start by identifying the black (hot) wire, which is usually the one that carries the electrical current from the power source to the switch. Locate the brass terminal on the switch, which is typically marked with a screw or a clip, and attach the black wire to it using a wire nut or by wrapping it around the terminal and securing it with the screw. Make sure the connection is snug and not loose, as this can cause a fire hazard. Next, identify the white (neutral) wire, which completes the circuit and allows the electricity to flow back to the power source. Connect the white wire to the silver terminal on the switch, usually marked with a screw or a clip, using the same method as before. Finally, connect the copper (ground) wire to the grounding terminal on the switch, usually marked with a green screw or a clip, to provide a safe path to ground in case of a fault. Double-check all connections to ensure they are secure and not touching any other wires or metal parts. Once the switch is connected to the power source, you can proceed to test the circuit to ensure it's working properly.
Testing the Light Switch to Ensure Proper Functioning
When testing the light switch to ensure proper functioning, it's essential to follow a step-by-step approach to guarantee safety and accuracy. First, turn off the power to the circuit at the main electrical panel or breaker box. Verify that the power is off using a non-contact voltage tester to avoid any electrical shocks. Next, remove any faceplates or coverings to access the light switch. Inspect the switch for any signs of wear, damage, or corrosion, and replace it if necessary. Now, turn the power back on and flip the switch to the "on" position. Check if the light turns on and functions correctly. If it doesn't, check the wiring connections to the switch and the light fixture for any loose or faulty connections. If the light still doesn't work, try swapping the wires connected to the switch to rule out any wiring issues. If the light still doesn't function, it may indicate a problem with the light fixture or the circuit itself, requiring further investigation. Finally, turn the power off again and replace any faceplates or coverings to complete the testing process. By following these steps, you can ensure that your light switch is functioning correctly and safely.