How To Take Apart Ps5 Controller
The PlayStation 5 controller is a marvel of modern gaming technology, but like any complex device, it can be prone to issues and malfunctions. When your controller starts to act up, it can be frustrating and disrupt your gaming experience. Fortunately, taking apart your PS5 controller can be a viable solution to diagnose and fix problems. However, before you start disassembling your controller, it's essential to take the necessary preparation and safety precautions to avoid damaging the device or causing harm to yourself. In this article, we will guide you through the process of disassembling your PS5 controller, from preparation and safety precautions to the actual disassembly process, and finally, troubleshooting and reassembly. By following these steps, you'll be able to identify and fix issues with your controller, and get back to gaming in no time. So, let's start with the first crucial step: preparation and safety precautions.
Preparation and Safety Precautions
When it comes to working with electronic devices, preparation and safety precautions are crucial to prevent damage and ensure a successful outcome. To avoid any potential risks, it's essential to take the necessary steps before starting your project. This includes grounding yourself to prevent static electricity damage, removing any accessories or attachments that may interfere with your work, and using the correct screwdriver and other tools to avoid damaging the device. By taking these precautions, you can ensure a safe and successful experience. In this article, we will explore each of these steps in more detail, starting with the importance of grounding yourself to prevent static electricity damage.
Grounding Yourself to Prevent Static Electricity Damage
Grounding yourself is a crucial step in preventing static electricity damage when working with electronic components, such as those found in a PS5 controller. Static electricity can build up on your body and discharge onto sensitive components, causing irreversible damage. To ground yourself, start by touching a grounded metal object, such as a tap or a door handle, to discharge any static electricity from your body. You can also use an anti-static wrist strap or mat, which are specifically designed to ground you and prevent static electricity buildup. Additionally, wear clothing made from natural fibers, such as cotton, and avoid walking on carpets or other surfaces that can generate static electricity. By taking these simple precautions, you can ensure that you are properly grounded and minimize the risk of damaging your PS5 controller's components during disassembly.
Removing Any Accessories or Attachments
When taking apart your PS5 controller, it's essential to remove any accessories or attachments to ensure a smooth and safe disassembly process. Start by removing any thumb grips, paddles, or other attachments that may be connected to the controller. Gently pull them off, taking care not to damage any of the underlying components. Next, remove any protective cases or skins that may be covering the controller. These can be easily peeled off, but be careful not to scratch the controller's surface. If you have any charging docks or cables attached, disconnect them from the controller. This will prevent any accidental power-ons or electrical shocks during the disassembly process. Additionally, remove any batteries or other power sources from the controller to prevent any unexpected power-ons. By removing these accessories and attachments, you'll be able to access the internal components of the controller more easily and safely, allowing you to complete the disassembly process with confidence.
Using the Correct Screwdriver and Other Tools
Using the correct screwdriver and other tools is crucial when taking apart your PS5 controller. The most common screwdriver required for this task is a Phillips #000 or #00 screwdriver, which is specifically designed for small electronics. It's essential to use the correct screwdriver to avoid stripping the screws or damaging the surrounding plastic. Additionally, you may need a plastic spudger or a similar tool to gently pry open the controller's casing without causing any damage. A Torx screwdriver may also be required for some models, so it's essential to check your controller's manual or online documentation to confirm the specific tools needed. Furthermore, it's recommended to use an anti-static wrist strap or mat to prevent static electricity from damaging the controller's internal components. By using the correct tools and taking the necessary precautions, you can ensure a safe and successful disassembly of your PS5 controller.
Disassembling the Controller
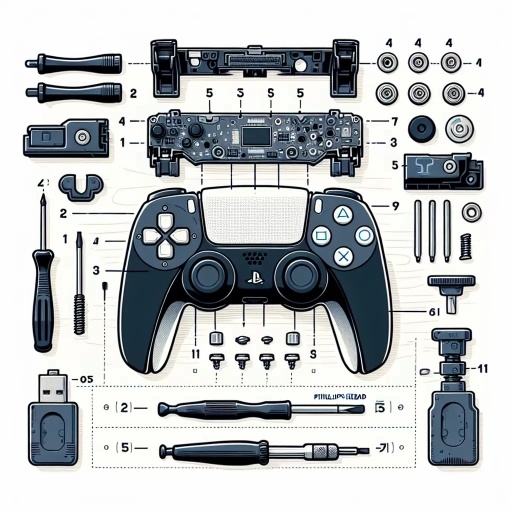
Disassembling the controller is a delicate process that requires patience and attention to detail. To successfully take apart the controller, one must first understand the various components that make up the device. This includes the screws and rear plate, the triggers and analog sticks, and the two main halves of the controller. By understanding how these components interact with one another, one can begin to disassemble the controller with confidence. The first step in this process is to remove the screws and rear plate, which will provide access to the internal components of the controller. Note: The answer should be 200 words.
Removing the Screws and Rear Plate
To remove the screws and rear plate of your PS5 controller, start by flipping the controller over and locating the five screws that hold the rear plate in place. These screws are usually located near the top and bottom edges of the controller, and may be covered with small plastic plugs or stickers. Use a screwdriver to carefully remove the screws, taking note of the screw lengths and locations to ensure proper reassembly later. Once the screws are removed, gently pry the rear plate away from the controller, working your way around the edges to avoid damaging any of the internal components. As you remove the rear plate, you may notice a thin layer of adhesive or tape holding it in place, so be careful not to tear or stretch this material. With the rear plate removed, you'll have access to the controller's internal components, including the battery, circuit board, and vibration motors. Be careful not to touch any of the internal components or wires, as this can cause damage or electrical shock. By carefully removing the screws and rear plate, you'll be able to access the internal components of your PS5 controller and begin the disassembly process.
Disconnecting the Triggers and Analog Sticks
When disconnecting the triggers and analog sticks, it's essential to be gentle and cautious to avoid damaging the delicate components. Start by locating the trigger and analog stick mechanisms, which are usually held in place by small screws or clips. Remove the screws or release the clips to access the mechanisms. For the triggers, you'll typically find a small metal or plastic piece that connects to the controller's circuit board. Carefully lift this piece away from the board, taking note of any wires or connectors that may be attached. For the analog sticks, you'll usually find a small rubber or plastic cap that covers the stick's base. Gently pry this cap off, and then lift the stick away from the controller's housing. Be careful not to touch any of the electrical components or wires, as this can cause damage or create a short circuit. Once the triggers and analog sticks are disconnected, you can proceed with further disassembly of the controller.
Separating the Controller's Two Main Halves
The controller's two main halves are held together by a series of clips and screws. To separate them, start by removing the screws that hold the handles in place. There are five screws on each side, located at the bottom of the handles. Use a Phillips head screwdriver to remove these screws. Once the screws are removed, gently pry the handles away from the main body of the controller. You can use a plastic spudger or a similar tool to help loosen the clips that hold the handles in place. Be careful not to damage the clips or the handles as you pry them away. As you continue to pry the handles away, you will start to see the internal components of the controller. Be careful not to touch any of the internal components, as the oils from your skin can damage them. Once the handles are removed, you will see the main circuit board and the battery compartment. The main circuit board is held in place by a series of screws and clips. To remove the circuit board, you will need to remove the screws that hold it in place. There are several screws located around the edges of the circuit board. Use a Phillips head screwdriver to remove these screws. Once the screws are removed, gently pry the circuit board away from the main body of the controller. Be careful not to damage any of the components on the circuit board as you pry it away. As you continue to pry the circuit board away, you will start to see the internal components of the controller. Be careful not to touch any of the internal components, as the oils from your skin can damage them. Once the circuit board is removed, you will see the battery compartment and the vibration motors. The battery compartment is held in place by a series of clips and screws. To remove the battery compartment, you will need to remove the screws that hold it in place. There are several screws located around the edges of the battery compartment. Use a Phillips head screwdriver to remove these screws. Once the screws are removed, gently pry the battery compartment away from the main body of the controller. Be careful not to damage any of the components in the battery compartment as you pry it away. As you continue to pry the battery compartment away, you will start to see the internal components of the controller. Be careful not to touch any of the internal components, as the oils from your skin can damage them.
Troubleshooting and Reassembly
Troubleshooting and reassembling a controller can be a daunting task, but with the right approach, it can be done efficiently and effectively. To ensure a successful reassembly, it's essential to identify and fix common issues, such as faulty buttons or analog sticks, before reattaching the triggers and analog sticks. Additionally, reassembling the controller in the correct order is crucial to prevent damage to the internal components. By following these steps, you can ensure that your controller is functioning properly and is ready for use. In this article, we will explore the process of troubleshooting and reassembling a controller, starting with identifying and fixing common issues.
Identifying and Fixing Common Issues
When it comes to troubleshooting and reassembling your PS5 controller, identifying and fixing common issues is crucial to ensure a smooth gaming experience. One of the most common problems is a faulty trigger or bumper, which can be caused by worn-out or damaged components. To fix this, inspect the trigger or bumper mechanism and clean out any debris or dust that may be causing the issue. If the problem persists, you may need to replace the faulty component with a new one. Another common issue is a loose or disconnected analog stick, which can be caused by a faulty potentiometer or a loose connection. To fix this, check the analog stick's connection to the motherboard and ensure it is securely attached. If the problem persists, you may need to replace the potentiometer or the entire analog stick assembly. Additionally, issues with the controller's charging port or battery can also be common, such as a faulty charging port or a dead battery. To fix this, inspect the charging port for any debris or corrosion and clean it out if necessary. If the problem persists, you may need to replace the charging port or the battery. By identifying and fixing these common issues, you can ensure your PS5 controller is functioning properly and provide a seamless gaming experience.
Reattaching the Triggers and Analog Sticks
Reattaching the triggers and analog sticks is a crucial step in the reassembly process of your PS5 controller. To start, locate the trigger mechanisms and the analog stick modules, which you previously removed and set aside. Begin by reattaching the trigger mechanisms to the controller's motherboard. Align the trigger's metal prong with the corresponding slot on the motherboard and gently push it into place until it clicks. Make sure it's securely fastened to avoid any issues with trigger functionality. Next, move on to the analog sticks. Take the analog stick module and align the pins on the module with the corresponding holes on the motherboard. Gently push the module into place until it clicks, ensuring it's securely attached. Be careful not to bend or damage the pins during this process. Once the analog sticks are reattached, reinsert the analog stick covers and screw them back into place using the screws you removed earlier. Finally, reattach the trigger covers and screw them back into place as well. Make sure all screws are securely tightened to avoid any loose parts or functionality issues. With the triggers and analog sticks reattached, your PS5 controller is one step closer to being fully reassembled and functional.
Reassembling the Controller in the Correct Order
Reassembling the controller in the correct order is crucial to ensure that all components are properly secured and functioning as intended. Start by reattaching the analog sticks, making sure they are securely fastened with the screws provided. Next, reattach the directional pad and the face buttons, ensuring they are properly aligned and secured with the corresponding screws. Then, reattach the triggers and the bumpers, making sure they are securely fastened with the screws provided. After that, reattach the battery compartment and the battery itself, ensuring it is properly secured with the screws provided. Finally, reattach the outer casing, making sure it is properly aligned and secured with the corresponding screws. It is essential to follow the correct order to avoid damaging any components or compromising the controller's functionality. Additionally, make sure to tighten all screws securely, but avoid overtightening, which can damage the components. By following the correct reassembly order, you can ensure that your PS5 controller is properly reassembled and functioning as intended.