How To Change Electric Guitar Strings
Changing the strings on your electric guitar can seem like a daunting task, but with the right approach, it can be a straightforward process. To ensure a smooth and successful string change, it's essential to break down the process into manageable steps. In this article, we'll guide you through the entire process, from preparation to completion. First, we'll discuss the importance of preparation, including gathering the necessary tools and materials, choosing the right strings, and understanding the basics of string tension. Next, we'll walk you through the string changing process itself, covering topics such as removing the old strings, installing the new ones, and adjusting the bridge and tuning. Finally, we'll provide tips on how to perform a final check and maintenance to ensure your guitar is playing its best. By following these steps, you'll be able to change your electric guitar strings with confidence. So, let's start with the first step: Preparation is Key.
Preparation is Key
Preparation is key to achieving success in any endeavor, and playing the guitar is no exception. To become a skilled guitarist, one must first prepare themselves with the right mindset, knowledge, and equipment. This includes choosing the right strings, gathering the necessary tools, and preparing your guitar. By doing so, you'll be able to produce high-quality sound, play with confidence, and avoid common mistakes that can lead to frustration and disappointment. In this article, we'll explore the importance of preparation in guitar playing, starting with the crucial step of choosing the right strings.
Choose the Right Strings
Here is the paragraphy: Choosing the right strings for your electric guitar is crucial for achieving the desired sound and playing feel. With so many options available, it can be overwhelming to decide which strings to use. Here are some factors to consider when selecting the right strings for your electric guitar: * **Gauge**: The gauge of a string refers to its thickness. Thicker strings produce a fuller sound, while thinner strings are easier to bend and provide a brighter sound. If you're a beginner, a medium gauge (0.010 - 0.046) is a good starting point. * **Material**: Strings can be made from various materials, including nickel, stainless steel, and coated strings. Nickel strings provide a warm, vintage sound, while stainless steel strings offer a brighter, more aggressive sound. Coated strings, such as Elixir or Nanoweb, have a longer lifespan and a smoother playing feel. * **Scale length**: Make sure to choose strings that are designed for your guitar's scale length. A longer scale length requires thicker strings to maintain proper tension. * **Tone**: Consider the tone you want to achieve. If you play in a heavy metal band, you may prefer a set of strings with a higher output and a brighter sound. If you play in a jazz band, you may prefer a set of strings with a warmer, more mellow sound. * **Brand**: Research different brands and read reviews to find the best strings for your needs. Some popular brands include Ernie Ball, D'Addario, and Elixir. By considering these factors, you can choose the right strings for your electric guitar and achieve the sound and playing feel you desire.
Gather the Necessary Tools
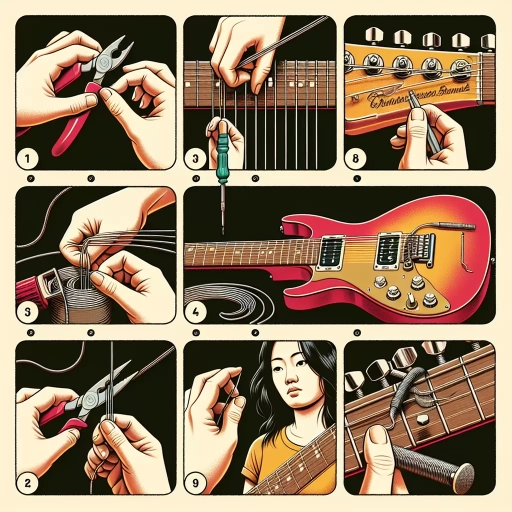
Here is the paragraphy: To change your electric guitar strings, you'll need a few essential tools. First and foremost, you'll need a new set of strings that match your guitar's specifications. It's also a good idea to have a string winder, which is a small tool that helps to remove the old strings and wind the new ones onto the tuning pegs. A pair of wire cutters or clippers is also necessary for trimming the excess string ends. Additionally, a bridge pin remover may be required if your guitar has a fixed bridge. A guitar tuner is also highly recommended, as it will help you to get your guitar back in tune quickly and accurately. Finally, a soft, dry cloth can be useful for wiping down the guitar's neck and body to remove any dirt or oils that may have accumulated during the string-changing process. By gathering all of these tools beforehand, you'll be able to complete the string-changing process efficiently and effectively.
Prepare Your Guitar
Here is the paragraphy: Before you start changing your electric guitar strings, it's essential to prepare your guitar. Begin by choosing a quiet and comfortable workspace with good lighting. Ensure your guitar is clean and free of dirt, grime, or old sweat, which can interfere with the new strings. Remove any accessories like straps, tuners, or effects pedals to prevent them from getting in the way. If you have a guitar with a tremolo system, consider locking it down to prevent any unwanted movement. Next, gather all the necessary tools and materials, including the new strings, a string winder, cutters, and a bridge or tremolo arm. Take a moment to inspect your guitar's bridge and nut to ensure they are clean and free of debris. If you find any dirt or grime, use a soft cloth and some guitar cleaner to wipe it away. Finally, take a deep breath, and get ready to start the string-changing process. By preparing your guitar, you'll ensure a smooth and successful string change.
The String Changing Process
Changing the strings on your guitar can seem like a daunting task, but with the right steps, it can be a straightforward process. The string changing process involves three main steps: removing the old strings, installing the new strings, and stretching and tuning the new strings. By following these steps, you can ensure that your guitar sounds its best and plays smoothly. In this article, we will guide you through each of these steps in detail, starting with the first and most important step: removing the old strings. This step is crucial in preparing your guitar for the new strings and preventing any damage to the instrument. By removing the old strings carefully and correctly, you can set yourself up for success in the rest of the string changing process. So, let's get started by removing the old strings.
Remove the Old Strings
Here is the paragraphy: To remove the old strings, start by loosening the low E string (thickest string) by turning the tuning peg counterclockwise. Once loose, carefully pull the string out of the bridge and away from the guitar. Repeat this process for the remaining strings, working your way up to the high E string (thinnest string). As you remove each string, take note of the string's position on the bridge and the tuning peg, as this will help you when installing the new strings. If the old strings are stuck or difficult to remove, you can use a string winder to help loosen them. Be careful not to scratch the guitar's finish or damage the bridge when removing the old strings. Once all the old strings are removed, take a moment to inspect the bridge and tuning pegs for any dirt, grime, or old string residue. Clean the area with a soft cloth and some guitar cleaner to ensure a smooth installation process for the new strings.
Install the New Strings
To install the new strings, start by taking the low E string (thickest string) and threading it through the bridge of the guitar. Make sure it's seated properly in the bridge and then thread the string through the tuning machine. Leave some slack, about 1-2 inches, and then wind the string around the tuning machine in a clockwise direction. Make sure to keep the string taut, but not too tight, as you wind it. Repeat this process for the A, D, G, B, and high E strings (thinnest string). As you install each string, make sure to stretch it by pulling it away from the fretboard and then releasing it. This will help settle the string and prevent tuning issues. Once all the strings are installed, use a string winder to tighten them up and tune the guitar. Be careful not to over-tighten, as this can cause damage to the guitar or the strings. Finally, use a cutters to trim the excess string at the tuning machine, leaving about 1/4 inch of string. This will help prevent the string from getting in the way of the tuning machine and will give your guitar a clean, professional look.
Stretch and Tune the New Strings
Stretch and tune the new strings by gently tugging on each string and then tuning it up to pitch. Repeat this process several times to help settle the strings and prevent tuning issues. Start with the low E string and work your way up to the high E string, making sure to tune each string carefully and accurately. Use a guitar tuner or tune by ear, whichever method you prefer. As you stretch and tune, pay attention to the string's pitch and adjust as needed. It's normal for new strings to go out of tune quickly at first, but with repeated stretching and tuning, they will eventually settle in and hold their pitch. Be patient and take your time, as rushing through this process can lead to tuning problems and a poor playing experience. By properly stretching and tuning your new strings, you'll be able to enjoy a clear, rich tone and smooth playing experience.
Final Check and Maintenance
Before you start playing your guitar, it's essential to perform a final check and maintenance to ensure it's in top condition. This involves a series of tasks that will not only improve the sound quality but also extend the lifespan of your instrument. First, you'll need to check the tuning and intonation to ensure that your guitar is producing the correct pitch and tone. Additionally, adjusting the bridge and action is crucial to achieve the perfect playing feel and prevent damage to the strings and fretboard. Finally, cleaning and conditioning the guitar will keep it looking and feeling its best. By following these steps, you'll be able to enjoy a great playing experience and keep your guitar in excellent condition. Let's start with the first step: checking the tuning and intonation.
Check the Tuning and Intonation
Here is the final paragraphy: Check the tuning and intonation of your guitar after changing the strings. Start by tuning your guitar to standard tuning using a tuner or tuning app. Play each string open and at the 12th fret to check for any tuning discrepancies. If the string is sharp or flat at the 12th fret, adjust the bridge or nut accordingly. Check the intonation by playing a string open and then at the 12th fret, and then at the 24th fret. If the pitch is sharp or flat at the higher frets, adjust the bridge or nut to compensate. Repeat this process for each string to ensure proper tuning and intonation. Additionally, check the action (string height) and adjust the bridge or nut if necessary to achieve the desired playing feel. By checking the tuning and intonation, you can ensure that your guitar sounds its best and plays smoothly.
Adjust the Bridge and Action
Adjusting the bridge and action is a crucial step in the process of changing electric guitar strings. The bridge is the part of the guitar where the strings are attached, and the action refers to the distance between the strings and the fretboard. Proper adjustment of the bridge and action is essential to ensure that the guitar plays smoothly and sounds good. To adjust the bridge, start by loosening the bridge screws and then adjusting the bridge to the desired height. The ideal height of the bridge will depend on the type of guitar and the player's preference, but a good starting point is to set the bridge so that the strings are about 4/64" (1.5 mm) above the fretboard at the 12th fret. Next, adjust the action by adjusting the truss rod. The truss rod is a metal rod that runs through the neck of the guitar and is used to adjust the neck's curvature. Turning the truss rod clockwise will increase the action, while turning it counterclockwise will decrease it. The ideal action will depend on the player's preference, but a good starting point is to set the action so that the strings are about 3/64" (1.2 mm) above the fretboard at the 12th fret. It's also important to check the intonation of the guitar after adjusting the bridge and action. Intonation refers to the guitar's ability to play in tune up and down the neck. To check the intonation, play a string open and then play it at the 12th fret. If the pitch is sharp, the string is too long, and if the pitch is flat, the string is too short. Adjust the bridge and action accordingly to achieve proper intonation. Finally, play the guitar and check for any buzzing or rattling sounds. If you hear any buzzing or rattling, it may be necessary to make further adjustments to the bridge and action. By following these steps, you can ensure that your electric guitar is properly adjusted and playing smoothly.
Clean and Condition the Guitar
Cleaning and conditioning the guitar is a crucial step in maintaining its overall health and playability. After changing the strings, it's essential to wipe down the guitar to remove any dirt, grime, or oils that may have accumulated during the process. Use a soft, dry cloth to gently wipe the body, neck, and headstock, paying particular attention to the areas around the bridge, tuners, and fretboard. For tougher stains or grime buildup, a slightly damp cloth can be used, but be sure to dry the area thoroughly to prevent any damage. Next, apply a guitar conditioner or polish to the fretboard and body, following the manufacturer's instructions. This will help to moisturize and protect the wood, keeping it from drying out and cracking. Finally, use a clean, dry cloth to buff the guitar and remove any excess conditioner or polish, leaving it with a smooth, glossy finish. Regular cleaning and conditioning will not only keep the guitar looking its best but also help to extend its lifespan and maintain its tone and playability.