How To Draw Canada Flag
The Canadian flag, with its iconic maple leaf design, is a symbol of national pride and identity for millions of Canadians and is recognized worldwide. Whether you're an aspiring artist, a student working on a project, or simply a patriotic individual looking to express your love for Canada, learning how to draw the Canadian flag can be both rewarding and educational. This comprehensive guide will walk you through the process of creating an accurate and visually appealing representation of the Canadian flag. We'll begin by exploring the flag's design elements and their significance, providing you with a deeper understanding of this national emblem. Next, we'll offer a detailed, step-by-step guide to drawing the flag, breaking down the process into manageable stages. Finally, we'll share expert tips and techniques to help you achieve a professional-looking result, ensuring your rendition of the Canadian flag is as impressive as possible. By the end of this article, you'll have the knowledge and skills to confidently draw the Canadian flag with precision and pride. Let's start by delving into the intricacies of the Canadian flag design, which will serve as the foundation for your artistic endeavor.
Understanding the Canadian Flag Design
The Canadian flag, with its iconic red and white design featuring a prominent maple leaf, is a powerful symbol of national identity and pride. This instantly recognizable emblem has become synonymous with Canada's values, heritage, and global presence. However, there's much more to this flag than meets the eye. From its rich history and deep-rooted symbolism to its precise proportions and specific color specifications, the Canadian flag is a masterpiece of design and meaning. This article delves into three crucial aspects of the Canadian flag: its historical significance and symbolic elements, the exact measurements and proportions that define its structure, and the precise color specifications that ensure its accuracy and consistency. By exploring these facets, we gain a deeper appreciation for the thought and craftsmanship behind this national symbol. Whether you're a vexillology enthusiast, a proud Canadian, or simply curious about the intricacies of flag design, understanding the Canadian flag's design will provide valuable insights into the art and science of creating a national emblem that stands the test of time.
History and symbolism of the Canadian flag
The Canadian flag, with its iconic red and white design featuring a prominent maple leaf, is a powerful symbol of national identity and pride. Its history and symbolism are deeply rooted in Canada's journey towards independence and its cultural heritage. The current Canadian flag, known as the "Maple Leaf Flag," was officially adopted on February 15, 1965, following an extensive period of debate and design consideration. Prior to this, Canada had used various versions of the British Red Ensign, which incorporated elements of the British flag and Canadian coat of arms. The push for a distinctly Canadian flag gained momentum in the 1960s as the country sought to assert its unique identity on the world stage. The process of selecting a new flag design was not without controversy. Prime Minister Lester B. Pearson championed the idea of a new flag, facing opposition from those who wished to maintain ties to Canada's British heritage. After much deliberation and thousands of design submissions, the current flag emerged as the chosen symbol. The flag's design is both simple and meaningful. The red bars on either side represent the Pacific and Atlantic oceans, symbolizing Canada's motto "A Mari Usque Ad Mare" (From Sea to Sea). The white central band represents the vast snow-covered landscapes of Canada, as well as the country's peaceful nature. The red maple leaf at the center is a longstanding symbol of Canadian identity, dating back to the 18th century when it was used by French Canadians along the Saint Lawrence River. The maple leaf itself carries deep significance. Maple trees are abundant across Canada and have been an important part of the country's economy and culture for centuries. The leaf symbolizes the natural beauty of Canada, its rich resources, and the resilience of its people. The stylized 11-point maple leaf on the flag was designed to be identifiable even at a distance and in various weather conditions. The choice of red and white as the flag's colors also holds historical significance. These colors were designated as Canada's official colors by King George V in 1921, in recognition of the country's contributions during World War I. The bold contrast between the red and white elements ensures the flag's visibility and recognizability. Since its adoption, the Canadian flag has become a powerful unifying symbol for the diverse population of Canada. It represents not only the country's natural beauty and resources but also its values of peace, tolerance, and multiculturalism. The flag is prominently displayed during national celebrations, international events, and on government buildings, serving as a constant reminder of Canadian identity and unity. Understanding the history and symbolism behind the Canadian flag adds depth to its simple yet striking design. It embodies the spirit of a nation that values its heritage while embracing progress and diversity, making it a source of pride for Canadians and a respected symbol worldwide.
Proper proportions and measurements
Proper proportions and measurements are crucial elements in accurately representing the Canadian flag. The flag's design, while seemingly simple, adheres to specific ratios and dimensions that contribute to its iconic appearance. Understanding these measurements is essential for anyone looking to create an authentic representation of the Canadian flag, whether for artistic, educational, or official purposes. The Canadian flag has a rectangular shape with a width-to-length ratio of 1:2, meaning that the width is half the length. This proportion gives the flag its distinctive elongated appearance, which is common among many national flags. The central white square, which serves as the background for the red maple leaf, occupies half the flag's width. This creates a perfect square in the middle, flanked by two identical red rectangles on either side. The red maple leaf itself is precisely positioned within the white square and follows strict guidelines for its shape and size. The leaf has eleven points, with the stem pointing downwards. The width of the leaf should be 0.95 times the width of the white square, ensuring that it fits comfortably within the space while maintaining a bold presence. The intricate design of the leaf is based on a stylized version rather than a naturalistic representation, which allows for easier reproduction and recognition at various sizes and distances. To achieve the correct proportions, flag makers and artists often use a grid system. This grid typically divides the flag into 24 equal parts horizontally and 12 parts vertically, creating a total of 288 squares. Using this grid, one can precisely place each element of the flag design. For instance, the tips of the maple leaf's side points should align with specific intersections on this grid, ensuring consistency across different reproductions. Color accuracy is another critical aspect of proper flag representation. The official red used in the Canadian flag is not just any shade of red but a specific hue known as "FIP red" (Federal Identity Program red) or "Canada red." This color is defined by precise color matching systems to ensure uniformity across all official representations of the flag. Attention to these details in proportions, measurements, and color is what sets apart an accurate representation of the Canadian flag from an approximation. Whether drawing, painting, or digitally creating the flag, adhering to these specifications helps maintain the integrity and symbolism of this national emblem. It's this level of precision that allows the Canadian flag to be instantly recognizable and respected worldwide, serving as a powerful symbol of Canadian identity and values.
Color specifications for accuracy
Color specifications play a crucial role in ensuring the accuracy and consistency of the Canadian flag's design. The precise hues used in the flag are not merely aesthetic choices but are carefully selected to represent the nation's identity and heritage. Understanding these color specifications is essential for anyone looking to recreate the flag with precision, whether for official purposes or personal projects. The Canadian flag consists of two primary colors: red and white. However, these are not just any shades of red and white; they are specific tones that have been standardized to maintain uniformity across all representations of the flag. The red used in the Canadian flag is officially designated as FIP red, named after the Federal Identity Program. This particular shade of red is vibrant and bold, symbolizing the strength and determination of the Canadian people. In technical terms, it is defined by specific color codes: Pantone 032, CMYK 0-100-100-0, and RGB 255-0-0. The white portions of the flag, including the central square and the two side panels, are meant to be a pure, bright white. This crisp white represents the vast snow-covered landscapes that are iconic to Canada and symbolizes peace and neutrality. While white may seem straightforward, maintaining consistency in its representation across various media and materials is crucial for accuracy. To ensure color fidelity, the Canadian government provides detailed guidelines for flag production. These specifications are particularly important when the flag is reproduced in different formats, such as print, digital displays, or fabric. For instance, when printing the flag, it's essential to use the correct Pantone color or CMYK values to achieve the precise red hue. In digital formats, the RGB values ensure that the colors appear correctly on screens. The importance of adhering to these color specifications cannot be overstated. Slight variations in shade can significantly alter the flag's appearance and, by extension, its symbolic impact. For example, a red that's too dark might lose the flag's vibrancy, while a red that's too orange or pink would be inaccurate and potentially disrespectful to the national symbol. Moreover, these color specifications extend beyond just the flag itself. They are used consistently across various official Canadian emblems and documents, creating a cohesive visual identity for the nation. This consistency helps in instant recognition and reinforces the flag's status as a powerful symbol of Canadian identity. For artists, designers, and anyone involved in reproducing the Canadian flag, understanding and accurately implementing these color specifications is crucial. It ensures that every representation of the flag, whether it's flying atop a government building or printed on a small lapel pin, carries the same visual impact and symbolic weight that has made the Canadian flag one of the most recognizable and respected national symbols in the world.
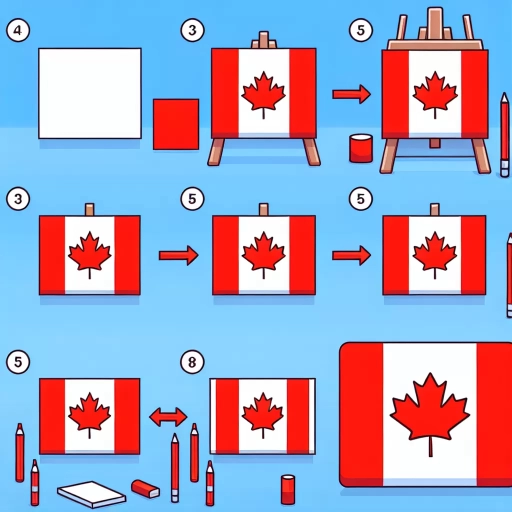
Step-by-Step Guide to Drawing the Canadian Flag
The Canadian flag, with its iconic red maple leaf set against a white background flanked by red bars, is a symbol of national pride and identity. This step-by-step guide will walk you through the process of drawing this emblematic flag, allowing you to recreate a piece of Canadian heritage with your own hands. Whether you're an aspiring artist, a history enthusiast, or simply looking for a creative project, this tutorial will provide you with the skills to accurately depict Canada's national emblem. We'll begin by creating the base rectangle and dividing the sections, ensuring the proper proportions that make the flag instantly recognizable. Next, we'll focus on drawing and positioning the maple leaf, the centerpiece that sets the Canadian flag apart. Finally, we'll add color and refine the details, bringing your drawing to life with vibrant reds and crisp lines. By following these steps, you'll not only produce a visually appealing representation of the Canadian flag but also gain a deeper appreciation for its design elements. Before we dive into the drawing process, let's take a moment to understand the Canadian flag design, its history, and the significance behind its simple yet powerful symbolism.
Creating the base rectangle and dividing the sections
Creating the base rectangle and dividing the sections is a crucial step in drawing the Canadian flag accurately. This stage sets the foundation for the entire design and ensures that all elements are properly proportioned and positioned. To begin, you'll need to draw a large rectangle that will serve as the canvas for your flag. The Canadian flag has a specific aspect ratio of 1:2, meaning that its width is twice its length. This unique proportion gives the flag its distinctive elongated shape, which is essential to capture for an authentic representation. Once you've established the outer boundaries of the flag, the next step is to divide the rectangle into three vertical sections of equal width. These sections will form the basis for the flag's iconic design: a red panel on each side and a white square in the center. The precision of these divisions is crucial, as they determine the placement of the maple leaf emblem and contribute to the flag's overall symmetry and balance. To ensure accuracy, you may want to use a ruler or straight edge to measure and mark these sections. Alternatively, you can fold the paper into thirds if you're working with a physical medium. If you're using digital tools, most graphic design software offers grid systems or guides that can help you achieve perfect divisions. It's important to note that while the flag appears to have simple geometric shapes, the proportions and placement of each element are carefully calculated. The central white square, for instance, is not a perfect square but rather a rectangle with a width equal to the height of the flag. This subtle detail contributes to the flag's harmonious appearance when flying. As you divide the sections, keep in mind that this step lays the groundwork for the subsequent stages of your drawing. The accuracy of these initial lines will influence the placement of the maple leaf and the overall impact of your finished flag. Take your time to get these proportions right, as they are fundamental to capturing the essence of the Canadian flag's design. By meticulously creating the base rectangle and dividing the sections, you're not just drawing lines on paper or screen; you're beginning to bring to life a powerful national symbol. This process connects you to the thoughtful design principles behind the flag, which was carefully crafted to represent Canadian values and identity. As you progress through this step, you're setting the stage for a flag that will embody the spirit of Canada in your artwork.
Drawing and positioning the maple leaf
Drawing and positioning the maple leaf is arguably the most crucial and challenging aspect of creating an accurate representation of the Canadian flag. The iconic red maple leaf serves as the centerpiece of the flag, demanding precision and attention to detail to capture its essence. To begin, it's essential to understand that the official maple leaf design consists of 11 points and follows specific proportions. Start by lightly sketching a vertical center line on your flag design, which will serve as a guide for positioning the maple leaf. The leaf should be centered both horizontally and vertically within the white square at the flag's center. Next, draw a light horizontal line across the center of the white square to create a cross-shaped guide. To achieve the correct size, the maple leaf should occupy approximately 70% of the white square's height. Begin by drawing the central vein of the leaf along the vertical guideline, extending it from the top of the leaf to its base. Then, sketch the two main side veins branching out at roughly 45-degree angles from the central vein. Now, focus on creating the leaf's outline. The top of the leaf should have a pronounced dip, forming two distinct upper lobes. As you move down the sides, draw the remaining lobes, ensuring that each one is slightly larger than the one above it. The bottom of the leaf should taper to a point where it meets the central vein. Pay close attention to the symmetry of the leaf, as this is crucial for an authentic appearance. The left and right sides should mirror each other precisely. Once you're satisfied with the basic shape, refine the edges by adding the characteristic serrations found on maple leaves. These should be sharp and well-defined, contributing to the leaf's distinctive appearance. After finalizing the outline, it's time to add the 11 points. The topmost point should align with the vertical center line, while the bottom point forms the leaf's tip. The remaining nine points should be distributed evenly around the leaf's perimeter, with five on each side. Remember that the official design of the maple leaf is stylized rather than a naturalistic representation. This means that while it should be recognizable as a maple leaf, it also adheres to specific geometric principles that give it its unique and easily reproducible form. Once you're satisfied with your drawing, carefully erase any visible guidelines and fill in the leaf with a vibrant red color, matching the red bars on either side of the flag. The precision in drawing and positioning the maple leaf is what transforms a simple sketch into an accurate depiction of the Canadian flag, capturing the nation's identity and pride in a single, powerful symbol.
Adding color and refining details
Adding color and refining details is a crucial step in creating an accurate and visually appealing representation of the Canadian flag. This stage brings your drawing to life, transforming it from a simple sketch into a vibrant and recognizable symbol of national pride. Begin by selecting the appropriate shade of red for the side panels. The official color is known as "Canada Red" (FIP red 485), which is a bright, bold hue that stands out against the crisp white background. Using colored pencils, markers, or paint, carefully fill in the left and right sections of the flag, taking care to maintain clean edges and uniform coverage. For the iconic maple leaf in the center, pay close attention to its intricate details. The maple leaf on the Canadian flag has 11 points, each representing a province or territory at the time of the flag's adoption in 1965. Use a lighter touch when coloring the leaf to create subtle shading and dimension, emphasizing the veins and contours that give it a natural, lifelike appearance. The white space surrounding the maple leaf should remain pristine, creating a striking contrast against the red elements. To add depth and realism to your drawing, consider incorporating subtle shadows and highlights. This can be achieved by using varying pressure when applying color or by blending different shades to create a more nuanced effect. Pay attention to the flag's proportions, ensuring that the width-to-length ratio is precisely 1:2, as specified in the official design guidelines. This attention to detail will lend authenticity to your representation. For an extra touch of realism, you might choose to add some texture to simulate the appearance of fabric. Light, wavy lines or gentle shading can create the illusion of a flag rippling in the breeze. If you're aiming for a more stylized or modern interpretation, experiment with different art techniques such as watercolor washes, digital effects, or even collage to give your Canadian flag drawing a unique twist while still maintaining its recognizable form. Remember that practice makes perfect, and don't be discouraged if your first attempt doesn't meet your expectations. Each time you draw the Canadian flag, you'll likely find new ways to refine your technique and improve the overall result. By focusing on accuracy, color balance, and thoughtful detailing, you'll be able to create a Canadian flag drawing that captures the essence of this powerful national symbol and showcases your artistic skills.
Tips and Techniques for a Professional-Looking Canadian Flag
The Canadian flag, with its iconic red maple leaf set against a crisp white background flanked by red bars, is a symbol of national pride and identity. Whether you're an artist, a student, or simply a patriotic citizen, creating a professional-looking rendition of this beloved emblem can be a rewarding endeavor. This article will guide you through the essential tips and techniques to craft a stunning representation of the Canadian flag that truly captures its essence and beauty. We'll explore three crucial aspects of flag creation: choosing the right materials and tools to ensure durability and vibrancy, common mistakes to avoid when drawing the flag to maintain its accuracy and proportions, and advanced techniques for shading and texture to add depth and realism to your artwork. By mastering these elements, you'll be well-equipped to produce a flag that not only looks professional but also pays homage to the rich history and symbolism it represents. Before delving into these specific techniques, it's essential to start with a solid foundation by understanding the Canadian flag design, which will serve as the basis for your artistic journey.
Choosing the right materials and tools
Choosing the right materials and tools is crucial when aiming to create a professional-looking Canadian flag. The quality of your finished product will largely depend on the supplies you use, so it's essential to select them carefully. Begin by considering the surface on which you'll be drawing or painting your flag. For a long-lasting result, opt for high-quality paper or canvas that can withstand your chosen medium without warping or bleeding. When it comes to drawing tools, precision is key. Invest in a set of fine-tipped markers or pencils that allow for crisp, clean lines. Mechanical pencils with varying lead thicknesses can be particularly useful for sketching initial outlines and adding intricate details. If you prefer traditional pencils, ensure they're well-sharpened to maintain accuracy throughout your drawing process. For those planning to paint their Canadian flag, select paints that offer vibrant, true-to-life colors. Acrylic paints are a popular choice due to their versatility, quick drying time, and ability to create both opaque and translucent effects. Ensure you have the exact shade of red required for the maple leaf and side bars – it should be a bright, bold red that stands out against the white background. High-quality paintbrushes in various sizes will allow you to achieve both broad strokes and fine details with ease. To achieve perfect proportions and straight lines, consider using rulers, T-squares, or even digital design software if you're comfortable with technology. These tools can help you maintain the correct 1:2 ratio of the flag's width to its length and ensure that all elements are properly aligned. For the maple leaf, which is the centerpiece of the Canadian flag, you may want to use a stencil or template to achieve a symmetrical and accurate shape. Alternatively, you can create your own template by printing out a high-resolution image of the maple leaf and carefully tracing its outline. Don't forget about additional supplies that can enhance your work, such as erasers for correcting mistakes, blending tools for smooth color transitions, and masking tape for creating clean edges. If you're working on a larger scale, consider using a projector to enlarge and trace the flag design onto your chosen surface, ensuring all proportions are maintained accurately. Remember that the quality of your materials and tools will directly impact the professional appearance of your finished Canadian flag. While it may be tempting to opt for cheaper alternatives, investing in superior supplies will result in a more polished and impressive final product. By carefully selecting your materials and tools, you'll set yourself up for success in creating a Canadian flag that truly captures the essence and pride of the nation.
Common mistakes to avoid when drawing the flag
When it comes to drawing the Canadian flag, several common mistakes can detract from its professional appearance and accuracy. One of the most frequent errors is misjudging the proportions of the flag's elements. The Canadian flag has specific dimensions, with a length twice its width and the maple leaf occupying a precise central position. Artists often make the maple leaf too small or too large, disrupting the flag's balance. Similarly, the positioning of the red bars on either side of the white square can be challenging to get right, with many people making them too narrow or wide. Another common pitfall is the improper rendering of the maple leaf itself. The leaf on the Canadian flag is stylized and has a specific design with 11 points. Many people tend to draw a more naturalistic maple leaf or one with an incorrect number of points, which immediately stands out as inaccurate. The leaf's shape and symmetry are crucial, and even small deviations can be noticeable to those familiar with the flag. Color accuracy is another area where mistakes frequently occur. The red used in the Canadian flag is a specific shade – Pantone 186C – which is a bright, vibrant red. Using a darker or more muted red can alter the flag's overall appearance and impact. Similarly, ensuring that the white areas are crisp and clean is essential for a professional look. Perspective errors can also plague flag drawings, especially when depicting the flag in motion or on a flagpole. Failing to account for how fabric folds and moves can result in an unrealistic representation. Additionally, when drawing the flag on a pole, it's important to remember that the maple leaf should always face forward, regardless of which side of the pole it's on. Detail inconsistencies are another common issue. The edges of the maple leaf and the borders between the red and white sections should be sharp and well-defined. Fuzzy or uneven lines can make the flag look amateurish. Moreover, adding unnecessary details or embellishments, such as shading within the leaf or texture on the bars, detracts from the flag's clean, iconic design. Lastly, a frequent mistake is neglecting the flag's aspect ratio. The official dimensions of the Canadian flag are 1:2 (height to width), but this is often overlooked, resulting in flags that are too long or too short. Maintaining this ratio is crucial for an accurate representation, whether drawing the flag flying freely or mounted on a surface. By being aware of these common mistakes and taking care to avoid them, artists can significantly improve the quality and accuracy of their Canadian flag drawings. Attention to detail, precision in proportions, and adherence to the official design specifications are key to creating a professional-looking representation of this iconic national symbol.
Advanced techniques for shading and texture
Advanced techniques for shading and texture can elevate your Canadian flag drawing from a simple representation to a lifelike, professional-looking piece of art. These methods add depth, dimension, and realism to your work, bringing the flag to life on paper or canvas. One essential technique is gradual shading, which involves creating smooth transitions between light and dark areas. For the maple leaf, start with a base color and gradually build up layers of darker shades to create depth and form. Use a combination of hatching, cross-hatching, and stippling to achieve various textures within the leaf. Pay close attention to the veins and edges, as these areas typically require more intricate shading to convey the leaf's natural structure. For the red sections of the flag, consider incorporating subtle variations in color to suggest the fabric's texture and movement. Use slightly darker shades of red in areas where the flag might naturally fold or crease, and lighter shades where light would hit the fabric directly. This technique adds a sense of dimensionality to the flat surface. Texture plays a crucial role in creating a realistic flag representation. To mimic the appearance of fabric, use fine, parallel lines or a gentle stippling technique to suggest the weave of the material. For a more weathered look, incorporate small imperfections or frayed edges along the flag's borders. When working on the white sections, avoid leaving them completely blank. Instead, use very light shades of gray or pale yellow to suggest subtle shadows and highlights. This approach helps to integrate the white areas with the rest of the drawing and prevents them from appearing too stark or disconnected. Consider the lighting in your composition as well. Determine the direction of your light source and apply shading accordingly. Areas facing the light should be brighter, while those facing away should be darker. This consistent approach to lighting will enhance the overall realism of your drawing. For digital artists, experimenting with different brush textures and opacity settings can yield impressive results. Many digital art programs offer brushes that mimic traditional media like watercolors or oil paints, which can be used to create unique textures and effects. Advanced shading techniques also involve understanding and applying color theory. Even in a predominantly red and white composition, incorporating subtle hints of complementary colors can add depth and interest. For example, adding a touch of green to the shadows of the red areas can create a more vibrant and dynamic appearance. Lastly, don't shy away from using reference images. Studying photographs of real Canadian flags in various lighting conditions and states of wear can provide valuable insights into how fabric behaves, how light interacts with different surfaces, and how to accurately represent the intricate details of the maple leaf. By mastering these advanced shading and texturing techniques, you can transform your Canadian flag drawing into a stunning, professional-quality artwork that captures the essence and beauty of this iconic national symbol.