How To Tape A Shoulder
 Taping a shoulder can be a daunting task for anyone unfamiliar with this procedure. When done correctly, this effectively supports the shoulder and reduces the risk of injuries, aiding in recovery from existing ones. This comprehensive guide provides clear and concise information about shoulder taping. It takes into account essential components like awareness of the shoulder's anatomy, the right materials and preparation for shoulder taping, and a step-by-step guide to ensuring its effectiveness. To kick off this exploration, we start by understanding the basics of the shoulder anatomy - an essential foundation to enhance your skills and confidence in taping a shoulder. By integrating knowledge of shoulder construction with the right taping materials and technique, you can master the art of shoulder taping in no time.
Understanding the Basics of the Shoulder Anatomy
Understanding the complex nature of shoulder anatomy is essential not only for medical professionals but also for individuals seeking to improve their fitness, heal injuries, and optimize kinetic performance. This article aims to untangle the complexity of shoulder anatomy, drilling down into the structure and function of the shoulder joint—an integral piece in the puzzle of understanding body dynamics. We will also delve into the common injuries and sources of pain surrounding the shoulder. These common pitfalls are significant, as knowing and addressing them can prevent discomfort and enhance quality of life. Finally, we will explore the role taping plays in supporting the shoulder—an often underestimated strategy in managing shoulder health, particularly for athletes or those with chronic injuries. As we venture into the details of shoulder anatomy, we begin with the structure and function of the shoulder joint, the keystone structure that sets the stage for everything else in our discussion.
The Structure and Function of the Shoulder Joint
The shoulder joint, essentially a ball and socket joint, is one of the most intricately designed structures of the human body, offering a paramount balance between stability and mobility. Comprised of three bones - the clavicle, scapula, and humerus, the joint endows the upper extremities with a remarkable range of movement, enabling actions from throwing a pitch to performing a ballet arabesque. At the heart of this assemblage lies the glenohumeral joint where the head of the humerus (the ball) fits into a shallow socket (the glenoid) in the scapula. This shallow socket is deepened by the glenoid labrum, a protective ring of cartilage, adding stability and reducing the risk of dislocation. Conjointly, the acromioclavicular and sternoclavicular joints hold the clavicle, or collarbone, joining the shoulder to the main skeleton. Complementing the bone structures, a network of ligaments, tendons, and muscles play a vital roles in the joint’s function. The rotator cuff, a dynamic quartet of muscles (supraspinatus, infraspinatus, subscapularis, and teres minor), works in unison to aid in the wide range of shoulder movements. Meanwhile, the bursae, small sacs of fluid, act as cushions decreasing friction between the joint components during movement. Additionally, the deltoid muscle plays a pivotal role in giving the shoulder its characteristic rounded contour and assisting with arm lifting. A marvelously intricate blend of ligaments, including the coracoacromial, coracohumeral, and transverse humeral ligaments, confer additional stability by binding the bones securely. This intricate assembly of structures allows for the multidimensional movement of the shoulder joint. From flexion and extension to abduction, adduction, rotation, and circumduction, these movements underpin the dexterity of our upper limbs. This basic knowledge of the shoulder’s complex anatomy is pivotal in understanding how to tape the shoulder accurately. Such preventative treatment can help to alleviate pain, support healing, and enhance the performance of this spectacularly versatile joint.
Common Injuries and Pain Sources in the Shoulder
There's no denying that the shoulder, as one of the most complex joint systems in the human body, is vulnerable to a variety of injuries and pain sources. Composed of bones, tendons, muscles and ligaments, its complexity allows for a wide range of motion but also makes it susceptible to diverse complications. Firstly, rotator cuff injuries are one of the most common shoulder ailments. This is primarily because the rotator cuff, consisting of a group of muscles and tendons that hold the upper arm bone in the shoulder socket, is constantly utilized in various shoulder movements. Rotator cuff tendinitis and tear are common conditions that lead to pain and functional limitations. This injury is typically a result of repetitive overhead movements like lifting weights, throwing a ball, or even just daily activities like brushing hair or reaching for objects. Another common injury is a shoulder dislocation, which can occur when the upper arm bone is forced out of the shoulder socket. This usually happens as a result of a strong, sudden impact or extreme rotation. A dislocated shoulder can cause intense pain, abnormal contortion and inability to move the joint. Additional shoulder pain sources include conditions like frozen shoulder and shoulder impingement. Frozen shoulder, often associated with diabetes and thyroid disorders, restricts movement in the shoulder due to the formation of stiff tissues around the joint. Impingement results from the excessive squeezing of the rotator cuff. This condition is often seen in people participating in activities that require repetitive, overhead arm movements. Clearly, understanding the anatomy of the shoulder not only offers insight into the myriad functions it allows us to perform, but it also sheds light on the multiple sources of pain and injury associated. It's important to be aware of these common injuries, as early detection and prevention can make a significant difference in the management and recovery process.
Understanding How Taping Supports the Shoulder
Understanding How Taping Supports the Shoulder The health and functionality of the shoulder joint are of paramount importance owing to its significance in the human muscular-skeletal system. It's your shoulder's key role in motion that makes its care crucial, especially when it suffers injury or strain, and this is where taping comes into play. Employing the principle of biomechanics, taping provides a type of external support to the shoulder, helping to alleviate strain and facilitate recovery. By acting as a secondary layer of muscles or ligaments, the tape aids in limiting excessive or abnormal movements that could worsen an existing injury or potentially lead to a new one. More than just a restrictive barrier, taping also promotes healing by improving both blood flow and lymphatic drainage. The applied pressure from the tape assists in alleviating pooling of fluids and decreases swelling or edema, subsequently mitigating pain and discomfort. Additionally, this mechanical support from taping holds the potential to hasten healing by fostering an environment that facilitates body function optimization. One of the unique aspects of shoulder taping is its essential role in proprioception - the body's inherent ability to perceive its positioning in space. Taping enhances the feedback between our body and brain, helping us intuitively know our body position, which is crucial when recovering from an injury. As such, a tape can influence the user's movement patterns, creating a conducive path towards rehabilitation and retraining muscle memory. However, the value of taping goes beyond physical support and pain relief. Taping is often colored bright and is visible, which emphasizes injury mindfulness. This visibility can act as a reminder to the user to take the necessary precautions when moving their shoulder, hence further preventing potential damage. In conclusion, taping is a versatile, accessible and highly beneficial tool in supporting the shoulder. It offers both physical and psychological benefits that significantly contribute to the recovery and the overall well-being of the individual. However, it's important to remember that while taping provides crucial support to the shoulder, it should be considered a part of a comprehensive treatment plan, and not a stand-alone solution. Optimizing the healing process involves understanding the intricacies of shoulder anatomy, applying appropriate treatment strategies like taping, and adopting effective physical therapy routines. Moreover, the process will vary for every person owing to individual differences in shoulder anatomy, types and extent of injury, and physical abilities or limitations. Thus, getting guidance from a medical professional for the proper taping technique and tension is crucial to ensure the maximum benefit and prevent any harm. Taping might just be a supporting 'actor' in the shoulder's drama, but undoubtedly, it plays one of the key roles in the healing and recovery process of the shoulder.
Materials and Preparation for Taping a Shoulder
Preparing to tape a shoulder, whether for support post-injury or as a preventative measure, involves a comprehensive understanding of the right materials for the job, meticulous preparation of the skin, and accurate positioning for effective application. This article provides a deep dive into these crucial aspects to shoulder taping for maximum impact and success. Initially, we will elaborate on one of the most crucial aspects - choosing the right type of tape. This selection can be a make-or-break factor in the taping process since various tapes serve varying functions. Then, we'll move onto preparation for application - a step that significantly influences the tape’s adhesion and staying power. Remember, hastily skipping over this step can lead to ineffective taping and possible skin irritations. Finally, we'll discuss the critical aspect of positioning for effective taping. This element requires a comprehensive understanding of human anatomy for the best results. Now, let's delve into the first crucial part – choosing the right type of tape. The variety of tapes in the market today can be overwhelming, but choosing the right one can significantly influence the overall taping outcome.
Choosing the Right Type of Tape
Choosing the right type of tape is pivotal in the successful preparation for taping a shoulder. Not all tapes are created equal, each type possesses characteristics that make it more suitable for certain applications. Medical taping, like shoulder taping, fundamentally requires sturdiness, flexibility, strong adhesion, and skin-friendliness. Kinesiology tape and athletic tape are the top choices for taping a shoulder due to these features. Kinesiology tape, also known as K-tape, is uniquely designed for muscle and joint support, making it an excellent option for shoulder taping. It’s crafted from a cotton-lycra blend, which mimics the skin's elasticity, allowing for a full range of motion. The tape can stretch up to 40% of its original length, providing constant but gentle support to the shoulder muscles and joints without restricting movement. The wave-like adhesive pattern also aids in lifting the skin slightly, promoting better blood flow and faster healing. On the other hand, Athletic tape, often referred to as sports tape, is made from a robust cotton material and offers high tensile strength, essential for stable shoulder support. With its zinc oxide adhesive, it secures firmly onto the skin, maintaining a reliable hold even under high-intensity conditions. However, unlike K-tape, it's designed to immobilize the joint and restrict motion to prevent further injury. Another factor that one must consider when choosing the right tape is skin compatibility. Some people may develop skin irritation or allergic reactions to certain adhesives. Therefore, hypoallergenic or latex-free options are available for individuals with sensitive skin to avoid adverse reactions. Finally, applicability is necessary for efficient and time-saving taping. Tapes that are easy to tear and do not require additional equipment like scissors for application can significantly simplify the taping process. In conclusion, knowing the material properties and benefits of each tape type is critical to making an informed decision. Whether you need flexibility like the K-tape or rigidity of the sports tape, understanding these implements will guide you to the best tape that meets your shoulder taping needs. This knowledge will aid in the efficient preparation for taping a shoulder and ultimately, contribute to effective injury management and quick recovery.
Preparing the Skin for Application
Preparing the skin for application is an essential aspect when we talk about the materials and preparation needed for taping a shoulder. It is a supporting pillar of the entire process that cannot be overlooked, as it lays secured groundwork for the subsequent steps. Much like how we prep a canvas before painting it to ensure colors hold and spread evenly, preparing the skin is crucial in shoulder-taping for the adhesives to stick correctly and provide the therapeutic support intended. Before starting, ensure that the area is clean and free from oils, debris, and sweat that could disrupt adhesion. A gentle antiseptic solution may be used to cleanse the skin thoroughly, taking care not to cause any irritation or damage. For those with sensitive skin, use soap and water. Dry the area completely to foster optimum adhesion, as moisture can cause the tape to peel off prematurely. Preparation also demands careful attention to hair in the area to be taped. Excessive body hair may interfere with the effectiveness of the taping and can cause discomfort when removing. Using a safe and sanitized tool, trim any thick hair to ensure maximum contact between tape and skin. Keep in mind to never shave the area just before taping, as it can cause micro-abrasions in the skin, leading to potential discomfort or even infection. Moreover, for individuals who might have allergic reactions, skin should be prepped with hypoallergenic underwrap as a protective layer between the adhesive and the skin surface. In some instances, specialists might apply a pre-tape spray, a solution designed to augment the adhesive properties of athletic tape, granting it a longer life and stronger hold. At times, you might need to apply a hot or cold pack before taping to soothe the area or decrease inflammation. Ensure the skin has returned to regular body temperature before applying the tape. And lastly, make sure the shoulder is in a neutral, comfortable position, as it impacts how well the tape will accommodate movement and provide support. In conclusion, adequately preparing the skin for application can enhance the efficiency of the therapeutic shoulder taping. Each step of the process correlates to the benefits that the taping offers, such as injury prevention, pain reduction, and joint stabilization. Hence, no step in the skin preparation phase, no matter how trivial it seems, should be hurried or entirely skipped over.
Positioning for Effective Taping
Positioning for effective taping is an essential aspect of the preparation process when it comes to taping a shoulder. Proper positioning not only makes the process more comfortable for the individual but also significantly impacts the efficiency and overall outcome of the taping process. Ideally, the individual should sit or stand upright with their shoulders held back and relaxed. This allows for easy access to the area and helps ensure the tape is applied accurately and effectively. Once this optimal posture is secured, the arm should be rotated slightly outward which helps expose the shoulder muscles and tendons in need of support. The outward rotation should be sustained but comfortable, as forcing it could inadvertently strain the muscles further. Maintaining this position would help in ensuring the tape adheres correctly to the shoulder complex, thereby facilitating proper support and protection upon motion. Additionally, carrying out this process in a well-lit environment can contribute significantly to the successful positioning for shoulder taping. Good lighting aids the precise application of the tape and avoidance of sensitive skin areas such as rashes or abrasions which may react negatively to the adhesive. In the process of positioning, ensure also that the individual's skin is clean and dry. Dust or sweat on the skin can hinder tape adherence and reduce the efficiency of the process. Using a pre-taping spray or wipe can be very beneficial in preparing the skin for taping, as they cleanse and dry the skin, creating suitable conditions for taping. Lastly, the materials for effective taping should always be within reach before starting the process. Having all necessary items such as tape, scissors, pre-taping spray or wipes, and optional extras such as underwrap or skin pads, at hand, helps to streamline the positioning and taping process, reducing the chances of unnecessary strain or movement. In conclusion, proper positioning is crucial in the taping process. Proactive steps taken in the preparation phase are arguably one of the most under-recognized yet pivotal components of successful shoulder taping. Hence, attention to detail in ensuring optimal lighting, correct posture, and the availability of taping materials can contribute significantly to the effectiveness of the overall process.
The Step-by-Step Guide to Effective Shoulder Taping
To navigate the world of shoulder taping can often feel complex with its plethora of techniques, common challenges, and aftercare. Our guide aims to simplify this process for you by breaking it down into easily digestible, step-by-step instructions. We begin by introducing you to the basic shoulder taping technique—a foundational stability practice that provides the cornerstone of effective shoulder taping. Laying this groundwork will allow you to better manage common taping challenges, which we'll dissect in a dedicated section full of professional tips to conquer these issues with ease. Lastly, we emphasize that the taping process does not end when the tape is applied—aftercare and ongoing management play a crucial role in successful shoulder taping and injury recovery. It’s a comprehensive process, and we’re here to guide you through every step. So, without further ado, let’s kickstart our journey with an exploration into the basic shoulder taping technique.
The Basic Shoulder Taping Technique
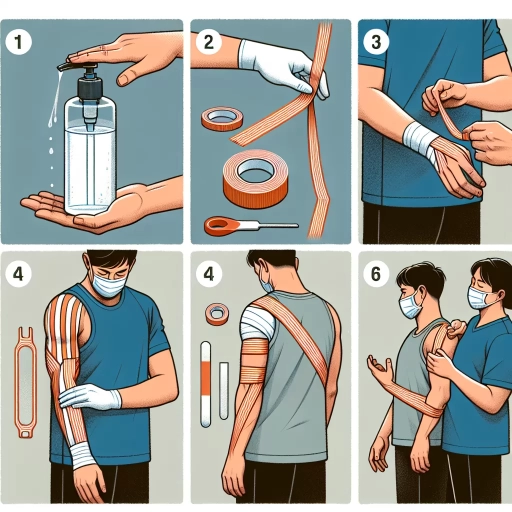
The Basic Shoulder Taping Technique is an integral part of the larger process of effectively taping a shoulder, immensely beneficial for reducing pain, swelling, and enhancing overall joint stability. This technique involves utilizing an athletic or kinesiology tape strategically wrapped around the shoulder joint, primarily aimed at providing support and relief to the surrounding muscles and tendons. Executed correctly, this technique assists in mitigating the risk of injury and accelerates the healing process following an unfortunate shoulder-related mishap. Its underlying importance extends beyond mere injury prevention, as it also boosts athletic performance by maintaining optimal shoulder alignment, a quintessential factor in maintaining the correct form. One of the primary steps of the Basic Shoulder Taping Technique involves the application of an underwrap - a gentle, skin-friendly material forming a protective barrier between the skin and tape. This not only prevents possible skin irritation but also ensures the tape sticks efficiently. Then comes the application of the athletic tape in a specific pattern, typically starting from the upper arm extending to the trapezius. The tape's tension must be carefully regulated to prevent any uncomfortable restriction of blood flow or mobility, hence, the need for an experienced hand or guidance. Imperative in the process is the regular assessment of the taped area for color changes or signs of discomfort, indicating issues with circulation and need for immediate readjustment. The taping's effectiveness isn't instantaneous but a gradual aid in alleviating shoulder discomfort. The Basic Shoulder Taping Technique, although incredibly beneficial, is not a one-size-fits-all solution. The taping pattern and technique should be customized to meet an individual's specific needs, taking into account factors such as the injury type, the severity of pain or discomfort, and even their activity level. In sum, the Basic Shoulder Taping Technique, while seemingly simple, considerably impacts the healing and prevention process of shoulder injuries. Used as a key support to comprehensive rehabilitative programs, it is a potent tool yielding resounding effects not just on the physicality of an individual, but also fostering the mental reassurance needed during the recovery journey. Effective shoulder taping, therefore, is a combination of science, art, and an understanding of one's bodily needs - elements that amplify its importance in the realm of sports, physiotherapy, and beyond.
Pro Tips for Managing Common Taping Challenges
Managing common taping challenges effectively requires careful practice, understanding of the process, and honed technique. Improper taping can lead to ineffective support or even injuries, making it crucial for individuals to be cognizant about the process. One of the essential tips is ensuring cleanliness and dryness on the skin to secure good adhesive contact. Residues of oil, moisture, or dirt can reduce the tape's ability to stick correctly, making it less effective. An often overlooked, yet critical element of successful taping is the correct tension. Overstretching the tape can cause discomfort, inflammation, and sometimes inhibit blood circulation. A good rule of thumb is to apply the tape with approximately 75% stretch for optimal results. For the tape to adhere properly and provide enough support, make sure you press it firmly against the skin once applied - activating the glue with your body heat. Cutting and applying tape into suitable lengths, depending on the area that needs support, is vital. Too long and it might end up coiling around unnecessary areas, too short, and it won’t provide enough support or coverage. Consider the case of shoulder taping – ensuring you have got the right length to reach from the starting point, across the shoulder, and to the end point is crucial. On the same note, an understanding of the body's anatomy will help immensely when it comes to effective taping. Each body part requires a specific taping technique to give optimal results. In the case of the shoulder, it's crucial to understand which muscles are affected and need support - deltoids, rotator cuff muscles, or the trapezius, among others. Round off the edges of the tape to prevent them from snagging on clothing and peeling off. Additionally, applying the end tabs of the tape without any stretch will make sure they stick for longer. Finally, to ensure that the adhesive tape does not cause any allergic reactions, it's best to do a patch test on a small area before fully applying it on the shoulder. These pro tips offer improved management of common taping challenges, thereby enhancing the effectiveness of shoulder taping as a supportive and healing method. As with all things, practice makes perfect - the more adept you become at applying these principles, the better you get at managing these challenges.
Aftercare and Ongoing Management with Shoulder Taping
Aftercare and Ongoing Management with Shoulder Taping Post-application of shoulder tape, prioritizing aftercare and ongoing management is essential to ensure optimal results and to foster quick recuperation and return to day-to-day functions. The significance of vigilant aftercare and continuing management emerges from the fundamental role it plays in sustaining the stability and mobility of the shoulder, reducing pain, and preventing potential re-injuries. Decoding the nuances of aftercare starts with regular inspection of the skin beneath the tape for any signs of irritation or allergic reactions. If the skin appears red, swollen, or feels excessively warm, it indicates the need to remove the tape and seek medical advice. Certainly, the tape should never be left on for more than five days, even if it seems to be holding up well, as extended periods can create an over-dependence on support, possibly leading to muscle weakening. Another pivotal aspect of aftercare and ongoing management involves maintaining the tape in a dry condition as much as possible. While most athletic tapes are designed to resist water, prolonged exposure can reduce their effectiveness. Thus, it's beneficial to avoid soaking the taped area when bathing or taking part in water-related activities. Moreover, using a blow dryer on a cool setting can be helpful in keeping the tape dry after light exposure to water. While shoulder taping is typically safe and effective, it should never be perceived as a standalone solution. The role of physiotherapy coupled with exercises targeted at strengthening the shoulder muscles and enhancing flexibility stands as a cornerstone complementing the taping strategy. Incorporating a suitable fitness regimen advised by a healthcare professional would aid in a comprehensive and holistic approach towards shoulder recovery. Additionally, it is important to monitor your pain levels and physical response to the tape application. While some discomfort upon initial application might be normal, persistent discomfort or increased pain levels should be addressed immediately with your healthcare provider. Lastly, it's crucial to schedule regular follow-up appointments with your healthcare provider to verify that the taping technique remains effective and to adjust it if required based on your progress. As bodies, injuries, and experiences are unique, personalized monitoring and management would support the cultivation of an effective and safe recovery path. Remember, your shoulder's journey to healing is not a race, but a marathon that demands patience, consistency, and careful management. Respect your body's pace, honor its signals, and trust the process for a stronger return to action. Accept shoulder taping as a tool, not a cure, in your rehabilitation toolkit, and give equal importance to aftercare for a well-rounded approach to recovery.