How To Make A Paper Fan
Here is the introduction paragraph: Making a paper fan is a fun and easy DIY project that can be enjoyed by people of all ages. Not only is it a great way to stay cool during the hot summer months, but it's also a creative outlet that allows you to express your personal style. In this article, we'll take you through the process of making a paper fan, from gathering the necessary materials and tools to customizing your finished product. To get started, we'll first take a look at the materials and tools needed to make a paper fan. Note: I did not ask you to write the whole article, just the introduction paragraph.
Materials and Tools Needed
When it comes to creating a beautiful and functional kite, having the right materials and tools is essential. To ensure a successful kite-making experience, it's crucial to choose the right paper, select a suitable stick or handle, and gather additional materials. The type of paper used can greatly impact the kite's durability and flight performance. Choosing the right paper is a critical step in the kite-making process, and it's essential to consider factors such as weight, texture, and color. With so many options available, selecting the perfect paper can be overwhelming, but with a little guidance, you can make an informed decision. In the next section, we'll take a closer look at choosing the right paper for your kite.
Choosing the Right Paper
Choosing the right paper is crucial when making a paper fan. The type of paper you select can greatly impact the overall appearance, durability, and functionality of your fan. For a traditional paper fan, you'll want to use a lightweight, yet sturdy paper that can hold its shape and withstand gentle handling. Look for papers with a smooth finish, such as rice paper, washi paper, or even lightweight cardstock. Avoid using thick or heavy papers, as they can be difficult to fold and may not hold their shape well. Additionally, consider the color and texture of the paper, as it can add an extra layer of visual interest to your fan. You can choose a solid color, a pattern, or even a paper with a unique texture, such as a paper with a subtle sheen or a paper with a natural fiber texture. Ultimately, the right paper will depend on your personal preference and the style of fan you're trying to create. By selecting a high-quality paper that meets your needs, you'll be able to create a beautiful and functional paper fan that will provide years of enjoyment.
Selecting a Suitable Stick or Handle
When selecting a suitable stick or handle for your paper fan, there are several factors to consider. First, think about the size of your fan. A larger fan will require a longer and sturdier handle, while a smaller fan can get away with a shorter and thinner one. You'll also want to consider the material of the handle. A wooden or bamboo handle can add a natural and rustic touch to your fan, while a plastic or metal handle can provide a more modern and sleek look. Additionally, think about the weight of the handle. A heavier handle can provide more stability and balance to the fan, but it may also make it more difficult to maneuver. On the other hand, a lighter handle can make the fan easier to wave, but it may not provide enough stability. Ultimately, the choice of handle will depend on your personal preference and the intended use of the fan. If you're looking for a more traditional and authentic look, a wooden or bamboo handle may be the way to go. However, if you're looking for a more modern and sleek design, a plastic or metal handle could be a better option. You can also consider using a stick or handle that is already available, such as a chopstick, pencil, or straw, to add a more rustic and DIY touch to your fan.
Gathering Additional Materials
Gathering additional materials is a crucial step in making a paper fan. Besides the paper or cardstock, you will need a few more items to complete your project. A ruler or straightedge is necessary for drawing straight lines and edges, while a pencil or marker is required for marking the folds and designs. A cutting tool, such as scissors or a craft knife, is needed to cut out the fan shape and any decorative elements. A bone folder or similar tool can be used to create crisp folds in the paper. You may also want to have some glue or a glue stick on hand to attach any embellishments, such as ribbons or tassels. Additionally, a surface to work on, such as a table or countertop, is necessary for assembling and decorating your fan. Having all of these materials within reach will make the process of making a paper fan much easier and more enjoyable.
Step-by-Step Instructions for Making a Paper Fan
A paper fan is a simple yet elegant accessory that can add a touch of sophistication to any outfit or room. With just a few basic materials and some easy-to-follow instructions, you can create your own beautiful paper fan at home. To make a paper fan, you will need to start by folding the paper into a fan shape, which will provide the foundation for your entire project. From there, you can attach a stick or handle to create a sturdy base, and finally, add some decorations and finishing touches to give your fan a personalized look. In this article, we will guide you through each of these steps in detail, starting with the first and most crucial step: folding the paper into a fan shape.
Folding the Paper into a Fan Shape
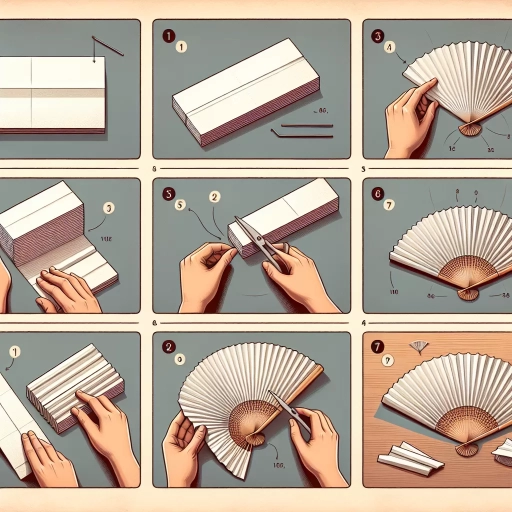
To create a fan shape, start by folding the paper in half lengthwise, so that one long edge meets the other. This will create a crease in the paper. Next, open the paper back up and fold the top right and left corners down so that they meet the middle crease you just made. The folds should be symmetrical and about 1 inch deep. Then, fold the bottom right and left corners up so that they meet the middle crease, making sure to align them with the top corners. You should start to see the fan shape take form. Continue to make small folds, moving from the top down, making sure to keep the edges aligned and the corners crisp. As you make each fold, gently push the paper outwards to create a smooth, curved shape. Repeat this process until you have made about 5-7 folds, depending on the size of your paper and the desired shape of your fan. Finally, take the top and bottom edges of the paper and fold them inwards towards the middle crease, making sure they are even and symmetrical. This will help to secure the fan shape and create a neat, compact design. With a bit of patience and practice, you should be able to create a beautiful, functional paper fan that is perfect for hot summer days or as a decorative accent for your home.
Attaching the Stick or Handle
To attach the stick or handle to your paper fan, start by applying a small amount of glue to the top of the fan's spine, where the stick will be placed. Next, carefully position the stick along the spine, ensuring it is centered and even. Hold the stick in place for a few seconds to allow the glue to set. If using a hot glue gun, be cautious not to apply too much glue, as it can create a mess. For a more secure hold, you can also add a small dot of glue to the top of the stick, where it meets the fan. Allow the glue to dry completely before handling the fan. Alternatively, you can use a strong adhesive tape, such as double-sided tape or masking tape, to attach the stick to the fan. Simply apply the tape to the spine and press the stick firmly onto it. Make sure the tape is not visible from the outside of the fan. Once the stick is securely attached, your paper fan is complete and ready to use.
Adding Decorations and Finishing Touches
Adding decorations and finishing touches is the final step in making a paper fan. This is where you can get creative and add a personal touch to your fan. You can use a variety of materials such as ribbons, stickers, glitter, and paint to decorate your fan. If you want to add a more elegant look, you can use a ribbon or a piece of lace to create a border around the edges of the fan. You can also add a small decorative pin or a brooch to the center of the fan for a more sophisticated look. Additionally, you can use a marker or a pen to draw patterns or designs on the fan, or you can use a stencil to create more intricate designs. The key is to have fun and be creative with your decorations. You can also add a personalized message or a name to the fan to make it more special. Once you have added your decorations, your paper fan is complete and ready to use.
Tips and Variations for Customizing Your Paper Fan
Paper fans have been a staple in many cultures for centuries, providing a simple yet effective way to cool oneself during hot weather. While traditional paper fans are beautiful in their own right, customizing your own paper fan can add an extra layer of personalization and creativity. In this article, we will explore various tips and variations for customizing your paper fan, including experimenting with different folding techniques, using various materials for decoration, and creating a themed or seasonal paper fan. By exploring these different approaches, you can create a unique and functional piece of art that reflects your personality and style. One of the most fundamental ways to customize your paper fan is by experimenting with different folding techniques, which can greatly impact the overall design and functionality of your fan. By mastering various folding techniques, you can create a wide range of designs, from simple and elegant to complex and intricate. In the next section, we will delve into the world of folding techniques and explore how you can use them to create a one-of-a-kind paper fan.
Experimenting with Different Folding Techniques
Experimenting with different folding techniques is an exciting way to take your paper fan-making skills to the next level. By trying out various folds, you can create unique and intricate designs that add an extra layer of beauty to your fan. One technique to try is the accordion fold, which involves folding the paper in a zig-zag pattern to create a textured, layered look. Another option is the pleat fold, which involves folding the paper in a series of small, evenly spaced pleats to create a delicate, lacy effect. You can also experiment with folding the paper in different directions, such as folding it in a diagonal or curved pattern, to create a more dynamic and interesting design. Additionally, you can try combining different folding techniques to create a truly one-of-a-kind fan. For example, you could start with an accordion fold and then add some pleats to create a fan with a mix of textures and patterns. By experimenting with different folding techniques, you can add your own personal touch to your paper fan and make it truly special.
Using Various Materials for Decoration
When it comes to decorating your paper fan, the possibilities are endless, and the choice of materials can greatly impact the overall look and feel of your finished product. For a more traditional and elegant appearance, consider using materials like silk, lace, or ribbons. These materials can add a touch of sophistication and glamour to your fan, making it perfect for formal events or special occasions. On the other hand, if you're looking for a more playful and whimsical design, you can use materials like glitter, stickers, or colorful tape. These materials can add a fun and festive touch to your fan, making it ideal for parties, celebrations, or everyday use. Additionally, you can also experiment with natural materials like leaves, flowers, or feathers to create a unique and earthy look. For a more modern and edgy design, consider using materials like metallic paper, foil, or even recycled materials like newspaper or cardboard. The key is to choose materials that reflect your personal style and complement the overall design of your fan. By experimenting with different materials and techniques, you can create a one-of-a-kind paper fan that is truly unique and eye-catching.
Creating a Themed or Seasonal Paper Fan
Creating a themed or seasonal paper fan is a great way to add a personal touch to your decor or gift-giving. To start, choose a theme or season that inspires you, such as a summer garden, a winter wonderland, or a festive holiday. Select paper colors and patterns that fit your theme, such as pastel shades for spring or bold reds and greens for Christmas. You can also use paper with fun designs, like polka dots or stripes, to add visual interest. Consider adding embellishments like glitter, stickers, or die-cuts to give your fan a more festive look. For a more sophisticated look, you can use paper with a natural texture, like kraft paper or watercolor paper, and add a simple ribbon or twine tie. To make your fan more durable, you can also add a layer of clear contact paper or laminate to protect it from the elements. With a little creativity, you can create a one-of-a-kind paper fan that reflects your personal style and adds a touch of elegance to any room.