How To Draw Glasses
Here is the introduction paragraph: Drawing glasses can be a fun and creative activity, but it can also be a bit challenging, especially if you're new to drawing. Whether you're an artist looking to add some accessories to your portraits or a fashion designer wanting to illustrate your latest eyewear designs, learning how to draw glasses can be a valuable skill. In this article, we'll take you through the steps to draw realistic and stylish glasses, from understanding the basics of drawing glasses to sketching the frame and lenses, and finally, adding realism and details to your drawing. To get started, let's begin with the fundamentals of drawing glasses, including the different types of glasses, the proportions, and the basic shapes involved. By understanding these basics, you'll be able to create a solid foundation for your drawing and set yourself up for success. So, let's dive in and start with the basics of drawing glasses.
Understanding the Basics of Drawing Glasses
Here is the introduction paragraph: Drawing glasses can be a challenging task, especially for beginners. However, with a solid understanding of the basics, anyone can learn to draw realistic and stylish glasses. To get started, it's essential to familiarize yourself with the different types of glasses, from classic aviators to trendy cat-eyes. This knowledge will help you understand the unique characteristics of each style and how to capture them on paper. Additionally, learning the basic shapes and proportions of glasses is crucial for creating accurate and balanced drawings. Finally, understanding the importance of perspective in drawing glasses will allow you to create depth and dimension in your artwork. By mastering these fundamental concepts, you'll be well on your way to creating stunning drawings of glasses. In this article, we'll delve into the basics of drawing glasses, covering these essential topics and more, to help you improve your skills and become a confident artist. Understanding the Basics of Drawing Glasses.
Familiarize yourself with the different types of glasses
. Here is the paragraphy: When it comes to drawing glasses, it's essential to familiarize yourself with the different types of glasses that exist. This will help you to accurately depict the style and shape of the glasses you're trying to draw. There are several types of glasses, including aviators, wayfarers, round glasses, cat-eye glasses, and rectangular glasses. Each type of glass has its unique characteristics, such as the shape of the frame, the size of the lenses, and the style of the temples. For example, aviators have a distinctive teardrop shape and are often associated with pilots, while wayfarers have a trapezoidal shape and are popular among celebrities. Round glasses, on the other hand, have a circular shape and are often worn by intellectuals and artists. Cat-eye glasses have an upward tilt at the outer corner and are often worn by women, while rectangular glasses have a straight shape and are often worn by men. By understanding the different types of glasses, you can create more accurate and detailed drawings that capture the unique characteristics of each style. Additionally, familiarizing yourself with the different types of glasses can also help you to create more realistic and believable drawings, as you'll be able to accurately depict the way the glasses sit on the face and interact with the surrounding features.
Learn the basic shapes and proportions of glasses
. Here is the paragraphy: To accurately draw glasses, it's essential to understand the basic shapes and proportions that make up their structure. Glasses typically consist of two main components: the frames and the lenses. The frames are usually made up of a combination of geometric shapes, such as rectangles, circles, and ovals. The shape and size of the frames can vary greatly depending on the style and type of glasses. For example, aviator glasses have a distinctive teardrop shape, while rectangular glasses have a more angular look. The lenses, on the other hand, are typically circular or oval in shape and are usually positioned within the frames. The size and shape of the lenses can also vary, with some glasses having larger or smaller lenses than others. When drawing glasses, it's crucial to pay attention to the proportions of the frames and lenses. The frames should be in proportion to the size of the face, and the lenses should be in proportion to the size of the frames. A good rule of thumb is to make sure the frames are about one-third to one-half the size of the face, and the lenses are about one-quarter to one-third the size of the frames. By understanding the basic shapes and proportions of glasses, you can create a more accurate and realistic drawing.
Understand the importance of perspective in drawing glasses
. When it comes to drawing glasses, perspective plays a crucial role in creating a realistic and visually appealing representation. Perspective refers to the way objects appear to shrink or converge as they recede into the distance. In the case of glasses, understanding perspective is essential to accurately depict the shape and proportions of the frames, lenses, and other details. By applying perspective principles, you can create a sense of depth and dimensionality in your drawing, making the glasses appear more lifelike and engaging. For instance, when drawing glasses from a side view, the temples (arms) of the glasses should appear to converge slightly as they extend behind the ear, creating a sense of depth and distance. Similarly, when drawing glasses from a front view, the lenses should appear to be slightly curved and tapered, with the edges of the frames converging towards the nose. By mastering perspective, you can add a level of sophistication and realism to your drawings of glasses, making them more convincing and visually appealing. Moreover, understanding perspective also allows you to experiment with different angles and viewpoints, enabling you to create more dynamic and interesting compositions. Whether you're drawing glasses for artistic purposes or for technical illustration, grasping the importance of perspective is essential to producing high-quality and accurate drawings.
Sketching the Frame and Lenses
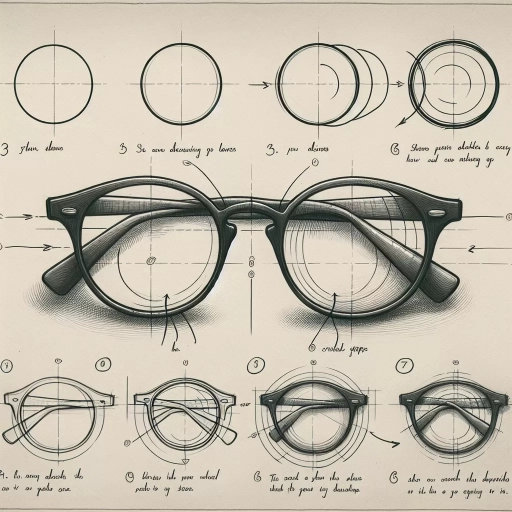
Here is the introduction paragraph: When it comes to drawing glasses, it's essential to start with the basics. Sketching the frame and lenses is a crucial step in creating a realistic and detailed illustration. To achieve this, it's necessary to break down the process into manageable parts. First, using simple shapes to sketch the frame of the glasses provides a solid foundation. Next, adding details to the frame, such as temples and nose pads, adds depth and dimension. Finally, drawing the lenses, considering their shape, size, and position, completes the overall look. By mastering these fundamental steps, you'll be well on your way to creating accurate and visually appealing drawings of glasses. In this article, we'll delve into the specifics of each step, providing you with a comprehensive guide to sketching the frame and lenses, ultimately leading to a deeper understanding of the basics of drawing glasses.
Use simple shapes to sketch the frame of the glasses
. Here is the paragraphy: To sketch the frame of the glasses, start by using simple shapes. Begin with a rectangle for the overall shape of the frame, making sure it's tall enough to accommodate the lenses and any decorative elements. Add two smaller rectangles on either side of the main rectangle, slightly angled to follow the contours of the face. These will form the temples, or arms, of the glasses. Next, draw a curved line connecting the top of the main rectangle to the top of each temple, creating the brow bar. This will help define the shape of the frame and provide a clear outline for the lenses. For a more detailed look, you can add additional shapes, such as circles or ovals, to create the rivets or hinges that hold the temples in place. By using simple shapes, you can create a clean and accurate outline of the frame, which will serve as a solid foundation for adding the lenses and other details.
Add details to the frame, such as temples and nose pads
. Here is the paragraphy: When adding details to the frame, start by sketching the temples, which are the arms that connect the frame to the ears. The temples should be slightly curved and tapered, with a small notch at the end where they meet the ear. You can also add some texture to the temples to give them a more realistic look. Next, add the nose pads, which are the small plastic or rubber pieces that sit on the bridge of the nose. The nose pads should be small and rounded, with a slight curve to fit the shape of the nose. You can also add some texture to the nose pads to give them a more realistic look. Finally, add any other details you want to include, such as engravings or logos on the temples or frame. You can also add some shading to the frame and lenses to give them a more three-dimensional look.
Draw the lenses, considering their shape, size, and position
. Here is the paragraphy: When drawing the lenses, it's essential to consider their shape, size, and position. The shape of the lenses can vary depending on the style of glasses, but most commonly, they are oval or rectangular. To draw the lenses, start by sketching the outline of the frame, and then add the lenses, making sure they are centered and evenly spaced. The size of the lenses will depend on the style of glasses and the face shape of the person wearing them. Generally, the lenses should be in proportion to the frame and the face. The position of the lenses is also crucial, as they should be placed in a way that creates a balanced and harmonious look. The lenses should be positioned in a way that they are not too close to the eyebrows or too far apart. By paying attention to the shape, size, and position of the lenses, you can create a realistic and stylish drawing of glasses.
Adding Realism and Details to Your Drawing
Here is the introduction paragraph: When it comes to drawing realistic glasses, it's the small details that can make all the difference. Adding realism and details to your drawing can elevate it from a simple sketch to a stunning work of art. To achieve this, there are several key elements to focus on. First, adding shading and texture can give your drawing depth and dimension, making the glasses look like they're jumping off the page. Additionally, incorporating reflections and highlights can enhance the realism of the lenses, capturing the way light interacts with the glass. Finally, paying attention to the details of the frame, such as screws and hinges, can add a level of authenticity to your drawing. By mastering these techniques, you can take your drawing to the next level and create a truly realistic representation of glasses. Understanding the basics of drawing glasses is just the starting point - with these advanced techniques, you can create a truly stunning piece of art.
Add shading and texture to give your drawing depth and dimension
. Here is the paragraphy: Adding shading and texture to your drawing can give it depth and dimension, making it look more realistic. Shading can be used to create the illusion of volume and shape, while texture can add a tactile quality to your drawing. To add shading, start by identifying the light source in your drawing and then use a range of values (light and dark) to create areas of shadow and highlight. You can use a variety of techniques, such as hatching, cross-hatching, and stippling, to create different textures and shading effects. For example, you can use hatching to create a smooth, even texture, while cross-hatching can be used to create a more rough, irregular texture. Stippling, on the other hand, can be used to create a detailed, high-contrast texture. When adding texture, consider the material and surface of the object you are drawing. For example, if you are drawing a pair of glasses, you might want to add texture to the frames to suggest the material they are made of, such as metal or plastic. You can also use texture to create a sense of wear and tear, such as scratches or scuffs on the lenses. By adding shading and texture to your drawing, you can create a more realistic and engaging image that draws the viewer in.
Incorporate reflections and highlights to enhance the realism of the lenses
. When it comes to adding realism and details to your drawing of glasses, one crucial aspect to focus on is the incorporation of reflections and highlights on the lenses. This is what truly brings the glasses to life and gives them a sense of depth and dimensionality. To achieve this, start by observing how light interacts with real glasses. Notice how it bounces off the surface, creating bright highlights and subtle reflections. You can then translate these observations onto your drawing by using a range of techniques. For instance, you can use a white or light-colored pencil to create sharp, defined highlights on the lenses, while a softer pencil or a blending stump can be used to create more subtle, nuanced reflections. It's also important to consider the shape and curvature of the lenses, as this will affect the way light behaves on their surface. By carefully rendering these reflections and highlights, you can create a sense of realism and authenticity in your drawing that will make the glasses look like they're jumping off the page. Additionally, you can also experiment with different shading techniques to create a sense of depth and dimensionality on the lenses, such as using hatching or cross-hatching to create a sense of texture and curvature. By combining these techniques with your reflections and highlights, you can create a truly realistic and detailed drawing of glasses that will impress and delight.
Pay attention to the details of the frame, such as screws and hinges
. Here is the paragraphy: When adding realism and details to your drawing, pay attention to the details of the frame, such as screws and hinges. These small elements can make a big difference in the overall appearance of your drawing. For example, if you're drawing a pair of glasses with a metal frame, you might want to include small screws that hold the frame together. You can also add hinges to the temples, which will give your drawing a more realistic look. Additionally, consider adding details such as engravings, logos, or other decorative elements to the frame. These details can help to create a more authentic and detailed drawing. By paying attention to these small details, you can add depth and realism to your drawing, making it more engaging and believable.