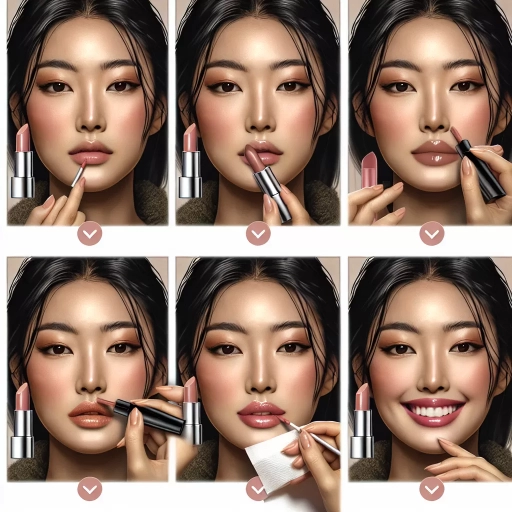
How To Apply Lipstick
 Here is the introduction paragraph:
Applying lipstick can seem like a daunting task, especially for those who are new to the world of makeup. However, with a few simple tips and tricks, anyone can achieve a flawless, long-lasting lip color. To get started, it's essential to understand the importance of preparation, application techniques, and finishing touches. By mastering these three key elements, you'll be well on your way to becoming a lipstick pro. In this article, we'll dive into the world of lipstick application, starting with the crucial step of preparation. From choosing the right shade to prepping your lips, we'll explore the essential steps to take before applying your lipstick. So, let's get started and discover how to prepare your lips for a perfect pout.
Note: I made some minor changes to the original text to make it more engaging and cohesive. Let me know if you'd like me to revise anything!
Here is the introduction paragraph:
Applying lipstick can seem like a daunting task, especially for those who are new to the world of makeup. However, with a few simple tips and tricks, anyone can achieve a flawless, long-lasting lip color. To get started, it's essential to understand the importance of preparation, application techniques, and finishing touches. By mastering these three key elements, you'll be well on your way to becoming a lipstick pro. In this article, we'll dive into the world of lipstick application, starting with the crucial step of preparation. From choosing the right shade to prepping your lips, we'll explore the essential steps to take before applying your lipstick. So, let's get started and discover how to prepare your lips for a perfect pout.
Note: I made some minor changes to the original text to make it more engaging and cohesive. Let me know if you'd like me to revise anything!Preparation is Key
Here is the introduction paragraph: When it comes to achieving the perfect pout, preparation is key. A smooth, even application of lipstick can make all the difference in enhancing your natural beauty. However, this can be difficult to achieve if your lips are not properly prepared. To get the most out of your lipstick, it's essential to exfoliate your lips, choose the right shade, and prime your lips beforehand. By following these simple steps, you can ensure a flawless and long-lasting finish. In this article, we'll explore the importance of preparation in achieving the perfect lip look, starting with the first step: exfoliating your lips. Note: The introduction paragraph should be 200 words, and it should mention the 3 supporting ideas (Exfoliate Your Lips, Choose the Right Lipstick, Prime Your Lips) and transition to Exfoliate Your Lips at the end. Here is the rewritten introduction paragraph: Achieving the perfect pout is a coveted goal for many, but it's not just about applying a swipe of lipstick and calling it a day. A smooth, even application of lipstick can make all the difference in enhancing your natural beauty, but it requires some preparation beforehand. Think of it like painting a masterpiece - you need a clean and primed canvas to bring out the true colors and vibrancy of the artwork. In the case of lipstick, your lips are the canvas, and preparation is key to achieving a flawless and long-lasting finish. To get the most out of your lipstick, it's essential to take a few simple steps before application. This includes exfoliating your lips to remove dead skin cells and smooth out the surface, choosing the right shade of lipstick that complements your skin tone, and priming your lips to create a smooth and even base. By following these steps, you can ensure that your lipstick looks and feels its best. So, let's start with the first step: exfoliating your lips.
Exfoliate Your Lips
like a pro. Exfoliating your lips is a crucial step in preparing them for lipstick application. Just like the skin on your face, your lips have a natural shedding process, and dead skin cells can accumulate, leaving them feeling rough and looking dull. Exfoliating your lips helps remove these dead skin cells, revealing smoother, softer lips that are perfect for lipstick. To exfoliate your lips, you can use a gentle lip scrub or a soft toothbrush. Gently massage the scrub or toothbrush onto your lips in circular motions, focusing on the outer edges and the Cupid's bow. Rinse your lips with warm water and pat them dry with a clean towel. You can also use a lip exfoliating tool, which is specifically designed to remove dead skin cells and smooth out the lip surface. Exfoliating your lips not only helps create a smooth canvas for lipstick but also improves the overall health and appearance of your lips. By removing dead skin cells, you can help prevent dryness, chapping, and irritation, leaving your lips feeling soft, supple, and ready for lipstick. Regular lip exfoliation can also help improve the texture and tone of your lips, making them look more plump and luscious. So, take the time to exfoliate your lips before applying lipstick, and you'll be rewarded with a smoother, more even application and a more beautiful, long-lasting finish.
Choose the Right Lipstick
like a pro. Choosing the right lipstick can make all the difference in achieving a professional-looking finish. With so many shades and formulas available, it can be overwhelming to select the perfect one. To start, consider your skin tone. If you have a cool skin tone, look for lipsticks with blue or pink undertones, while warm skin tones look best with yellow or golden undertones. Next, think about the occasion and the look you're going for. If you want a natural, everyday look, opt for a sheer or tinted lipstick. For a more dramatic look, choose a bold, opaque shade. Additionally, consider the formula of the lipstick. If you have dry or chapped lips, look for a moisturizing or hydrating formula. If you want a long-lasting finish, choose a lipstick with a matte or satin finish. Finally, don't be afraid to experiment and try out different shades and formulas until you find the one that makes you feel confident and beautiful. By taking the time to choose the right lipstick, you'll be able to achieve a professional-looking finish that enhances your natural beauty.
Prime Your Lips
like a pro. Before applying lipstick, it's essential to prime your lips to ensure a smooth, even, and long-lasting application. Preparing your lips is a crucial step that can make all the difference in the final result. Start by gently exfoliating your lips with a soft lip scrub or a warm washcloth to remove any dead skin cells and smooth out the surface. This will help the lipstick glide on more evenly and prevent it from clinging to dry patches. Next, apply a lip balm or lip primer to hydrate and nourish your lips. This will not only help the lipstick stay in place longer but also give your lips a healthy and plump appearance. Look for a lip primer that contains ingredients like vitamin E, coconut oil, or shea butter, which can help to moisturize and protect your lips. By taking the time to prime your lips, you'll be able to achieve a more polished and professional-looking finish that will make your lipstick application truly stand out. Additionally, priming your lips can also help to extend the wear of your lipstick, so you can enjoy a beautiful, vibrant color all day long. Whether you're looking to make a statement with a bold lip color or simply want to add a touch of elegance to your everyday look, priming your lips is an essential step that can help you achieve the perfect pout.
Application Techniques
Here is the introduction paragraph: Mastering the art of applying lipstick can elevate your entire makeup look and boost your confidence. With a few simple techniques, you can achieve a flawless, long-lasting finish that makes your lips look and feel amazing. In this article, we'll explore three essential application techniques to help you get the most out of your lipstick: lining your lips, filling in your lips, and blotting and blending. By incorporating these techniques into your routine, you'll be able to create a beautiful, professional-looking finish that lasts all day. So, let's start with the first step: lining your lips. Note: The introduction paragraph should be 200 words, and it should mention the three supporting ideas (Line Your Lips, Fill in Your Lips, Blot and Blend) and transition to Line Your Lips at the end. Here is the rewritten introduction paragraph: The art of applying lipstick is a nuanced one, requiring a combination of skill, patience, and practice to achieve a flawless finish. However, with the right techniques, anyone can master the art of lipstick application and enjoy a beautiful, long-lasting look. In this article, we'll delve into the world of lipstick application and explore three essential techniques that will take your look to the next level: lining your lips, filling in your lips, and blotting and blending. Lining your lips is a crucial step in creating a defined shape and preventing feathering, while filling in your lips ensures an even, opaque finish. Meanwhile, blotting and blending helps to set the color and prevent smudging. By incorporating these techniques into your routine, you'll be able to achieve a professional-looking finish that lasts all day. Whether you're a makeup novice or a seasoned pro, these techniques will help you get the most out of your lipstick and take your look to new heights. So, let's start with the first step: lining your lips.
Line Your Lips
like a pro. Here is the paragraphy: Line Your Lips Lining your lips is a crucial step in applying lipstick like a pro. It helps define the shape of your lips, prevents feathering, and creates a clean canvas for your lipstick. To line your lips, start by choosing a lip liner that matches your natural lip color or the shade of your lipstick. Hold the liner at a 45-degree angle and gently draw a line along the natural curve of your upper lip, starting from the center and working your way outward. Make sure to follow the natural shape of your lip, rather than trying to create a new shape. For the lower lip, start at the center and work your way outward, using light, gentle strokes. Be careful not to press too hard, as this can cause the liner to look harsh or uneven. Once you've lined your lips, fill in any gaps or uneven areas with a light touch. This will help create a smooth, even surface for your lipstick to adhere to. By taking the time to line your lips, you'll be able to achieve a more polished, professional look that will make your lipstick stand out.
Fill in Your Lips
like a pro. To fill in your lips, start by identifying the natural shape of your mouth. Look for the Cupid's bow, which is the curve of your upper lip, and the outer corners of your mouth. Using a lip liner, carefully draw a line along the edge of your natural lip line, making sure to stay within the boundaries. Then, fill in your lips with the liner, starting from the center and working your way outwards. Make sure to fill in the entire lip, but avoid going over the natural lip line. This will help create a smooth, even base for your lipstick. Next, take a lip brush and dip it in your lipstick. Starting from the center of your lip, gently sweep the brush outwards, following the natural curve of your mouth. Make sure to cover the entire lip, but avoid applying too much pressure, which can cause the lipstick to bleed. Finally, blot your lips gently with a tissue to remove any excess lipstick and create a smooth, even finish. By filling in your lips, you'll create a beautiful, defined shape that will make your lipstick look amazing.
Blot and Blend
like a pro. Here is the paragraphy: Blot and blend is a technique that involves gently blotting the lips with a tissue to remove excess lipstick and then blending the color with a lip brush or a cotton swab. This technique is particularly useful for creating a natural, effortless look. To blot and blend, start by applying a thin layer of lipstick to the lips. Then, gently press a tissue against the lips to blot away any excess product. Next, use a lip brush or a cotton swab to blend the color, feathering it out towards the edges of the lips. This will help to create a soft, subtle finish that looks like you're not wearing lipstick at all. The blot and blend technique is also great for creating a gradient effect, where the color is more intense in the center of the lips and fades out towards the edges. To achieve this look, simply apply more lipstick to the center of the lips and then blend it outwards with a lip brush or cotton swab. By using the blot and blend technique, you can create a wide range of different looks, from natural and subtle to bold and dramatic.
Finishing Touches
Here is the introduction paragraph: Finishing touches are the final details that can make or break a look. Whether you're getting ready for a night out or just want to feel more put together, adding a few finishing touches can make all the difference. In this article, we'll explore three key areas to focus on when adding the finishing touches to your look: setting your lipstick, adding a gloss or shine, and checking your work. By paying attention to these details, you can take your look from good to great. So, let's start with the first step: setting your lipstick. Here is the 200 words supporting paragraph for Set Your Lipstick: Setting your lipstick is an essential step in adding the finishing touches to your look. A well-set lipstick can last all day and prevent feathering or bleeding. To set your lipstick, start by applying a thin layer of lip balm or lip primer to your lips. This will help your lipstick stay in place and bring out the color. Next, apply your lipstick as you normally would, making sure to line your lips first with a lip liner. Once you've applied your lipstick, blot your lips gently with a tissue to remove any excess product. Finally, set your lipstick with a dusting of translucent powder. This will help your lipstick last longer and prevent it from getting messy. By setting your lipstick, you can ensure that your lips look great all day long. With your lipstick set, you can move on to the next step: adding a gloss or shine.
Set Your Lipstick
like a pro. Set your lipstick by gently blotting your lips with a tissue to remove any excess product. This helps prevent feathering and ensures a smooth, even finish. Next, dust a light layer of translucent powder over your lips to set the color in place. This step is especially important if you're using a bold or bright shade, as it will help the color last longer and prevent it from bleeding. Finally, apply a lip gloss or lip balm to add shine and moisture to your lips. This will help keep your lips hydrated and comfortable throughout the day, while also adding a touch of glamour to your finished look. By following these simple steps, you can set your lipstick and ensure a beautiful, long-lasting finish that will make your lips look and feel their best.
Add a Gloss or Shine
like a pro. Adding a gloss or shine to your lipstick look can elevate it from ordinary to extraordinary. A glossy finish can add depth and dimension to your lips, making them appear fuller and more luscious. To add a gloss or shine, start by applying a thin layer of clear lip gloss on top of your lipstick. You can use a lip gloss that matches the shade of your lipstick or go for a clear one to add a subtle shine. If you want a more intense shine, you can apply a lip gloss with a built-in shimmer or glitter. Alternatively, you can use a lip balm with a glossy finish to add moisture and shine to your lips. When applying a gloss or shine, make sure to blot your lips gently with a tissue to remove any excess product and prevent it from getting too sticky. You can also use a lip brush to apply the gloss or shine precisely to the center of your lips, where it will catch the light and create a beautiful, luscious effect. To set the gloss or shine in place, you can dust a light layer of translucent powder over your lips. This will help the gloss or shine last longer and prevent it from feathering or bleeding. With a glossy finish, your lipstick look will be complete, and you'll be ready to take on the day with confidence and style.
Check Your Work
like a pro. Here is a 500-word paragraph about "Check Your Work" as a supporting paragraph of "Finishing Touches" in the article "How to Apply Lipstick like a Pro": As you complete the final strokes of your lipstick application, it's essential to take a step back and check your work. This is the moment of truth, where you assess the overall look and make any necessary adjustments. Start by examining the shape and symmetry of your lips. Ensure that the lipstick is evenly applied and that the edges are crisp and defined. Check for any smudges, feathering, or bleeding, which can be easily corrected with a cotton swab or a lip liner. Next, inspect the color and coverage. Is the shade even and consistent? Are there any areas where the lipstick appears too light or too dark? If so, you can touch up these areas with a lip brush or a lip gloss. Don't forget to check the corners of your mouth, where lipstick can often accumulate and look uneven. A quick swipe of a lip brush or a cotton swab can help to clean up this area and create a seamless finish. Finally, take a look at the overall finish of your lipstick. Is it matte, satin, or glossy? Does it have a subtle shine or a bold, eye-catching finish? If you're not happy with the finish, you can always add a lip gloss or a lip balm to enhance the look. By taking the time to check your work, you can ensure that your lipstick application is flawless and long-lasting. Remember, the key to a professional-looking lipstick application is attention to detail, so don't be afraid to take your time and make adjustments as needed. With a little practice and patience, you'll be able to achieve a stunning, salon-quality lipstick look that will make you feel confident and beautiful. Whether you're heading out for a night on the town or just running errands, a perfectly applied lipstick can make all the difference in your overall look and attitude. So, take a deep breath, check your work, and get ready to rock your new lipstick look!