How To Draw A Cube
Understanding the Basic Geometry of a Cube
The Definition of a Cube
A cube can be defined as a three-dimensional geometric figure with six identical square faces. Each face joins with another at a right angle, allowing for the construction of an entirely symmetrical, six-faced, three-dimensional figure. It's an elementary object in the study of geometry and used often in illustrations, designs, and architectural configurations. While it may seem simple, drawing a cube requires understanding its structure and focusing on the geometry involved.
The Basic Structure of a Cube
A cube's anatomy consists of 8 corners or vertices, 12 edges, and 6 equal square faces. All of the edges in a cube are of the same length, which contributes to its perfect, equal structure. This symmetry in the cube's design is one of the visual clues that our brains use to perceive it as a 3D object. By considering all these aspects, you can sketch an accurate and proportional cube, enhancing the three-dimensional appearance of your drawing.
Components of a Cube
Before starting to draw a cube, it's crucial to understand its various components. Knowing what accounts for the vertices, edges, and faces of a cube can be incredibly helpful. Vertices are the cube's corners, where the edges meet. A cube has 8 vertices. Edges, on the other hand, are the lines where two faces of the cube meet, and a cube has 12 of these. Lastly, faces are the square sides of the cube, and they number six.
Step-by-Step Guide on How to Draw a Cube
Getting Started
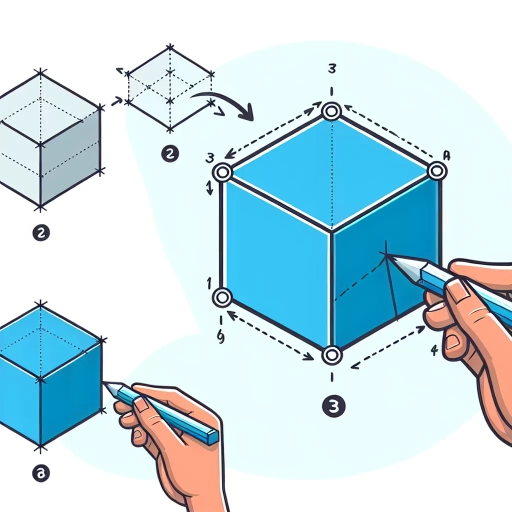
Designing a cube starts with drawing a square. As the foundation of the cube, this square determines the size and orientation of your final illustration. After drawing the square, you draw diagonals from each corner to form an X in the middle. Find the center of the square by intersecting horizontal and vertical lines with the X. This intersection is the vanishing point for the edges of the cube in the perspective view.
Adding the Third Dimension
Next, you draw lines from each corner of the square to a point outside of the square. This point is called the vanishing point. These lines represent the edges of the cube that recede into the distance, and they give the drawing its three-dimensional quality. Making sure these lines are all directed to the exact same spot is the key to correctly portraying a three-dimensional cube on a two-dimensional plane.
Completing the Cube
The last stage in drawing a cube involves connecting the ends of the lines generated from the vanishing point. Drawing three straight lines between the outer points of the lines drawn earlier completes the cube. Once you've drawn these lines, erase the parts that shouldn't be visible, and voila, you have drawn a perfect cube! The whole process involves understanding geometry principles and carefully applying them to create realistic 3D drawings.
Frequently Asked Questions About Drawing a Cube
Why Can't I Draw a Perfect Cube?
Drawing a good cube depends heavily on perspective and proportions. If your perspective view is off, or your square base isn't proportioned correctly, your cube might look distorted or skewed. Always use a ruler or straight edge to guide your lines and ensure proper alignment when drawing your cube
What Are Some Common Mistakes to Avoid When Drawing a Cube?
When drawing a cube, three of the most common mistakes are not using lines that vanish to a single point, including lines that ought not to be visible, and creating squares that are not equal size. Avoiding these mistakes will result in a more accurate and aesthetically pleasing cube.
Can A Cube Be Used in Different Artistic Contexts?
Yes, a cube can be used in a variety of artistic contexts. From architecture to digital design and animation, the cube's basic geometric properties can pave the way for a multitude of creative possibilities. Once you've mastered how to draw a cube, you can manipulate its perspective, shading, and size to create unique and interesting compositions.