How To Install Baseboard Heater
Baseboard heaters are a popular and efficient way to warm up your home, especially in colder climates. They are easy to install, and with the right guidance, you can do it yourself. In this article, we will walk you through the process of installing a baseboard heater, from preparation to completion. Before you start, it's essential to prepare your space and gather the necessary materials. This includes turning off the power, clearing the area, and ensuring you have all the required tools and equipment. Once you're ready, you can move on to the step-by-step installation process, which involves mounting the heater, connecting the wiring, and testing the unit. After installation, it's crucial to consider post-installation factors, such as safety precautions and maintenance tips. In the next section, we'll dive into the preparation phase, discussing the essential steps to take before installing your baseboard heater.
Preparation Before Installation
When it comes to installing a baseboard heater, preparation is key to a successful and efficient process. Before starting the installation, it's essential to take the time to prepare properly to avoid any potential issues or complications. This involves several crucial steps, including choosing the right baseboard heater for your specific needs, planning the installation layout to ensure optimal performance and safety, and preparing the necessary tools and materials to complete the job. By taking the time to carefully consider these factors, you can ensure a smooth and stress-free installation process. In this article, we'll explore each of these steps in more detail, starting with the importance of choosing the right baseboard heater for your home.
Choose the Right Baseboard Heater
When choosing the right baseboard heater for your space, consider several key factors to ensure you select a model that meets your heating needs efficiently and safely. First, determine the size of the area you want to heat, as this will help you choose a heater with the appropriate wattage. A general rule of thumb is to look for a heater that can provide 10 watts of power per square foot of space. Next, think about the type of baseboard heater you need. Electric baseboard heaters are a popular choice, but you may also consider hydronic or hot water baseboard heaters, which can be more energy-efficient and cost-effective in the long run. Additionally, consider the features you need, such as a thermostat, timer, or remote control, to ensure convenient and energy-efficient operation. It's also essential to check the safety features of the heater, including overheat protection, tip-over shut-off, and certification from a reputable testing organization, such as UL or ETL. Finally, consider the design and style of the heater, as it will be a visible part of your room's décor. By carefully evaluating these factors, you can choose a baseboard heater that provides reliable and efficient heat while also enhancing the aesthetic of your space.
Plan the Installation Layout
When planning the installation layout of your baseboard heater, it's essential to consider several factors to ensure a safe, efficient, and effective heating system. First, determine the total heating requirements of your space by calculating the square footage and the desired temperature. This will help you decide on the number of heaters needed and their placement. Next, assess the room's layout, taking note of any obstacles, such as windows, doors, and furniture, that may affect the heater's performance or create cold spots. Consider the location of electrical outlets and switches, as well as any plumbing or HVAC components that may interfere with the heater's installation. Additionally, think about the heater's airflow and ensure that it won't be blocked by any objects or structures. It's also crucial to check the manufacturer's instructions for specific installation requirements, such as clearance distances from combustible materials and the recommended height above the floor. By carefully planning the installation layout, you can ensure a safe, efficient, and effective baseboard heating system that meets your needs and provides comfortable warmth throughout your space.
Prepare the Necessary Tools and Materials
To ensure a smooth and successful baseboard heater installation, it is essential to prepare the necessary tools and materials beforehand. Start by gathering the required tools, including a drill, screwdriver, level, tape measure, and wire strippers. You may also need a voltage tester to verify the electrical connections. Additionally, make sure you have a ladder or step stool to access the areas where the heater will be installed. In terms of materials, you will need the baseboard heater unit itself, as well as any necessary mounting brackets, screws, and electrical connectors. It is also a good idea to have some extra wire and connectors on hand in case of any unexpected issues. Furthermore, consider purchasing a thermostat or temperature sensor to regulate the heater's temperature and ensure optimal performance. Having all the necessary tools and materials ready will save you time and frustration during the installation process, allowing you to focus on getting the job done efficiently and effectively.
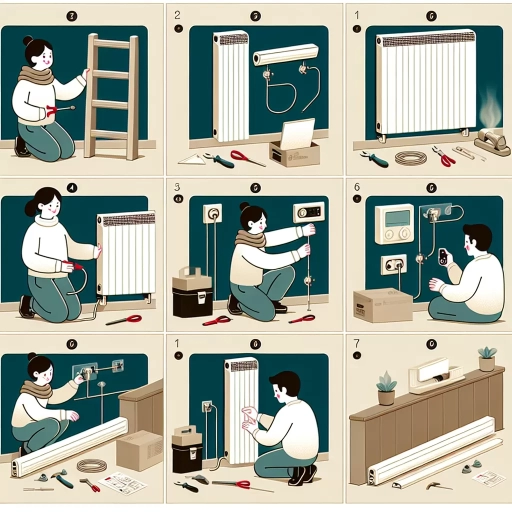
Step-by-Step Installation Process
Installing a heater in your home can be a daunting task, but with a step-by-step guide, you can ensure a safe and efficient installation process. To begin with, it's essential to follow the manufacturer's instructions and take necessary safety precautions to avoid any accidents or injuries. The installation process typically involves three key steps: mounting the heater to the wall, connecting it to the electrical system, and testing it for proper functioning. By following these steps, you can ensure that your heater is installed correctly and functions optimally. In this article, we will walk you through each of these steps in detail, starting with the first crucial step: mounting the heater to the wall.
Mount the Heater to the Wall
Here is the paragraphy: Mount the heater to the wall by holding it against the wall and marking the screw holes with a pencil. Use a level to ensure the heater is straight and a stud finder to locate the wall studs. Drill pilot holes into the wall at the marked screw holes, then screw the heater into place using the provided screws. Make sure the heater is securely fastened to the wall to prevent it from tipping over. If you have a particularly heavy heater, you may want to consider using wall anchors for added support. Once the heater is mounted, double-check that it is level and plumb to ensure proper operation.
Connect the Heater to the Electrical System
To connect the heater to the electrical system, start by turning off the power to the circuit at the main electrical panel. Verify the power is off using a non-contact voltage tester. Next, locate the electrical connections on the heater, typically found at the back or bottom of the unit. Identify the black (hot) wire, white (neutral) wire, and copper (ground) wire. Connect the black wire to the brass terminal on the heater, the white wire to the silver terminal, and the copper wire to the grounding screw. Ensure all connections are secure and not loose. If your heater has a built-in thermostat, connect the thermostat wires to the corresponding terminals on the heater. Finally, turn the power back on at the main electrical panel and test the heater to ensure it's working properly. It's recommended to consult the manufacturer's instructions for specific wiring diagrams and instructions, as different models may have varying connection requirements. Additionally, if you're not comfortable with electrical work, it's highly recommended to hire a licensed electrician to perform the installation.
Test the Heater for Proper Functioning
To ensure the baseboard heater is working correctly, it's essential to test it for proper functioning after installation. Start by turning off the power to the heater at the circuit breaker or fuse box. Then, inspect the heater for any signs of damage or wear, such as dents, scratches, or frayed cords. Next, plug in the heater and turn the power back on. Set the thermostat to a moderate temperature, around 20-25°C (68-77°F), and wait for the heater to warm up. Check the heater's output by feeling the warmth emitted from the grille or fins. If the heater is working correctly, you should feel a gentle warmth within a few minutes. Additionally, check for any unusual noises, such as rattling, buzzing, or hissing sounds, which could indicate a problem with the heater's internal components. If everything seems to be working correctly, turn off the power and let the heater cool down before proceeding with the final installation steps. By testing the heater for proper functioning, you can ensure a safe and efficient heating solution for your home.
Post-Installation Considerations
When it comes to post-installation considerations, there are several key factors to keep in mind to ensure the longevity and effectiveness of your system. Three crucial aspects to consider are ensuring proper ventilation and airflow, regular maintenance and upkeep, and considering additional safety features. By prioritizing these elements, you can prevent potential issues, reduce downtime, and optimize performance. Proper ventilation and airflow, in particular, play a critical role in maintaining a healthy and efficient system. This is because inadequate airflow can lead to overheating, reduced lifespan, and compromised performance. Therefore, it is essential to ensure that your system is installed in a well-ventilated area, and that any obstructions or blockages are removed to facilitate smooth airflow. By doing so, you can help prevent common problems and ensure your system operates at its best. Ensure Proper Ventilation and Airflow is a critical step in this process, and one that should not be overlooked.
Ensure Proper Ventilation and Airflow
Proper ventilation and airflow are crucial to ensure the safe and efficient operation of a baseboard heater. Inadequate ventilation can lead to a buildup of carbon monoxide, moisture, and heat, which can cause damage to the heater, walls, and surrounding areas. To ensure proper ventilation, it is essential to maintain a clear space of at least 12 inches in front of the heater and 3 inches on either side. This allows for unobstructed airflow and helps to prevent overheating. Additionally, it is recommended to install a working carbon monoxide detector in the same room as the heater to alert occupants of any potential dangers. Regular maintenance, such as cleaning dust and debris from the heater and surrounding areas, can also help to ensure proper airflow and ventilation. Furthermore, it is crucial to ensure that the heater is installed in a well-ventilated area, away from windows, doors, and any obstructions that could impede airflow. By following these guidelines, homeowners can ensure that their baseboard heater operates safely and efficiently, providing reliable heat and comfort throughout the year.
Regular Maintenance and Upkeep
Regular maintenance and upkeep are crucial to ensure the longevity and efficiency of your baseboard heater. To start, make sure to dust the heater regularly, as dust buildup can reduce airflow and increase the risk of overheating. Use a soft brush or vacuum cleaner to gently remove dust and debris from the heater's surface and grills. Additionally, check the heater's thermostat and temperature settings to ensure they are accurate and functioning properly. It's also essential to inspect the heater's electrical connections and wiring for any signs of wear or damage, and to replace any damaged or frayed cords. Furthermore, consider having your baseboard heater professionally serviced every 2-3 years to ensure it's working at optimal levels. This maintenance can include cleaning the heater's internal components, checking for any blockages or leaks, and performing any necessary repairs or replacements. By staying on top of regular maintenance and upkeep, you can help prevent common issues, reduce energy bills, and ensure your baseboard heater continues to provide reliable and efficient heat for years to come.
Consider Additional Safety Features
When it comes to post-installation considerations for your baseboard heater, it's essential to think about additional safety features to ensure a safe and secure heating experience. One crucial aspect to consider is the installation of a thermostat or temperature sensor to regulate the heater's temperature and prevent overheating. This feature can be especially useful in areas with high foot traffic or where pets and children may accidentally touch the heater. Another safety feature to consider is a ground fault circuit interrupter (GFCI) outlet, which can detect and interrupt ground faults, reducing the risk of electrical shock. Additionally, you may want to consider installing a heater guard or cover to prevent accidental contact with the heater's hot surfaces. These safety features can provide peace of mind and help prevent accidents, making your baseboard heater installation a safe and reliable solution for your heating needs.