How To Flatten Chicken Breast
Flattening chicken breast is a crucial step in many recipes, but it can be a daunting task for those who are new to cooking. However, with the right techniques and preparation, you can achieve perfectly even and thin chicken breasts that cook consistently and are full of flavor. To flatten chicken breast like a pro, it's essential to start with the right preparation, including selecting the right tools and understanding the importance of even thickness. In this article, we'll explore the key steps to flattening chicken breast, from preparation to technique, and provide additional tips for achieving even cooking. We'll begin by discussing the importance of preparation, including how to choose the right tools and how to prepare your chicken breast for flattening. By following these simple steps, you'll be well on your way to creating delicious and evenly cooked chicken dishes. Preparation is Key.
Preparation is Key
When it comes to cooking chicken breast, preparation is key to achieving a delicious and tender final product. To ensure that your chicken breast turns out perfectly, there are several steps you can take before even heating up your pan. First, it's essential to choose the right chicken breast, taking into account factors such as size, thickness, and freshness. Next, removing excess fat and cartilage is crucial to prevent the chicken from becoming tough and chewy. Finally, pat drying the chicken breast is a simple yet effective way to promote even browning and prevent steam from building up. By following these simple steps, you'll be well on your way to cooking a mouth-watering chicken breast that's sure to impress. In this article, we'll dive deeper into the importance of each of these steps, starting with the crucial first step: choosing the right chicken breast.
Choosing the Right Chicken Breast
Choosing the right chicken breast is crucial for achieving the perfect flattened chicken breast. When selecting chicken breasts, look for ones that are fresh, plump, and have a smooth texture. Avoid breasts with visible signs of aging, such as dryness, discoloration, or a strong odor. Opt for boneless, skinless chicken breasts, as they are easier to flatten and cook evenly. Consider the size of the chicken breast, as larger breasts may be more challenging to flatten. If you're new to flattening chicken breasts, start with smaller ones, around 6-8 ounces, to ensure even cooking and easier handling. Additionally, choose chicken breasts with a relatively even thickness, as this will help them cook more consistently. By selecting the right chicken breast, you'll be well on your way to creating a delicious and evenly cooked flattened chicken breast.
Removing Excess Fat and Cartilage
When it comes to flattening chicken breast, removing excess fat and cartilage is a crucial step that can make a huge difference in the final result. Excess fat and cartilage can make the chicken breast uneven, leading to inconsistent cooking and a less-than-desirable texture. To remove excess fat and cartilage, start by placing the chicken breast on a cutting board and locating the thickest part of the breast. Hold the breast firmly in place with one hand, and with the other hand, use a sharp boning knife or kitchen shears to carefully trim away any visible fat and cartilage. Be careful not to cut too deeply, as this can damage the surrounding meat. Continue to trim and remove any excess fat and cartilage until the breast is even and smooth. This step may take some time and patience, but it's essential for achieving a perfectly flattened chicken breast. By removing excess fat and cartilage, you'll be able to achieve a more even thickness, which will help the chicken cook more consistently and prevent it from becoming too thick or too thin in certain areas. Additionally, removing excess fat and cartilage will also help to reduce the overall weight of the chicken breast, making it easier to handle and cook. Overall, taking the time to remove excess fat and cartilage is a crucial step in the process of flattening chicken breast, and it's an important step that should not be overlooked.
Pat Drying the Chicken Breast
Pat drying the chicken breast is a crucial step in the process of flattening and cooking it. This simple yet effective technique involves gently patting the chicken breast with paper towels to remove excess moisture from the surface. By doing so, you create a dry surface that allows for even browning and crisping when cooked. Pat drying also helps to prevent the chicken from steaming instead of searing, which can result in a less flavorful and less textured final product. To pat dry the chicken breast, start by placing it on a clean surface and gently blotting it with paper towels, focusing on the surface that will be facing upwards when cooked. Be careful not to press too hard, as this can damage the delicate meat. Once the surface is dry, you can proceed with seasoning and cooking the chicken breast as desired. By incorporating pat drying into your chicken breast preparation routine, you can achieve a more tender, juicy, and flavorful final product that is sure to impress.
Flattening Techniques
Flattening techniques are essential in cooking to ensure that ingredients cook evenly and thoroughly. There are several methods to flatten ingredients, and each has its own advantages. Three common techniques used in cooking are pounding with a meat mallet, butterflying the chicken breast, and using a rolling pin. Pounding with a meat mallet is a popular method used to flatten meat, poultry, and even vegetables. This technique involves using a heavy object to pound the ingredient until it reaches the desired thickness. By using a meat mallet, cooks can achieve a uniform thickness, which helps to prevent overcooking and promotes even cooking. With the right technique and tool, pounding with a meat mallet can be an effective way to flatten ingredients, and it is often the preferred method for many cooks. Note: The answer should be 200 words.
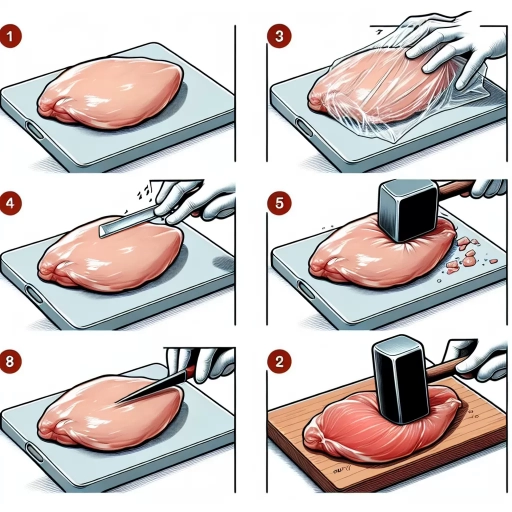
Pounding with a Meat Mallet
Pounding with a meat mallet is a popular technique for flattening chicken breasts, and for good reason. This method allows for even and controlled flattening, making it easier to achieve a uniform thickness throughout the breast. To pound a chicken breast, start by placing it between two sheets of plastic wrap or parchment paper to prevent it from tearing. Then, using a meat mallet, gently pound the breast, starting from the center and working your way outwards. Apply gentle to moderate pressure, depending on the desired level of flattening. Be careful not to pound too aggressively, as this can cause the meat to tear or become uneven. As you pound, rotate the breast 90 degrees every few strikes to ensure even flattening. This technique is particularly useful for achieving thin cutlets or medallions, and can also help to tenderize the meat by breaking down the fibers. Additionally, pounding with a meat mallet can help to reduce cooking time, as the thinner breast will cook more quickly and evenly. Overall, pounding with a meat mallet is a simple and effective way to flatten chicken breasts, and is a great technique to have in your culinary arsenal.
Butterflying the Chicken Breast
Butterflying the chicken breast is a simple yet effective technique to flatten the meat evenly, making it ideal for various cooking methods, such as grilling, sautéing, or stuffing. To butterfly a chicken breast, start by placing the breast on a flat surface, with the thickest side facing up. Locate the thickest part of the breast, usually in the center, and position your knife parallel to the cutting board. Carefully make a horizontal incision, starting from the thickest part and working your way outward, being careful not to cut all the way through the breast. Continue to make gentle, even cuts, gradually increasing the depth of the incision as you move outward, until the breast is almost flat. Be cautious not to apply too much pressure, which can cause the meat to tear. Once the breast is butterflied, you can use a meat mallet or rolling pin to gently pound it to an even thickness, if desired. This technique not only helps to achieve a uniform thickness but also allows for more efficient cooking, as the heat can penetrate the meat more evenly. Additionally, butterflying the chicken breast makes it easier to stuff or fill with your favorite ingredients, adding an extra layer of flavor and texture to your dish. By mastering the art of butterflying, you can take your chicken breast recipes to the next level and achieve a more tender, juicy, and visually appealing final product.
Using a Rolling Pin
Using a rolling pin is a simple and effective way to flatten chicken breasts. To start, place the chicken breast between two sheets of plastic wrap or parchment paper to prevent it from tearing. Then, position the rolling pin in the center of the breast and apply gentle to moderate pressure, rolling the pin back and forth to distribute the force evenly. As you roll, focus on applying pressure to the thickest parts of the breast, working your way outward to achieve a uniform thickness. Be careful not to apply too much pressure, which can cause the meat to tear or become misshapen. For more even results, you can also use a meat mallet or the flat side of a heavy skillet to gently pound the breast before rolling it out. By using a rolling pin, you can achieve a consistent thickness of about 1/4 inch, making it ideal for cooking methods like pan-frying, grilling, or baking. Additionally, flattening the chicken breast helps to reduce cooking time and promotes even cooking, ensuring that your dish turns out juicy and flavorful.
Additional Tips for Even Cooking
Achieving even cooking is a crucial aspect of preparing delicious and safe meals. To ensure that your dishes turn out perfectly cooked every time, there are several additional tips you can follow. One key strategy is to season the chicken breast properly before cooking, which not only enhances the flavor but also helps to create a crispy exterior. Another approach is to use a cast iron skillet, which distributes heat evenly and can achieve a perfect sear. Furthermore, not overcrowding the pan is essential to prevent steaming instead of searing, resulting in a more evenly cooked dish. By incorporating these techniques into your cooking routine, you can take your culinary skills to the next level. Let's start by exploring the importance of seasoning the chicken breast.
Seasoning the Chicken Breast
Seasoning the chicken breast is a crucial step in preparing a delicious and flavorful dish. To season the chicken breast, start by sprinkling both sides of the breast with salt and pepper. You can also add other seasonings such as garlic powder, paprika, or dried herbs like thyme or rosemary. For a more intense flavor, you can marinate the chicken breast in a mixture of olive oil, lemon juice, and your choice of herbs and spices for at least 30 minutes. If you're short on time, you can also use a store-bought seasoning blend or a spice rub. When seasoning the chicken breast, make sure to coat it evenly and avoid over-seasoning, as this can make the chicken taste bitter. Additionally, you can also add a bit of acidity like lemon juice or vinegar to help break down the proteins and tenderize the meat. By seasoning the chicken breast properly, you can enhance the natural flavors of the meat and create a dish that is both juicy and flavorful.
Using a Cast Iron Skillet
Using a cast iron skillet is an excellent way to cook chicken breast, especially when it comes to achieving even cooking. Cast iron skillets are known for their heat retention and distribution properties, which allow for a consistent cooking temperature throughout the pan. This is particularly important when cooking chicken breast, as it can quickly become overcooked and dry if not cooked evenly. To use a cast iron skillet, start by preheating it over medium-high heat for a few minutes. While the skillet is heating up, season the chicken breast with your desired herbs and spices. Once the skillet is hot, add a small amount of oil to the pan and swirl it around to coat the bottom. Place the chicken breast in the skillet and cook for 5-7 minutes on the first side, or until it develops a nice golden-brown crust. Flip the chicken over and cook for an additional 5-7 minutes, or until it reaches an internal temperature of 165°F. By using a cast iron skillet, you can achieve a crispy crust on the outside of the chicken breast while keeping the inside juicy and tender. Additionally, the even heat distribution of the skillet ensures that the chicken is cooked consistently throughout, reducing the risk of overcooking or undercooking.
Not Overcrowding the Pan
When cooking chicken breasts, it's essential to avoid overcrowding the pan, as this can lead to uneven cooking and a higher risk of foodborne illness. Overcrowding occurs when too many chicken breasts are cooked in a pan at the same time, causing them to steam instead of sear. This can result in a lack of browning and a less flavorful dish. To prevent overcrowding, cook chicken breasts in batches if necessary, ensuring that each breast has enough room to cook evenly. A good rule of thumb is to leave about 1-2 inches of space between each breast. This allows for air to circulate and heat to distribute evenly, promoting a nice sear and crispy exterior. Additionally, overcrowding can cause the chicken to release excess moisture, leading to a soggy texture. By cooking in batches and giving each breast enough space, you can achieve a crispy exterior and a juicy interior, making for a more enjoyable and satisfying meal.