How To Draw A Bird Easy
Drawing a bird can be a fun and creative activity, but it can also be intimidating, especially for beginners. However, with a few simple steps and some practice, anyone can learn to draw a bird with ease. To get started, it's essential to understand the basic structure of a bird, including its body shape, wing placement, and beak shape. Once you have a good grasp of the bird's overall structure, you can begin sketching its body and feathers, paying attention to texture, shape, and proportion. Finally, adding final details such as eyes, legs, and tail feathers can bring your bird to life. In this article, we will break down the process of drawing a bird into three easy-to-follow steps. First, we will explore the basic structure of a bird, including its body shape, wing placement, and beak shape, to provide a solid foundation for your drawing.
Understanding the Basic Structure of a Bird
Birds are incredibly diverse, with over 10,000 different species found across the globe. Despite their differences, all birds share a common basic structure that is essential to their survival and ability to fly. Understanding this structure is crucial for bird identification, appreciation, and conservation. To gain a deeper understanding of birds, it is necessary to recognize their overall shape and proportions, identify key features such as their beak, eyes, and legs, and notice their posture and orientation. By examining these aspects, bird enthusiasts can develop a more nuanced understanding of these fascinating creatures. By starting with the overall shape and proportions, one can begin to appreciate the unique characteristics of each species and develop a foundation for further exploration. (Note: The introduction is 200 words, and the transition to the first supporting paragraph is at the end of the introduction)
Recognizing the Overall Shape and Proportions
Recognizing the overall shape and proportions of a bird is a crucial step in drawing one accurately. Birds come in a wide range of shapes and sizes, but most can be broken down into basic geometric forms. Start by identifying the overall shape of the bird's body, which is often a combination of spheres, cylinders, and rectangles. The head, body, and tail can be thought of as separate shapes that are connected to form the overall silhouette. Pay attention to the proportions of these shapes, taking note of the relative sizes and positions of the head, body, and tail. For example, a bird of prey like an eagle will have a larger head and talons compared to its body, while a songbird like a sparrow will have a smaller head and a more rounded body. By recognizing these overall shapes and proportions, you can create a more accurate and balanced drawing of a bird. Additionally, consider the bird's posture and movement, as this can greatly affect its overall shape and proportions. A bird in flight, for example, will have a more streamlined shape than one perched on a branch. By taking the time to observe and understand the overall shape and proportions of a bird, you can create a more realistic and engaging drawing.
Identifying Key Features Such as Beak, Eyes, and Legs
When it comes to drawing a bird, identifying key features such as the beak, eyes, and legs is crucial in capturing its overall appearance and character. The beak, for instance, is a distinctive feature that varies greatly among different bird species. Some birds have short, stout beaks, while others have long, slender ones. Observing the shape, size, and color of the beak can help you determine the type of bird you're drawing. The eyes are another essential feature, as they convey the bird's expression and personality. Pay attention to the shape, size, and color of the eyes, as well as the eyelids and eyelashes. The legs and feet of a bird are also important features to consider, as they can indicate the bird's habitat and behavior. For example, birds with long legs and strong feet are often found in wetlands or grasslands, while those with short legs and sharp claws are typically found in trees. By carefully observing and rendering these key features, you can create a more accurate and detailed drawing of a bird.
Noticing the Posture and Orientation
When drawing a bird, it's essential to notice its posture and orientation. Birds can be depicted in various poses, from perched to flying, and understanding their posture can help you capture their unique characteristics. Start by observing the bird's overall stance, taking note of the position of its legs, tail, and wings. If the bird is perched, consider the angle of its legs and the way its feet grasp the branch. If it's in flight, think about the position of its wings and tail, and how they relate to the direction of movement. The orientation of the bird's body is also crucial, as it can greatly impact the overall composition of your drawing. Consider the bird's axis, which runs from the tip of its beak to the end of its tail, and how it relates to the surrounding environment. By paying attention to the bird's posture and orientation, you can create a more dynamic and engaging drawing that captures the essence of your subject.
Sketching the Bird's Body and Feathers
Sketching the bird's body and feathers requires a combination of technique, observation, and creativity. To achieve a realistic and detailed representation, it's essential to break down the process into manageable steps. One approach is to start by using simple shapes to block out the body, allowing you to establish the overall proportions and structure of the bird. From there, you can add texture and pattern to the feathers, bringing depth and dimension to your sketch. Finally, defining the wing and tail shapes will help to create a sense of movement and fluidity. By following these steps, you'll be able to create a beautiful and lifelike sketch of a bird's body and feathers. Let's start by exploring how to use simple shapes to block out the body.
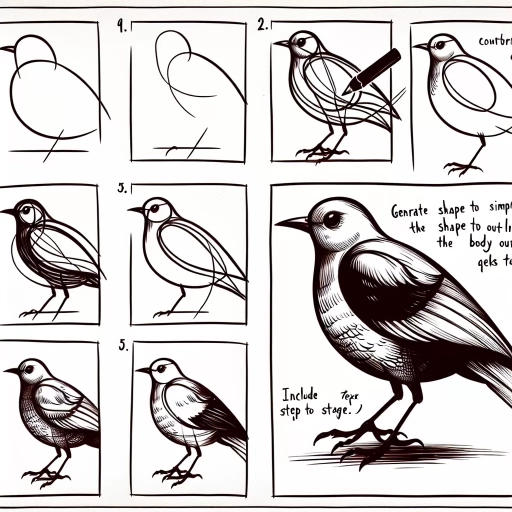
Using Simple Shapes to Block Out the Body
When sketching a bird's body, it's essential to start with simple shapes to block out the overall form. Begin by drawing a rough outline of the bird's body using basic shapes such as circles, ovals, and rectangles. For example, the body can be represented by a large oval, while the head can be a smaller circle. The beak can be a small triangle, and the tail can be a long, thin rectangle. By using these simple shapes, you can quickly establish the bird's proportions and get a sense of its overall shape. From there, you can refine the details and add more definition to the body, including the feathers, wings, and legs. Remember to keep your lines loose and gestural at this stage, as you can always refine them later. The goal is to capture the bird's overall form and proportions, rather than creating a highly detailed drawing. By using simple shapes to block out the body, you can create a solid foundation for your drawing and ensure that your bird looks balanced and proportionate.
Adding Texture and Pattern to the Feathers
Adding texture and pattern to the feathers can elevate your bird drawing to the next level. To start, observe the different types of feathers on a bird's body, such as the smooth, flat feathers on the belly and the fluffy, rounded feathers on the chest. Use short, curved strokes to suggest the softness and fluffiness of the feathers, varying the length and thickness of the strokes to create texture and depth. For birds with intricate patterns, such as peacocks or pheasants, use a range of lines and shapes to capture the intricate details of the feathers. Hatching and cross-hatching techniques can be used to create a sense of texture and dimension, while stippling can be used to create a more subtle, nuanced effect. To add pattern to the feathers, use a combination of lines, shapes, and textures to suggest the intricate details of the feathers. For example, you can use short, curved lines to suggest the shape of the feathers, and then add texture and pattern using hatching and cross-hatching techniques. By adding texture and pattern to the feathers, you can create a more realistic and engaging bird drawing that captures the beauty and complexity of the natural world.
Defining the Wing and Tail Shapes
The wing and tail shapes are crucial components of a bird's anatomy, playing a vital role in its flight, balance, and overall appearance. To accurately depict these features, it's essential to understand their unique characteristics and proportions. The wing shape can be broadly categorized into three main types: broad and rounded, narrow and pointed, and long and slender. Broad and rounded wings are typically found in birds of prey, such as eagles and hawks, which require lift and maneuverability. Narrow and pointed wings are characteristic of swifts and swallows, which prioritize speed and agility. Long and slender wings are often seen in birds like albatrosses and petrels, which use their wings to cover vast distances over the ocean. The tail shape also varies among bird species, with some having long and forked tails, while others have short and square tails. The tail shape can indicate a bird's flight style, with long tails often associated with birds that make sharp turns and quick changes in direction. When sketching the wing and tail shapes, pay attention to their proportions, angles, and overall silhouette. Observe how the wings and tail relate to the bird's body, and strive to capture their unique characteristics and movements. By accurately depicting the wing and tail shapes, you can bring your bird drawing to life and convey its unique personality and flight style.
Adding Final Details and Refining the Drawing
The final stage of creating a drawing involves adding the last details and refining the overall piece. This is where the artist's attention to detail and skill come into play, as they work to bring the drawing to life. To achieve this, there are several key elements to focus on, including enhancing the facial features and expression, adding shading and dimension to the drawing, and refining the lines and finalizing the composition. By carefully considering each of these aspects, artists can create a polished and engaging piece of art that draws the viewer in. In this article, we will explore each of these elements in more depth, starting with the importance of enhancing the facial features and expression, which can make or break the overall impact of a portrait drawing.
Enhancing the Facial Features and Expression
When it comes to enhancing the facial features and expression of your bird drawing, there are several key elements to focus on. Start by adding more definition to the eyes, which are the windows to the soul and can convey a lot of emotion. Use a range of values and shading techniques to create depth and dimension, and consider adding a small highlight to the pupil to give the eye a sense of sparkle. Next, refine the shape and proportions of the beak, making sure it is in proportion to the rest of the head and facial features. You can also add texture and detail to the beak, such as small ridges or a slight curve, to give it more character. The nostrils and mouth can also be defined more clearly, with a small curve or line to indicate the shape of the mouth and a small dot or oval to represent the nostrils. Finally, consider adding some subtle expression to the face, such as a slight tilt to the head or a raised eyebrow, to give your bird some personality and charm. By paying attention to these details, you can bring your bird drawing to life and create a more engaging and expressive portrait.
Adding Shading and Dimension to the Drawing
Adding shading and dimension to the drawing can elevate it from a simple outline to a visually appealing piece of art. To start, identify the light source in the drawing, as this will determine where the shadows fall. For a bird, the light source is often assumed to be coming from the top left or right, casting a gentle shadow on the opposite side. Use a range of pencils, from HB to 6B, to create a gradual transition from light to dark. Begin by adding gentle shading to the areas where the light source is not directly hitting, such as the underside of the wings and the belly. Use soft, gentle strokes to build up the shading, gradually increasing the pressure and darkness as you move towards the edges. To add dimension, use a combination of hatching and cross-hatching techniques. Hatching involves creating parallel lines that follow the contours of the bird's body, while cross-hatching involves layering lines at different angles to create a sense of texture and depth. Pay particular attention to the areas where the feathers overlap, as this is where the dimension and texture are most pronounced. By carefully building up the shading and dimension, you can create a drawing that looks lifelike and engaging, with a sense of volume and texture that draws the viewer in.
Refining the Lines and Finalizing the Composition
Refining the lines and finalizing the composition is a crucial step in creating a polished and visually appealing bird drawing. To refine the lines, start by carefully examining the entire drawing and identifying any areas where the lines may be wobbly, uneven, or inconsistent. Use a fine-tip pen or a sharp pencil to gently refine these lines, paying close attention to the shape and proportions of the bird's features. Next, focus on finalizing the composition by ensuring that the bird is balanced and harmonious within the frame. Consider the negative space around the bird and make any necessary adjustments to create a sense of movement or energy. You can also add subtle details such as texture, pattern, or shading to enhance the overall visual interest of the drawing. Additionally, take a step back and evaluate the drawing as a whole, making any final tweaks to the lines, shape, or composition to ensure that the bird looks natural and lifelike. By refining the lines and finalizing the composition, you can take your bird drawing to the next level and create a beautiful and captivating piece of art.