How To Tape A Sprained Finger
Here is the introduction paragraph: A sprained finger can be a painful and frustrating injury, especially for athletes or individuals who rely heavily on their hands for daily activities. Fortunately, taping a sprained finger can provide the necessary support and stability to promote healing and reduce discomfort. However, it's essential to understand the basics of taping a sprained finger to ensure proper application and avoid exacerbating the injury. Before diving into the taping process, it's crucial to prepare the affected area and gather the necessary materials. In this article, we'll take you through a step-by-step guide on how to tape a sprained finger effectively. To start, let's begin by understanding the basics of taping a sprained finger, including the different types of tape, the importance of proper alignment, and the role of taping in the healing process.
Understanding the Basics of Taping a Sprained Finger
Here is the introduction paragraph: A sprained finger can be a painful and debilitating injury, especially for athletes and individuals who rely heavily on their hands for daily activities. Understanding the basics of taping a sprained finger is crucial for promoting healing, reducing pain, and preventing further injury. But before we dive into the taping process, it's essential to understand what a sprained finger is and how it occurs. A sprained finger is a common injury that occurs when the ligaments surrounding the finger joint are stretched or torn, often due to sudden twisting or bending. Proper taping techniques are vital to ensure that the finger is stabilized and supported, allowing the ligaments to heal properly. However, it's also important to take precautions before taping a sprained finger to avoid exacerbating the injury. In this article, we will explore the basics of taping a sprained finger, including what a sprained finger is and how it occurs, the importance of proper taping techniques, and precautions to take before taping a sprained finger.
What is a Sprained Finger and How Does it Occur?
. A sprained finger occurs when the ligaments surrounding the joints in the finger are stretched or torn, leading to pain, swelling, and limited mobility. This type of injury is common in sports, particularly those that involve catching, throwing, or gripping, such as basketball, football, and tennis. It can also happen in everyday activities, like lifting heavy objects or slipping on a wet surface. When a finger is sprained, the ligaments are subjected to excessive stress, causing micro-tears or complete ruptures. The severity of the sprain depends on the extent of the ligament damage, with mild sprains involving minimal stretching and severe sprains involving complete tears. Understanding the basics of a sprained finger is essential to provide proper care and support, which is where taping comes in – a simple yet effective technique to help alleviate pain, reduce swelling, and promote healing. By learning how to tape a sprained finger, individuals can take the first step towards a speedy recovery and get back to their normal activities without further aggravating the injury.
The Importance of Proper Taping Techniques
. Proper taping techniques are crucial when it comes to treating a sprained finger. Not only does it provide support and stability to the affected area, but it also helps to reduce pain and inflammation. When done correctly, taping can help to immobilize the finger, allowing it to heal faster and reducing the risk of further injury. On the other hand, improper taping techniques can lead to a range of complications, including skin irritation, nerve damage, and even delayed healing. Therefore, it is essential to learn the correct taping techniques to ensure that you are providing the best possible care for your sprained finger. By taking the time to learn how to tape your finger properly, you can help to promote a speedy recovery, reduce the risk of complications, and get back to your normal activities as quickly as possible. Additionally, proper taping techniques can also help to prevent future injuries by providing additional support and stability to the finger. By incorporating taping into your injury prevention routine, you can help to keep your fingers healthy and strong, and reduce the risk of future sprains and strains. Overall, the importance of proper taping techniques cannot be overstated, and by taking the time to learn how to tape your finger correctly, you can help to ensure a safe and successful recovery.
Precautions to Take Before Taping a Sprained Finger
. Before taping a sprained finger, it's essential to take some precautions to ensure proper healing and prevent further injury. First, assess the severity of the sprain and consider seeking medical attention if the pain is severe, or if there's numbness, tingling, or difficulty moving the finger. If the sprain is minor, clean and dry the affected area thoroughly to prevent infection. Remove any jewelry, such as rings, to prevent swelling and ensure a snug fit of the tape. It's also crucial to trim your fingernails to prevent scratching or puncturing the skin while taping. Additionally, consider using a hypoallergenic tape to minimize the risk of skin irritation or allergic reactions. If you have sensitive skin, apply a thin layer of petroleum jelly or lotion to the affected area before taping to reduce friction and discomfort. Furthermore, make sure to tape the finger in a way that allows for some movement and flexibility, as immobilizing the finger completely can lead to stiffness and prolonged recovery. By taking these precautions, you can ensure a safe and effective taping process that promotes healing and supports the recovery of your sprained finger.
Preparing for the Taping Process
Here is the introduction paragraph: When it comes to treating a sprained finger, taping is a common and effective method to provide support and stability to the affected area. However, before you start taping, it's essential to prepare properly to ensure the best results. This involves gathering the necessary materials and equipment, assessing the severity of the sprain and determining the best taping method, and cleaning and preparing the affected area. By taking the time to prepare correctly, you can ensure that the taping process is successful and helps to promote healing. In this article, we will explore the steps involved in preparing for the taping process, which will provide a solid foundation for understanding the basics of taping a sprained finger.
Gathering the Necessary Materials and Equipment
. Here is the paragraphy: When preparing for the taping process, it's essential to gather the necessary materials and equipment to ensure a secure and comfortable fit. You'll need a roll of athletic tape, preferably 1.5 or 2 inches wide, which is specifically designed for taping injuries. You may also want to have some pre-wrap or underwrap on hand to provide extra cushioning and support. Additionally, it's a good idea to have some scissors or a tape cutter to cut the tape to the desired length. If you're planning to tape your finger for an extended period, you may also want to consider using a foam or gel pad to provide extra cushioning and protection. Having all the necessary materials and equipment within reach will make the taping process much easier and more efficient. It's also important to make sure the area around your finger is clean and dry before applying the tape to ensure a secure and long-lasting fit. By taking the time to gather the necessary materials and equipment, you'll be able to create a supportive and comfortable tape job that will help your sprained finger heal quickly and effectively.
Assessing the Severity of the Sprain and Determining the Best Taping Method
. Assessing the severity of the sprain is crucial in determining the best taping method for a sprained finger. A mild sprain may only require a simple buddy taping technique, where the injured finger is taped to an adjacent finger for support and stability. However, a more severe sprain may necessitate a more complex taping method, such as a figure-eight or a basketweave technique, to provide additional support and protection to the affected joint. To assess the severity of the sprain, it's essential to evaluate the level of pain, swelling, and limited range of motion. If the sprain is severe, it may be necessary to seek medical attention to rule out any further complications, such as a fracture or ligament damage. Once the severity of the sprain is determined, the best taping method can be chosen to provide optimal support and promote healing. It's also important to consider the individual's activity level and the type of activities they will be engaging in while the finger is taped, as this can impact the type of taping method used. By carefully assessing the severity of the sprain and selecting the most appropriate taping method, individuals can effectively manage their symptoms and promote a speedy recovery.
Cleaning and Preparing the Affected Area
. Here is the paragraphy: Before applying the tape, it's essential to clean and prepare the affected area to ensure a secure and comfortable fit. Start by washing your hands thoroughly with soap and water to remove any dirt, oils, or lotions that may interfere with the adhesive. Gently pat the area dry with a clean towel, paying extra attention to the skin around the sprained finger. Remove any jewelry, such as rings or watches, that may get in the way of the tape or cause discomfort. If you have any open wounds or cuts on the affected area, apply a thin layer of antibiotic ointment and cover with a bandage before proceeding. Next, use a lint-free wipe or cotton ball to remove any remaining dirt, oils, or residue from the skin. This will help the tape adhere better and reduce the risk of skin irritation. Finally, use a small amount of talcum powder or cornstarch to lightly dust the area, which will help the tape stick to the skin more securely. By taking the time to properly clean and prepare the affected area, you'll be able to apply the tape with confidence and ensure a comfortable, secure fit that will support your sprained finger as it heals.
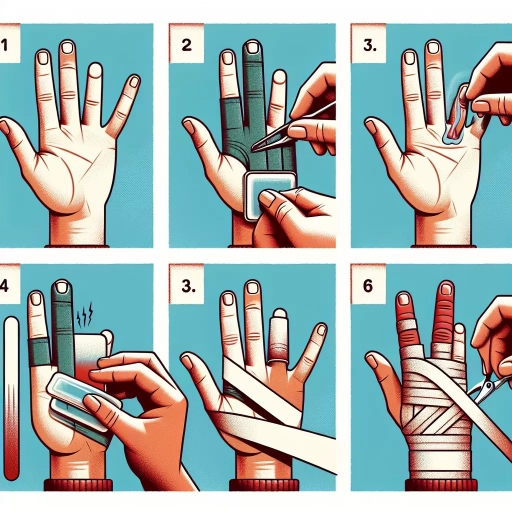
Step-by-Step Guide to Taping a Sprained Finger
Here is the introduction paragraph: A sprained finger can be a painful and debilitating injury, making everyday activities a challenge. Fortunately, taping a sprained finger can provide the necessary support and stability to promote healing and alleviate discomfort. However, it's essential to learn the proper technique to ensure effective taping. In this article, we will guide you through a step-by-step process on how to tape a sprained finger, covering the application of the initial layer of tape for support and stability, adding additional layers of tape for reinforcement and protection, and finishing the taping process to ensure a secure fit. By following these steps, you'll be able to provide your injured finger with the care it needs to recover quickly and safely. Understanding the basics of taping a sprained finger is crucial, and we'll start by exploring the fundamentals of this process.
Applying the Initial Layer of Tape for Support and Stability
. Applying the initial layer of tape is a crucial step in providing support and stability to a sprained finger. This layer serves as the foundation for the rest of the taping process, and its proper application is essential for effective injury management. To begin, start by wrapping a thin layer of tape around the base of the finger, just below the knuckle. This will help to anchor the tape in place and prevent it from slipping or bunching up during movement. Next, wrap the tape around the finger in a circular motion, overlapping the edges of the tape as you go to create a seamless bond. Be sure to apply even pressure to the tape, avoiding any wrinkles or creases that could cause discomfort or irritation. As you wrap the tape, focus on providing support to the injured area, rather than constricting the finger. The goal is to provide stability and protection, not to cut off circulation or restrict movement. By applying the initial layer of tape in a careful and deliberate manner, you can set the stage for a successful taping job that will help to promote healing and reduce pain and discomfort.
Adding Additional Layers of Tape for Reinforcement and Protection
. To add additional layers of tape for reinforcement and protection, start by applying a second layer of tape in the same manner as the first, ensuring that it is smooth and even. This layer should be applied in the same direction as the first, with the tape being wrapped around the finger in a circular motion. As you apply the second layer, make sure to maintain even pressure to avoid creating any wrinkles or air pockets. It's also essential to ensure that the tape is not too tight, as this can restrict blood flow and cause discomfort. Once the second layer is in place, you can apply additional layers as needed, following the same process. It's recommended to apply no more than three to four layers of tape, as excessive tape can cause the finger to become stiff and limit mobility. As you add each layer, make sure to check the finger for any signs of discomfort or restricted movement, and adjust the tape accordingly. By adding additional layers of tape, you can provide extra support and protection to the sprained finger, helping to promote healing and prevent further injury.
Finishing the Taping Process and Ensuring a Secure Fit
. Finishing the Taping Process and Ensuring a Secure Fit Once you have applied the tape to the affected finger, it's essential to ensure a secure fit to provide optimal support and protection. To finish the taping process, start by gently pressing the tape onto the skin to remove any air bubbles or wrinkles. This will help the tape adhere properly and prevent it from coming loose during daily activities. Next, use your fingers to smooth out the tape, making sure it's evenly applied and not twisted or bunched up. You can also use a small amount of tape to anchor the end of the strip to the adjacent finger, preventing the tape from unraveling. Finally, give the tape a gentle tug to ensure it's snug but not too tight, allowing for a full range of motion. It's also crucial to check the tape regularly to ensure it's not too loose or too tight, as this can affect the healing process. By following these steps, you can ensure a secure fit and provide your sprained finger with the support it needs to heal properly. Additionally, you can also use pre-wrap or underwrap to add extra cushioning and support to the affected area, which can help reduce pain and discomfort. By taking the time to properly finish the taping process, you can help your sprained finger heal faster and reduce the risk of further injury.