How To Draw A Maple Leaf
Understanding the Structure and Anatomy of a Maple Leaf
The Characteristic Features of a Maple Leaf
The structure of a maple leaf is largely varied and unique. First, it is important to note that a maple leaf is characterized by its palmate shape - similar to a hand with outstretched fingers. Next, it has a fresh green color during the spring and summer months and transforms into vibrant shades of orange, yellow, and red during the fall, which makes capturing its beauty all the more appealing and intriguing to artists. Finally, the leaf veins are not just for aesthetics but they serve a crucial function - they supply water, hormones, and nutrients from the tree to the leaf, and assist in the photosynthesis process.
Observing and Sketching the Maple Leaf
Observation is a crucial first step in learning how to draw a maple leaf accurately. Spend some time looking closely at a real maple leaf. Notice its symmetrical structure, rounded lobes, and vein pattern. Sketch the leaf using light, loose lines initially to capture its overall shape. Do a quick contour drawing outlining the leaf’s border, focusing on the main outline and not on the finer details. These observations and preliminary sketches will be your guide in the subsequent, more detailed steps of your illustration.
Understanding the Impact of Light and Shadow
To make your maple leaf drawing realistic, it is essential to understand the impact of light and shadow. Where the light hits the leaf, it will look brighter and where the leaf is curved or folded, it will appear darker. Shadows add depth and dimension to the leaf, transforming it from a flat drawing into a 3D representation. Be sure to observe carefully where the light source is coming from. Shading according to the direction of light ensures that the texture of the leaf's surface is noticeable in your drawing.
Step-By-Step Guide to Drawing a Maple Leaf
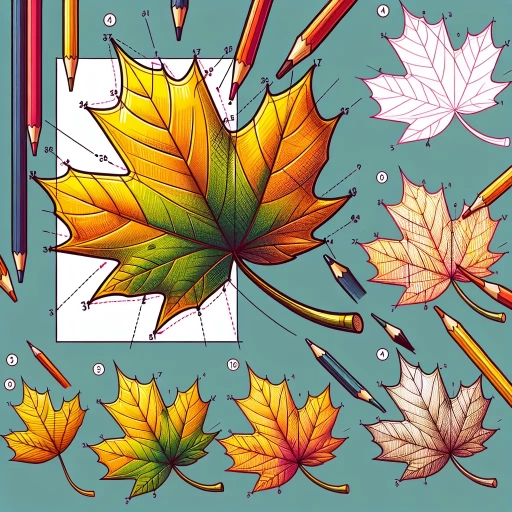
Starting with the Outline
The first step is starting off your drawing with a basic outline of the leaf. Since not every leaf is the same, it is important to plan your drawing by starting with a light sketch of the general shape. This outline serves as the skeleton or structure for the whole drawing on which specific details, shading, highlighting and textures will be added later. Beginning with the central vein is often the easiest starting point, followed by the outline of the leaf.
Adding Details and Textures
The second step involves adding the details and textures to make the leaf look more realistic. The veins and the serrated edges of the leaf can bring alive your illustration. Start by drawing the main veins fanning out from the stem and then smaller ones within each section. Pay attention to creating the jagged, irregular edge characteristic of maple leaves. Textures matter a lot. By observing the leaf's natural textures closely and replicating those minute patterns and details on your drawing, you can make your illustration come alive and look more realistic and natural.
Shading and Colouring
The final step involves adding shading to your drawing, whether you're working in pencil or adding color. Consider where the light source is and use it to guide your shading. Understand that the area which light directly hits will remain lighter, whereas the areas where the leaf curves away from the light, or where it overlaps onto itself, will be darker. The addition of colour brings the element of realism to your drawing. Choose the shades depending upon the season represented. It could range from shades of vibrant red and orange of a sweet autumnal leaf to the fresh green hues of a spring leaf.
Practicing and Mastering the Art of Drawing a Maple Leaf
Drawing Different Types of Maple Leaves
Once you've mastered the basic form of the leaf, try to draw different kinds of maple leaves. Take into account that the shape of maple leaves can vary greatly depending on the species. For example, sugar maple leaves have a characteristic five-lobed shape with a few sharp points, while red maple leaves tend to have deeper indentations and sharper points. Understanding these differences can help improve your skills and broaden your repertoire.
Drawing Maple Leaves in Different Conditions
Another interesting artistic endeavor can be capturing the leaf in different stages of its life cycle, like a new leaf sprouting out in the spring, a fully matured leaf in the summer and a dry, withered leaf in the fall ready to drop off from the tree. Moreover, other environmental influences like wind that folds and twists the leaves or morning dew droplets adding a sparkle to the leaf can be great aspects to depict in your drawing.
Continuous Practice
Like any other skill, improving your ability to draw a maple leaf requires regular practice. Draw the same leaf repeatedly until you reach a level of accuracy and detail with which you're satisfied. Consider seeking feedback, either from friends or online communities, and use it as an opportunity for improvement. Remember that patience and perseverance are key in mastering any form of art.