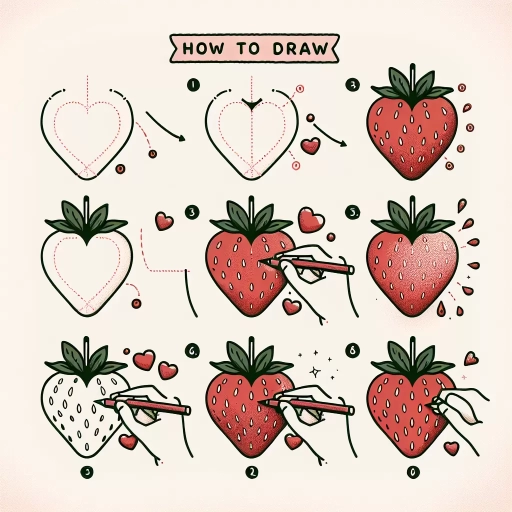
How To Draw A Strawberry
 Artistic endeavors allure and inspire, merging technique, creativity, and personal style to create something unique. If you've been pondering over your next sketching project, let's embark on a colorful journey, exploring how to draw a classic summer-themed favorite - the strawberry. In this high-definition, engaging article, we are going to delve into some practical techniques and tips to create a beautifully detailed drawing of this delicious fruit. This comprehensive guide will start by uncovering the fundamental structure of a strawberry, thereby helping you understand the rudimentary form and proportions. Then, we will be progressing towards various methods to sketch and outline to exemplify structure and visualize depth. Finally, we will be polishing your sketches by the application of shadows and highlights, and the precise placement of color for a realistic effect. Now that we have your pencils and papers ready, let's dive into our first step - understanding the basic structure of a strawberry.
Understanding the Basic Structure of a Strawberry
Understanding the basic structure of a strawberry is a fascinating exploration into the world of this sweet, aromatic fruit. It requires careful observation and knowledge that goes beyond its delicious taste. This article will guide you through this exploration in three fundamental areas. First, we will help you recognise the unique shape of a strawberry. This will go beyond its general heart-like shape, as we delve even deeper into its specific characteristics. Second, we will scrutinise the textured surface of this well-loved fruit, shedding light on the small and intriguing details often missed by the untrained eye. Lastly, but importantly, we will delve into an examination of other characteristic features that distinguish strawberries from other fruits. Each interesting part contributes enormously towards the whole identity of a strawberry, adding a complex layer of uniqueness. To begin this informative journey, let's start by understanding what inherently forms the core of every strawberry: identifying and recognising its unique shape.
Recognising the Unique Shape of a Strawberry
Recognising the distinctive contours of a strawberry is an indispensable aspect towards grasping the basic structure of this fruit and deftly illustrating it on paper. The strawberry, in comparison to other fruits, has a heart-like structure, reflecting a deceptively dynamic balance between subtle variances and symmetry. Look closely, and you'll see an evolved teardrop or conical form, tapered at the top and broader at the base, with a scattering of tiny mustard-like seeds dotting the exterior surface. However, a strawberry isn't precisely uniform. It exhibits minor irregularities in shape and size, making each berry unique - a testament to the wonderful quirks of nature. Some strawberries might have one side slightly bulged out compared to the other, while others might be more rounded or even elongated. In essence, the geometry of a strawberry is not rigidly defined, but fluid and flexible, and understanding this fundamental element is crucial to accurately capturing its likeness. To comprehend this further, envision a three-dimensional triangle with a slightly flat apex, curved edges, and a slightly hefty base. The strawberry's 'shoulders' tend to protrude out at an obtuse angle from the apex before tapering towards the base, which extends outward but remains flat, giving the fruit stability. The curvature of the skin from top to bottom implies a sense of movement, an almost spiralling effect, further highlighted by the scattered seeds that follow the curve. Turning our attention to the hue, strawberries display a gradient of vibrant reds, starting lighter at the apex going darker towards the base, with occasional spots of pale greens and yellows where the seeds reside. The captivating contrast strikes a fine balance between the brightness of its red skin and the subtlety of the seeds, drawing our attention and keeping it there. In a nutshell, recognising the unique shape of a strawberry entails appreciating both its broad-strong base and its refined-diverse tip, while also noting the varied distribution of the seeds, irregularities that make every strawberry distinct, and the enchanting play of colours. By gaining an understanding of these elements, one can depict a much more realistic and authentic representation of this remarkable fruit. It's all about engaging in a process of visual inquiry and interpretation to breathe life into our representations on paper. After all, isn't that what the art of drawing is about?
Identifying the Textured Surface
Identifying the Texture of a Strawberry Surface Understanding the complex structure of a strawberry involves more than just observations of color and shape, it digs deeper into the intricate details of its textured surface. The characteristic pattern of a strawberry's skin can add significant depth to its visual depiction and requires astute attention to synthesise accurately. A notable feature of a strawberry's surface is its unique texture, characterized by the presence of small, seed-like achenes scattered across an otherwise smooth, plump canvas. These achenes, commonly mistaken as seeds, are in fact the tiny, individual fruits of the strawberry, each containing a single seed. They lend an intriguing contrast to the strawberry's surface, providing a tactile dimension to the otherwise smooth skin. To draw this accurately, pinpoint the locations of these small achenes closely. They are not just randomly placed but indeed follow a subtle, yet discernable pattern. The texture alters dramatically as the strawberry ripens from a hard green bud to a juicy red fruit. The transformation is not merely in color; even the texture undergoes substantial change. While a mature strawberry is glossy and soft, with the achenes pushing forth as pronounced dimples, an unripe one is rigid and bumpy. Capturing this evolution through strokes of a pencil is a creative challenge, yet achievable through accurate portrayal and understanding. A discernable way to replicate the texture of the strawberry's surface in your artwork is by combining techniques from still life drawing. This includes stippling for the small achenes and hatching to bring out the glossiness of the ripe fruit. Adjust the level of pressure on your pencil to show the depth and volume of these tiny achenes. A softer touch suggests a ripe and juicy surface, while harder lines communicate a firmer, unripened strawberry. The identification and accurate recreation of the texture of a strawberry's surface, therefore, serves as a supportive piece to mastering the larger concept of sketching a strawberry. It is through the practice of such intricate detail that one can enhance their artistic proficiency. Remember - it is the buildup of these tiny, individual components that converge to shape the realistic strawberry that you aim to draw. So, as you set out to perfect drawing a strawberry, take the time to understand its unique texture – it might just make all the difference in your final artwork.
Examining the Characteristic Features
In our quest to understand the basic structure of a strawberry, examining the characteristic features is an important stage. Strawberry, a member of the Rosaceae family, presents an intriguing anomaly in the category of fruits as its seeds are found on the outside. These 'seeds' are technically called achenes and are in fact the true fruits containing the plants' seeds. Noticeably red when fully mature, these heart-shaped fruits are not only aesthetically pleasing but also offer an array of health benefits. As we delve deeper into the core pattern of a strawberry, we encounter the calyx. Located at the base, it comprises leaf-like structures known as sepals. The calyx plays an integral part in protecting the strawberry during the early stages of its growth. Noticeably, each strawberry has approximately 200 seeds on its exterior. Those are not just for decoration; they play an essential role in reproduction once they fall onto the ground, new plants emerge from them, offering a culinary delight year after year. The flesh of the strawberry is generally juicy and sweet, crisp yet tender with a distinct texture. The strawberries acquire a bright red hue and gain their characteristic sweetness only when completely mature. The inside of a strawberry is hollow, but the interior wall is lined with small seeds. Size, color, and form vary among different strawberry varieties. Some are small and round, while others are large and conical. The berries' surface can be either smooth or marred by minor blemishes. However, each of these characteristic features contributes to making the strawberry a visual treat. Designing a seamless line-based drawing from these detailed traits is quite fascinating. Translating these features into a drawing involves understanding that the heart shape of a strawberry is not symmetrical, unlike a typical heart icon, but slightly wider at the top. While sketching, the seeds should not be overlooked; instead, they can be signified with small indents on the surface. Summarily, examining the characteristic features of a strawberry brings to the fore an interesting dynamic of nature's artistry. The process serves as a foundation for appreciating and drawing the strawberry with a more refined perspective. So, whether you're a budding artist trying to perfect your craft or simply interested in learning, understanding these intricacies can considerably enhance your experience and results.
Techniques to Sketch and Outline a Strawberry
The art of sketching and outlining a strawberry encompasses more than just picking up a pencil. It's about understanding the form, texture, and layering of details that constitute the essence of a strawberry. This article will take you through a journey, teaching you how to utilize artistic techniques to create a lifelike representation of this summer fruit. First, we will establish the foundations by drawing a guideline for the strawberry, a crucial step in capturing its unique shape. Then, we will dive into the intricate process of adding details to the strawberry's surface, enhancing its realism and appeal. Lastly, the focus will shift towards the critical task of outlining the strawberry and its leaves, the final touch to bring your drawing to life. Each of these steps holds a vital place in the art of sketching, serving as the building blocks for your future masterpieces. Our journey starts with the first step - creating a guideline for the strawberry drawing. Get ready to embark on an artistic adventure, where every line drawn unravels an element of the complex yet mesmerizing world of sketching.
Creating a Guideline for the Strawberry Drawing
Carefully creating a guideline for strawberry drawing is an essential prerequisite to achieving a realistic and appealing piece of art. First, study the shape and the details of the strawberry using a reference image. A fresh strawberry usually has a heart or conical shape with a slight curve at the top where the green leafy cap, also known as the calyx, is situated. Notice the presence of tiny seeds known as achene which are evenly scattered all over the brightly colored body of the strawberry. Your first task is to sketch the body by lightly drawing an outline. It would help if you establish an accurate symmetry that gives it an authentic, natural look. To create guidelines, start by drawing a soft line down the middle of your page. This line will serve as your symmetry line. Next, sketch a heart or cone shape around this line, with the bottom more pointed and the top slightly flattened where the calyx will be. Remember that your drawing doesn't need to be perfect at this stage. It's crucial to keep these preparatory lines as light as possible, as they will guide the more polished lines you will draw in later stages. Mistakes can be easily corrected at this stage, and sketching lightly makes this process simpler. Remember, these sketches are not the final lines but rather a rough blueprint. Think of it as building a house: before construction begins, architects create a blueprint, which forms the overall structure lay-out. Similarly, your guideline sketches are the preliminary framework for your final drawing. So, don't stress about making them perfect; rather focus on giving your sketch a defined and clear structure upon which you can improve and perfect in the subsequent stages. After the basic shape has been completed, the next step in guideline creation involves detailing. It requires visualizing the placement of small seeds scattered across the strawberry's surface, and lightly sketching circles representing them. Also sketch the leafy protrusions on the top, and indicate the areas that will be in shadow to give the drawing depth and realism. Remember, the primary purpose of sketching and outlining a strawberry or any object is to provide a structured roadmap to your drawing process. Guidelines ensure accuracy in representing shapes and details of the subject. They ensure you capture the essence of what you are trying to draw, making the process less complex and the end results more satisfying. Creating guidelines for drawing a strawberry is a step-by-step process that not only enhances your drawing skills but also allows you to appreciate and understand the subjects of your art more profoundly. Hence, the importance of this part of the artistic process cannot be overstated.
Adding Details to the Strawberry's Surface
Adding depth and realism to your strawberry sketch isn’t as hard as it might seem. By paying close attention to the texture and lighting of the strawberry’s surface, you can create a stunning, detailed piece that draws the eye of your audience. The key is understanding that a strawberry isn’t smooth, but adorned with tiny achenes (the yellow seed-like dots) and dimples that give it a unique texture. Start by lightly penciling circles where each achene will be. They're not uniform in size or evenly dispersed but randomly distributed across the berry, so make sure to reflect that in your sketch. Once you've marked out where each achene will sit, use a combination of fine line work and soft shading to give each a three-dimensional appearance. This is where your understanding of light source becomes invaluable. If the light is hitting the strawberry from the right, then the left side of each achene should be in shadow, and vice versa. Now turn your attention to the dimples or indentations around each achene. Remember, these are not just mere dips in the strawberry's surface; they are an integral part of the fruit's character. Use soft pencil strokes and vary the pressure to create the illusion of depth. The dimples close to the light source should be more lightly shaded than those in shadow. In drawing the strawberry's surface texture, avoid rushing. It is important to build up the depth and texture gradually. A common mistake is to darken the sketch too quickly. Keep your pencil strokes light, and layer the shading— this is what will give your strawberry a vibrant, lifelike appearance. Finally, observe your strawberry! Use the power of observation to capture the small details that will make your sketch come to life. Notice how the achenes are not all the same size or precisely spaced, how some dimples are deeper than others, or how the light casts shadows. Drawing is an exercise in seeing, and the more you train your eyes to see, the better your sketches will become. Remember, the devil is in the detail! By using these techniques, your strawberry surface will have depth, texture, and realism that captivates your audience. They will feel like they could reach out, pick up the strawberry off the page, and enjoy its sweetness. Don't be afraid to learn, experiment, and, most importantly, have fun in your drawing journey. With meticulous attention to detailing the strawberry's surface, not only will your drawing skills improve, but you'll find that your ability to perceive and appreciate the world around you is enhanced as well. So start sketching! Grab your pencil and let your creativity flow. There's incredibly rewarding work ahead, and there's no better time to start than now.
Outlining the Strawberry and Leaves
Outlining a strawberry and its leaves requires precision, keen observation, and an understanding of form and structure. A strawberry is not simply a heart-shaped fruit, but a complex structure filled with details that need to be captured for a realistic representation. The first step involves a rough sketch to shape the strawberry's form. Draw a symmetrical heart for the body, slightly elongated at the bottom. Capturing the curvature of the fruit is crucial as it gives depth and perspective, ensuring the strawberry does not appear flat. Adding the leaves is the next step, which often confuses many artists. A strawberry leaf is trifoliate, meaning that a single stem supports three leaflets. The leaflets have a toothed edge and a pronounced central vein. Sketch three ovals at the top of your strawberry, slightly overlapping each other and the top of the strawberry. Next, sketch the serrated leaf edges by drawing small arcs or 'V' shapes at the outline of each oval. These leaves should appear from behind the strawberry, adding dimensionality to the sketch. The stem or calyx is at the center of these leaves, serving as the fruit’s crown. Draw a small circle in the center of the heart, then add lines radiating outwards that taper toward the tips of the leaves. Distinguishing the leaves from the strawberry body and from each other is important, ensuring they don't merge into a single form. Remember that perfection and precision come with practice. Outlining gives your sketch structure, upon which detailed shading and texture are applied. Create a balance between the outline and inner details to produce a realistic and visually pleasing sketch. Use light strokes while outlining and add weight once you're satisfied with the form and proportion. This technique presents the strawberry as a three-dimensional object, bringing your drawing to life. In conclusion, outlining a strawberry and its leaves involves studying the fruit's form, the character of its leaves, and understanding how these elements intertwine. With enough practice, this technique helps to create an accurate and realistic depiction of a strawberry.
Enhancing Your Sketch with Shadows, Highlights, and Color
In the fascinating world of sketching, even the slightest details such as shadows, highlights, and coloring can significantly enhance your artwork, providing depth, realistic look, and life to your subjects. This article will discuss in detail the techniques for applying shadows to create depth, adding highlights to bring about a realistic look, and using colors to breathe life into your work. Mastering these techniques will allow you to transform a simple strawberry sketch into a fabulous piece of art that appears as though it's ready to be plucked right off the page. As we delve into these techniques, we will first embark on an illustrative journey into the domain of shadows. Understanding and applying shadows to your sketches is paramount in achieving depth and dimension, making your strawberry appear three-dimensional rather than flat. Get prepared to delve deep into the interesting aspects of shadows and learn how they can be your surefire tool to give your sketches a compelling depth.
Applying Shadows to Create Depth
When breaking down the step-by-step operation of sketching a strawberry, an often overlooked yet crucial technique involves the application of shadows to create depth in your drawing. This method is not merely for hyper-realistic drawings or sophisticated artists. It's an artistic weapon that every sketcher, at any skill level, can use to add a three-dimensional appearance to their 2D art pieces. The scientifically precise, yet fundamentally straightforward approach to applying shadows correctly can dramatically enhance the quality and efficiency of sketches. Shadows, in the simplest terms, represent the areas that light doesn't reach. They build the perception of depth, tricking the human eye into visualizing a flat piece of paper or a flat 2D figure as an object with depth and mass - an essential factor in making your strawberry doodle look real. Everything in the world around us, including strawberries, casts a shadow, and it is the artist's role to translate this natural phenomenon onto their canvas. Before starting to shade, it's essential to understand where the light source is coming from. Once you establish the source of lighting on your artistic workspace, you'll be able to direct the shadows correctly. Shadows aren't just random dark patches but carefully crafted artwork pieces directed by the intensity of light. The side of the strawberry subjected to the light source will have a brighter tone, while the opposite side, where light does not reach, will have a darker tone - your "shadow." Applying shadows to create depth in your strawberry sketch involves several steps. Begin by lightly sketching your strawberry, then gradually start to identify and fill in the shadowed regions based on your light source. Use softer graphite pencils, such as a 4B or 6B, to achieve smoother gradients and darker values - ideal for shadowing. Gradations are crucial to maintain. A smooth transition from bright to dark creates a round, realistic feel necessary when drawing soft and naturally round items like strawberries. Furthermore, remember the concept of the "cast shadow.” It is the darkest area of a shadow and is always closest to the object. When sketching your strawberry, this would be the area right under it, the shadow the strawberry casts on the surface it sits. Experimenting with the intensity of the shadows will allow you to work on the depth of your sketch, giving your strawberry a more real, tactile semblance. Remember, the strength of the shadow is inversely proportional to the distance from the object. The shadow’s edges become softer, the further away you move from the item. Understanding and applying shadow to create depth isn't merely a drawing skill. It's a representation of how accurately you, as an artist, can capture and depict natural elements, thus enhancing the authenticity and relativity of your sketches. So, go ahead and start innovating your strawberry doodles with the depth of shadows, and watch your 2D sketches come to life.
Adding Highlights for a Realistic Look
Adding highlights is an essential step in achieving a realistic look for your sketched strawberry. Highlights can make a significant difference in bringing your artwork to life, simulating dimension and depth, and inducing a sense of volume and vitality that can captivate viewers. The inception of highlights commences with identifying the light source in your sketch. Typically, highlights are found on the side of the object closer to the light source. When it comes to a strawberry, envision the glossy, almost mirror-like reflection it has when bathed in sunlight. These reflections are your highlights - the representation of light bouncing off your strawberry. To create highlights, you can leave specific areas of your sketch untouched to render a white, bright shine that portrays intense illumination. Alternatively, for a less stark, softer glow, you might wish to lightly shade the area using your pencil or even gently smudge an applied layer of graphite or charcoal. Remember, the key is to create stunning contrast between the highlights and the darker areas of your sketch. Gradually layering the highlights brings a rounded, three-dimensional quality to your work. Start with soft strokes, then gradually add more until you achieve your desired brightness. Be careful not to add too many highlights, though, as it could potentially make your drawing looked washed out. The aim is to strike a balance that enhances the natural texture and volume of the strawberry. The beauty of adding highlights isn't solely in elevating the realism of your sketch but also in enhancing viewer engagement. Incorporating varied levels of brightness and shadow in your artwork immerses your audience into the scene, allows them to appreciate the interplay of light and texture, and adds an interactive dimension as they may explore the image from different viewing angles. When highlights are combined effectively with shadows and colours — which will be discussed later — it can help you portray a strawberry that may look good enough to eat! As an artist, this level of control over your audience's perception and response is a powerful narrative and emotive tool, allowing you to weave your stories using the universal language of visual art. Stay tuned for the subsequent sections for more tips on enhancing your sketches.
Using Colors to Bring Your Strawberry to Life
Colors aren't just a means for visual pleasure; they serve as potent tools in shaping the perception and interpretation of an artwork. By employing the right fusion of colors, you can make your strawberry sketch spring into life, lending it a vivid, lifelike appeal that goes beyond the capabilities of a simple pencil sketch. At the core of this technique is the art of choosing and applying the right shades that resonate with the identity of the subject—in this case, the strawberry. The vivid red of strawberries is one of their defining characteristics, but one must also be mindful that it's not a uniform, singular shade of red. In reality, a single strawberry is a symphony of hues—from the deepest maroons to the lightest pinks, from the shadows deep within the seeds to the shimmering highlights on the glossy surface. A keen understanding of how light interacts with the strawberry's surface is crucial. Pay close attention to how light filters through the dimples and the ridges, casting a cascade of highlights and shadows. It's the clever manipulation of these subtle changes in color, combined with the strategic application of lighting, that lends your sketch a multi-dimensional effect, and ultimately brings your strawberry to life. Furthermore, the strawberry's leaves and seeds need not be neglected, as they contribute to the overall harmony of the image. The crunchy green leaves crown the strawberry with a contrasting color, creating a refreshing balance against the overwhelmingly red body. As for the seeds, dapple your strawberry with specks of yellow or light gold to emulate their natural look. Lastly, remember that a splash of color can turn your drawing from good to great, making it more interesting and engaging. A background wash of a neutral shade, like light blue or beige, can make your strawberry pop, amplifying its vividness and increasing its overall appeal. So, grab your palette, let the colors sing, and let your strawberry come to life. From the layers of red on the strawberry to the play of shadows and highlights, and to the contrasting greens of the leaves—each brush stroke brings you one step closer to a more vivid, more dynamic, and ultimately, a more engaging piece of art.