How To Tie A Bow With A Ribbon
Understanding the Basics of Ribbon Tying
The Importance of Material Selection
When it comes to tying a bow with a ribbon, the material utilized can make or break your attempt. Different ribbon materials have varied characteristics that can affect the ease of tying as well as the final appearance of the bow. For instance, satin ribbons are smooth and shiny, making them a popular choice for elegant bows. However, they can also be slippery, thus making the tying process slightly challenging. On the contrary, grosgrain ribbons offer a textured feel that can make bow tying easier, but they lack the glossy finish of satin ribbons.
Different Types of Bows
Understanding the types of bows you can create with a ribbon is crucial in mastering the art of ribbon tying. The most common types include the basic bow, the looped bow, and the florist's bow. The basic bow typically consists of two loops and two loose ends, resembling the bows seen on shoelaces. The looped bow, also known as the gift bow, involves multiple loops that create a fuller appearance. Lastly, the florist's bow, a staple in gift wrapping and floral arrangements, combines several loops for a rich and intricate look.
The Steps to Tie a Basic Bow
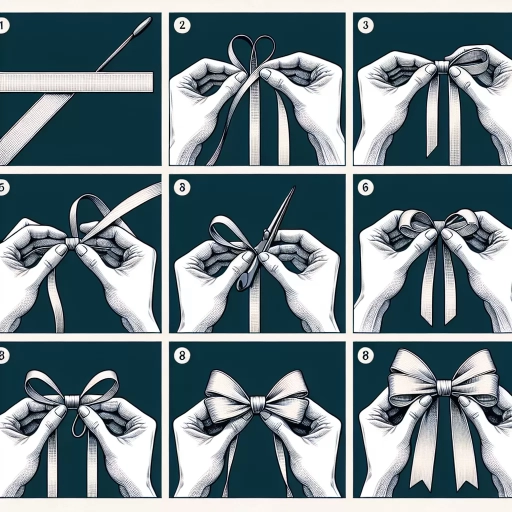
Tying a basic bow with a ribbon involves several key steps that need to be properly executed for the best result. Start by determining the length of the ribbon needed. Then, create a loop at one end of the ribbon, leaving one end longer than the other. Make a similar loop with the other end and bring the two loops together in the middle. Finally, adjust the loops and ends as necessary to create a balanced and symmetrical bow. Mastery of this basic bow will serve as the foundation for learning more complex bow-tying techniques in the future.
Advanced Techniques in Ribbon Bow Tying
Creating a Looped Bow
Looped bows are an excellent way to add a touch of elegance and sophistication to any gift or decorative item. Start by determining the required ribbon length based on the number and size of loops desired. Create a loop at one end and continue to form additional loops, keeping them equal in size. Once all the loops are created, hold them together at the center and secure with a knot or fastener. Arrange the loops as needed to create a fuller, symmetrical appearance. This method can be intricate initially, but with practice, you can efficiently tackle even larger, more elaborate looped bows.
Making a Florist's Bow
Florist's bows are a popular choice, especially in floral arrangements and gift wrapping, due to their intricate, luxe appearance. Start by creating a series of loops without cutting your ribbon. The number of loops will dictate the fullness of your bow. Once your loops are made, cut the ribbon and create a loop in the middle for holding. After this, separate each loop and twist until you've created a voluminous and symmetrical bow. Though it might seem challenging initially, it's a worthy skill to learn given its versatility and aesthetic appeal.
The Art of Bow Embellishment
Enhancing or embellishing your bow can take it up a notch, transforming it into a decorative masterpiece. You can use things like glitter, sequins, beads, lace, or small ornaments to give your bow some extra flair. Plus, pairing your ribbon with complementary or contrasting textures and colors will give your bow additional depth and interest. Remember, courage and creativity play an essential role in this process, empowering you to experiment with endless possibilities and create truly unique bows.
Troubleshoot Common Ribbon Bow Tying Problems
Ribbon Slippery Issues
One common problem that you might encounter when working with ribbons, particularly satin ones, is slippiness. This can make tying a neat bow challenging. However, there are tricks you can use to combat this issue. For instance, using a non-slip surface to hold your ribbon while tying can help you maintain better control, thereby reducing the chances of the ribbon slipping out of your hands. Also, applying a tiny quantity of hairspray or clear fabric glue can provide your ribbon with a bit of grip, making it easier to work with.
Ribbon Fraying
Frayed ends are another common issue when working with ribbons. When left unchecked, fraying can detract significantly from the overall appearance of your bow. A quick and easy method to prevent this issue is to apply clear nail polish or fray check along the cut edges of the ribbon. These treatments form a seal that prevents the ribbon fibers from unraveling, thereby preventing the frayed ends.
Creating Symmetrical Bows
Creating perfectly symmetrical bows is perhaps one of the greatest challenges faced by many when tying bows with ribbon. One effective strategy is to carefully adjust and even out the loops and ends as you tie your bow. For those preferring more precise methods, using a ruler or measuring tape to check your loop sizes can ensure evenness. With practice, you will be able to estimate these measurements by sight, but until then, these tools can be extremely helpful.