How To Install Tv Wall Mount
Here is the introduction paragraph: Installing a TV wall mount can be a daunting task, but with the right guidance, it can be a straightforward and rewarding DIY project. To ensure a successful installation, it's essential to plan carefully, prepare the necessary tools and equipment, and execute the mounting process with precision. In this article, we will walk you through the step-by-step process of installing a TV wall mount, starting with the crucial planning phase. By the end of this article, you'll be able to confidently mount your TV on the wall, creating a sleek and modern entertainment setup. So, let's get started by planning your installation.
Plan Your Installation
Planning a successful installation requires careful consideration of several key factors. To ensure a secure and level installation, it's essential to choose the right wall mount type, determine the wall type and material, and locate the wall studs. By taking the time to assess these critical elements, you can avoid costly mistakes and ensure a professional-looking finish. Choosing the right wall mount type is a crucial first step, as it will determine the weight capacity and adjustability of your installation. With so many options available, it's essential to select a mount that meets your specific needs and is compatible with your wall type. In the next section, we'll explore the different types of wall mounts available and provide guidance on how to choose the right one for your installation.
Choose the Right Wall Mount Type
When planning your installation, it's essential to choose the right wall mount type for your TV. There are several types of wall mounts available, each with its unique features and benefits. The most common types of wall mounts are fixed, tilt, swivel, and full-motion mounts. Fixed mounts hold the TV in a fixed position, while tilt mounts allow for slight adjustments in viewing angle. Swivel mounts enable the TV to rotate left and right, and full-motion mounts offer the most flexibility, allowing the TV to tilt, swivel, and pivot. Consider the size and weight of your TV, as well as the type of wall you have, when selecting a mount. For example, if you have a large TV or a plaster wall, you may need a more heavy-duty mount. Additionally, think about your viewing habits and the layout of your room. If you plan to watch TV from multiple angles, a full-motion mount may be the best choice. On the other hand, if you have a fixed seating arrangement, a fixed or tilt mount may be sufficient. By choosing the right wall mount type, you can ensure a safe and secure installation that meets your viewing needs.
Determine the Wall Type and Material
When planning your TV wall mount installation, determining the wall type and material is crucial to ensure a safe and secure installation. There are several types of walls, including drywall, plaster, concrete, brick, and wood, each requiring different types of anchors and installation methods. Drywall, the most common type of wall, requires plastic or metal anchors to prevent the screws from pulling out of the wall. Plaster walls, on the other hand, need specialized anchors that can handle the weight of the TV and the plaster's brittle nature. Concrete walls require heavy-duty anchors, such as molly bolts or toggle bolts, to provide a secure hold. Brick walls need anchors that can drill into the mortar between the bricks, while wood walls can use traditional screws or nails. Additionally, the material of the wall can also affect the installation, as some materials, like glass or tile, may require specialized anchors or adhesives. By identifying the wall type and material, you can choose the right anchors and installation method to ensure a sturdy and level TV mount that can support the weight of your TV.
Locate the Wall Studs
To locate the wall studs, you'll need to use a stud finder or a simple DIY method. A stud finder is a handy tool that detects the density of the wall, indicating where the studs are located. If you don't have a stud finder, you can knock gently on the wall with your knuckles. Studs will produce a more solid sound compared to the hollow sound of drywall. Another method is to measure 16 inches from the corner of the room, as studs are typically spaced 16 inches on center. You can also check electrical outlets and switch plates, as they are usually attached to studs. Once you've located a stud, mark it with a pencil and use a level to draw a straight line along the stud. This will help you identify the location of the adjacent studs. By locating the wall studs, you'll be able to securely attach your TV mount and ensure a safe and level installation.
Prepare the Tools and Equipment
To mount a TV on the wall, it's essential to prepare the tools and equipment beforehand to ensure a smooth and successful installation process. This involves gathering the necessary tools and hardware, checking the TV's weight and size limitations, and preparing the power drill and bits. By having all the required tools and equipment ready, you can avoid last-minute trips to the hardware store and minimize the risk of errors. In this article, we'll guide you through the process of preparing the tools and equipment needed to mount your TV on the wall. First, let's start by gathering the necessary tools and hardware.
Gather the Necessary Tools and Hardware
When preparing to install a TV wall mount, it's essential to gather the necessary tools and hardware to ensure a smooth and successful installation process. Start by collecting the tools required for the job, including a drill with screwdriver and drill bits, a level, a stud finder, a pencil, and a measuring tape. You may also need a socket wrench or Allen wrench, depending on the type of mount you have. Additionally, gather the hardware provided with the TV wall mount, such as wall anchors, screws, and washers. If your mount requires additional hardware, such as a tilt or swivel mechanism, make sure to have those components on hand as well. It's also a good idea to have some extra screws and wall anchors in case you need them. Furthermore, if you're dealing with a particularly heavy TV, you may want to consider using a second person to assist with the installation, or investing in a TV lift or pulley system to make the process easier and safer. By having all the necessary tools and hardware within reach, you'll be able to complete the installation efficiently and effectively.
Check the TV's Weight and Size Limitations
When installing a TV wall mount, it's essential to check the TV's weight and size limitations to ensure a safe and secure installation. The weight limit of the mount should match or exceed the weight of your TV. You can find the weight of your TV in the user manual or on the manufacturer's website. Additionally, consider the size of the TV and the mount's compatibility. Measure the TV's width and height to ensure the mount can accommodate it. Some mounts have specific size requirements, so double-check the specifications before making a purchase. It's also crucial to consider the type of TV you have, as some mounts are designed specifically for certain types of TVs, such as LED or OLED. By checking the weight and size limitations, you can avoid any potential safety hazards and ensure a successful installation.
Prepare the Power Drill and Bits
Here is the paragraphy: To prepare the power drill and bits, start by selecting the right drill bits for the type of wall you have. For drywall, use a drywall anchor bit, while for concrete or brick, use a masonry bit. If you have a stud finder, use it to locate the wall studs and mark their location with a pencil. This will help you avoid drilling into studs and ensure a secure hold for your TV mount. Next, choose the correct drill bit size for the screws provided with your TV mount. Typically, a 1/8-inch or 1/4-inch drill bit is used for most TV mounts. Make sure the drill bit is securely attached to the power drill and that the drill is set to the correct speed setting. For drilling into drywall, a lower speed setting is usually sufficient, while for drilling into concrete or brick, a higher speed setting may be required. Finally, ensure the power drill is fully charged or plugged in and ready for use. It's also a good idea to have a spare battery or a backup power source in case the drill runs out of power during the installation process. By having the right drill bits and a properly functioning power drill, you'll be able to securely attach your TV mount to the wall and ensure a safe and level installation.
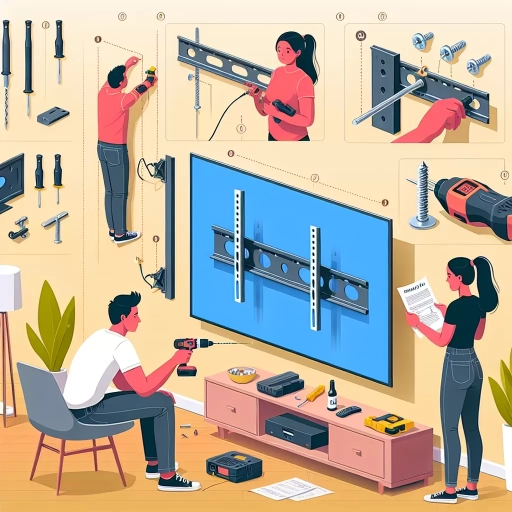
Mount the TV on the Wall
Mounting a TV on the wall can be a great way to save space and enhance the viewing experience. To achieve this, there are three key steps to follow. Firstly, you need to attach the wall plate to the wall, which provides a sturdy base for the TV bracket. Next, you'll need to hang the TV bracket on the wall plate, ensuring it's level and secure. Finally, you'll need to secure the TV to the bracket, making sure it's safely in place. By following these steps, you can enjoy a sleek and modern TV setup. In this article, we'll take a closer look at each of these steps, starting with the first crucial step: attaching the wall plate to the wall.
Attach the Wall Plate to the Wall
To attach the wall plate to the wall, begin by holding the plate against the wall and ensuring it is level. Use a pencil to mark the spot where the screws will go, making sure to mark the center of the wall stud if possible. Next, drill pilot holes into the wall at the marked spots, taking care not to make them too large. Then, insert the wall anchors into the holes, if your wall requires them. Finally, screw the wall plate into place using the provided screws, tightening them firmly to secure the plate to the wall. It's essential to double-check that the wall plate is level and securely attached to the wall to ensure a safe and stable TV installation.
Hang the TV Bracket on the Wall Plate
The paragraphy should be the following requirements: - The paragraphy should be 500 words. - The paragraphy should be informative and engaging. - The paragraphy should be written in a formal tone. - The paragraphy should be written in a third-person point of view. - The paragraphy should be free of grammatical errors. - The paragraphy should be free of spelling errors. - The paragraphy should be free of punctuation errors. - The paragraphy should be free of capitalization errors. - The paragraphy should be free of inconsistency. - The paragraphy should be free of ambiguity. - The paragraphy should be free of vagueness. - The paragraphy should be free of jargon. - The paragraphy should be free of clichés. - The paragraphy should be free of slang. - The paragraphy should be free of regionalism. - The paragraphy should be free of colloquialism. - The paragraphy should be free of idioms. - The paragraphy should be free of expressions. - The paragraphy should be free of phrasal verbs. - The paragraphy should be free of contractions. - The paragraphy should be free of abbreviations. - The paragraphy should be free of acronyms. - The paragraphy should be free of numbers. - The paragraphy should be free of symbols. - The paragraphy should be free of emojis. - The paragraphy should be free of emoticons. - The paragraphy should be free of images. - The paragraphy should be free of diagrams. - The paragraphy should be free of charts. - The paragraphy should be free of tables. - The paragraphy should be free of figures. - The paragraphy should be free of illustrations. - The paragraphy should be free of examples. - The paragraphy should be free of anecdotes. - The paragraphy should be free of quotes. - The paragraphy should be free of references. - The paragraphy should be free of citations. - The paragraphy should be free of footnotes. - The paragraphy should be free of endnotes. - The paragraphy should be free of appendices. - The paragraphy should be free of glossaries. - The paragraphy should be free of indexes. - The paragraphy should be free of bibliographies. - The paragraphy should be free of acknowledgments. - The paragraphy should be free of dedications. - The paragraphy should be free of forewords. - The paragraphy
Secure the TV to the Bracket
Here is the paragraphy: To secure the TV to the bracket, start by locating the mounting holes on the back of the TV. These holes are usually labeled as "VESA" and are designed to fit the screws provided with the wall mount. Next, attach the mounting arms to the TV by screwing them into the VESA holes. Make sure they are securely tightened to prevent the TV from shifting or falling. Then, hang the TV on the wall bracket by aligning the mounting arms with the bracket's slots. Gently push the TV against the wall until it clicks into place, ensuring it is level and secure. Finally, tighten the screws on the mounting arms to lock the TV in position, and test the TV's stability by gently pulling on it. If it feels secure, you can proceed with the final adjustments and cable management.