How To Draw An Angel
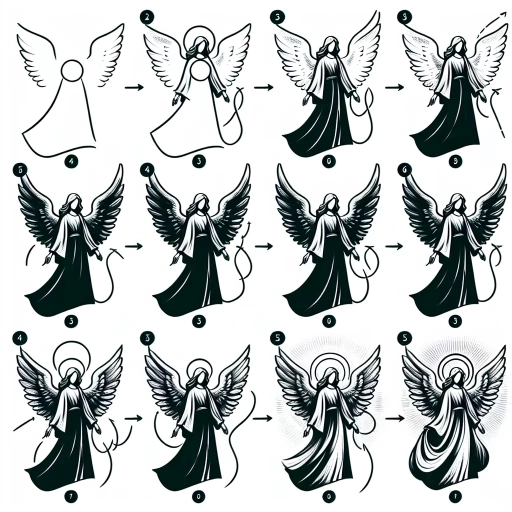
Drawing an angel can be a fun and creative activity, allowing you to express your artistic side and bring a touch of divine beauty to your artwork. To create a stunning angel drawing, it's essential to start with the basics, understanding the fundamental elements that make up this heavenly being. This includes grasping the proportions, shapes, and lines that define an angel's form. Once you have a solid foundation, you can move on to sketching the angel's body and face, paying attention to the delicate features and subtle expressions that bring your angel to life. Finally, adding details and refining your drawing will help you achieve a polished and captivating piece of art. In this article, we'll guide you through the process of drawing an angel, starting with the essential basics that will set you up for success. Understanding the Basics of Drawing an Angel is the first step in creating a breathtaking angel drawing, and it's where we'll begin our journey.
Understanding the Basics of Drawing an Angel
Drawing an angel can be a challenging yet rewarding task, requiring a combination of artistic skill and attention to detail. To create a beautiful and realistic angel, it's essential to understand the basics of drawing this heavenly being. One of the key aspects to consider is proportion and measurement, as angels are often depicted with slender bodies and delicate features. Additionally, facial features and expressions play a crucial role in conveying the angel's emotions and personality. Finally, the wings and feathers of an angel are a defining characteristic, requiring careful attention to shape, texture, and movement. By mastering these fundamental elements, artists can bring their angelic creations to life. In this article, we will delve into the basics of drawing an angel, starting with the importance of proportion and measurement.
Proportion and Measurement
Proportion and measurement are crucial elements in drawing an angel, as they help create a believable and aesthetically pleasing representation of the subject. To achieve accurate proportions, it's essential to understand the relationship between the different parts of the angel's body. A general rule of thumb is to divide the body into sections, with the head being one-eighth of the total height, the torso being three-eighths, and the legs being four-eighths. The arms should be in proportion to the body, with the upper arm being roughly the same length as the forearm. When it comes to measurement, it's vital to pay attention to the size and placement of the angel's features, such as the eyes, nose, and mouth. The eyes should be about one-quarter of the way down from the top of the head, while the nose should be roughly halfway between the eyes and the chin. The mouth should be slightly below the nose, and the chin should be in line with the bottom of the nose. By carefully measuring and proportioning the different parts of the angel's body, you can create a drawing that is both realistic and visually appealing. Additionally, paying attention to the proportions and measurements of the angel's wings, halo, and other accessories can help to create a sense of balance and harmony in the overall composition. By taking the time to carefully plan and measure your drawing, you can create a beautiful and captivating representation of an angel that will inspire and delight.
Facial Features and Expressions
Facial features and expressions are crucial in drawing an angel, as they convey emotions and personality. The face is the focal point of any portrait, and angels are no exception. To draw an angel's face, start by sketching the overall shape, which is typically heart-shaped or oval. The eyes are the windows to the soul, and angels' eyes are often depicted as large, almond-shaped, and upward-tilting, giving them an otherworldly appearance. The eyebrows are usually thin and arched, adding to the angel's gentle and serene expression. The nose is small and slightly upturned, while the mouth is a subtle, enigmatic smile that suggests kindness and compassion. To capture the essence of an angel's expression, focus on conveying a sense of peace, calmness, and inner light. A gentle, soft gaze and a subtle, knowing smile can go a long way in creating an angelic countenance. When drawing an angel's face, remember to keep the features delicate and refined, avoiding harsh lines or sharp angles. By mastering the subtleties of facial features and expressions, you can create an angel that radiates love, wisdom, and divine beauty.
Wings and Feathers
Wings and feathers are two of the most distinctive and iconic features of an angel's appearance. When drawing an angel, it's essential to understand the structure and anatomy of wings and feathers to create a realistic and visually appealing representation. Wings are typically depicted as long, curved, and symmetrical, with a slight arch at the top and a rounded tip. They are usually attached to the angel's back, with the joint located at the shoulder blade. Feathers, on the other hand, are the individual components that make up the wing, and they come in a variety of shapes, sizes, and textures. There are several types of feathers, including flight feathers, which are long and stiff, and down feathers, which are soft and fluffy. When drawing feathers, it's crucial to capture their texture and movement, as they can add a sense of dynamism and energy to the angel's wings. To achieve this, artists can use a range of techniques, such as hatching, cross-hatching, and stippling, to create a sense of depth and dimensionality. By understanding the basics of wings and feathers, artists can create a more realistic and captivating representation of an angel, and bring their drawing to life.
Sketching the Angel's Body and Face
Sketching the angel's body and face requires a combination of technical skill and artistic expression. To create a beautiful and realistic depiction of an angel, it's essential to break down the process into manageable steps. First, you'll need to sketch the overall form and pose of the angel, considering the proportions and movement of the body. Next, you'll define the facial features and details, capturing the subtleties of expression and emotion. Finally, you'll add hair and accessories, completing the angel's appearance and adding a touch of elegance. By following these steps, you'll be able to create a stunning and captivating sketch of an angel. In this article, we'll explore each of these steps in detail, starting with the foundation of the sketch: the overall form and pose.
Sketching the Overall Form and Pose
Sketching the overall form and pose of an angel is a crucial step in capturing its ethereal beauty. To begin, start by sketching the overall shape of the angel's body, using simple shapes such as circles, ovals, and rectangles to help you get the proportions right. Pay attention to the pose of the angel, considering the way the body is positioned and the flow of the lines. For a traditional angel pose, the body is often depicted in a gentle, S-curve, with the shoulders relaxed and the hips slightly tilted. The arms are often extended, with the hands holding a symbol of the angel's purpose, such as a harp or a sword. The legs are typically depicted in a relaxed position, with the weight evenly distributed between both feet. As you sketch the overall form and pose, remember to keep your lines soft and gentle, using a range of values to suggest the volume and texture of the angel's body. Consider the way the light falls on the body, using highlights and shadows to create a sense of depth and dimension. By taking the time to carefully sketch the overall form and pose of the angel, you'll be able to capture its essence and create a beautiful, otherworldly drawing.
Defining Facial Features and Details
When sketching an angel's face, it's essential to define the facial features and details that will bring your drawing to life. Start by drawing the overall shape of the face, including the forehead, nose, mouth, and jawline. The forehead should be slightly curved, with the nose being straight and proportional to the rest of the face. The mouth should be a gentle, enigmatic smile, with the lips being full and inviting. The jawline should be smooth and rounded, with a subtle definition that suggests a strong yet delicate bone structure. Next, add the eyes, which are the windows to the soul. Angels are often depicted with large, almond-shaped eyes that are full of kindness and compassion. The eyes should be tilted slightly upwards, giving the impression of a gentle, otherworldly gaze. The eyebrows should be thin and arched, adding a touch of elegance and sophistication to the face. Finally, add the hair, which can be depicted in a variety of styles, from flowing locks to a neat, chin-length bob. The hair should be soft and flowing, with a subtle texture that suggests a sense of movement and energy. By defining these facial features and details, you can create a beautiful and captivating angel that seems to come alive on the page.
Adding Hair and Accessories
Adding hair and accessories to your angel drawing can elevate the overall appearance and add a touch of elegance. To start, consider the style and length of the hair. You can opt for a flowing, curly mane or a sleek, straight look. Use gentle, flowing lines to suggest the movement and texture of the hair. For a more intricate look, you can add individual strands or layers, using a range of values to create depth and dimension. When it comes to accessories, consider adding a halo, which can be depicted as a simple circle or an elaborate, ornate design. You can also add a crown, tiara, or other headpiece, using a range of shapes and lines to create a sense of luxury and sophistication. Additionally, consider adding jewelry, such as a necklace or earrings, to add a touch of sparkle and shine. To complete the look, you can also add a flowing cloak or robe, using gentle, curved lines to suggest the movement and flow of the fabric. By adding these details, you can create a beautiful, ethereal angel that captures the imagination and inspires the spirit.
Adding Details and Refining the Drawing
Adding details and refining a drawing is a crucial step in the creative process. It's where the artist gets to bring their vision to life and add depth, dimension, and emotion to their work. To achieve this, artists employ various techniques, including shading and lighting, texture and patterns, and refining lines and final touches. By mastering these techniques, artists can create a more engaging and realistic drawing that captures the viewer's attention. In this article, we'll explore these techniques in more detail, starting with the importance of shading and lighting in creating a believable and immersive atmosphere. By understanding how to manipulate light and shadow, artists can add volume, depth, and mood to their drawing, setting the stage for the next steps in the refining process. Note: The answer should be 200 words.
Shading and Lighting Techniques
Shading and lighting techniques are essential components of drawing an angel, as they help to create depth, dimension, and a sense of realism. To achieve a soft, ethereal glow, artists can use gentle hatching and cross-hatching techniques, applying varying degrees of pressure to create subtle gradations of tone. For a more dramatic effect, chiaroscuro can be employed, using strong contrasts between light and dark to create a sense of volume and three-dimensionality. Stippling, a technique that involves creating images using small dots, can also be used to create intricate, detailed textures and patterns, adding depth and visual interest to the drawing. When it comes to lighting, artists can use a range of techniques to create a sense of luminosity, from subtle, soft glows to bold, dramatic highlights. By carefully balancing light and dark, artists can create a sense of atmosphere and mood, drawing the viewer's eye through the composition and creating a sense of movement and energy. By mastering shading and lighting techniques, artists can add depth, dimension, and emotion to their drawings, bringing their angelic subjects to life in a way that is both captivating and believable.
Adding Texture and Patterns
Adding texture and patterns to your angel drawing can elevate it from a simple outline to a rich and visually appealing artwork. To add texture, you can use a range of techniques such as hatching, cross-hatching, and stippling. Hatching involves creating parallel lines that follow the contours of the angel's body, while cross-hatching involves layering lines at different angles to create depth and dimension. Stippling, on the other hand, involves creating patterns with small dots to create texture and shading. You can also use different tools such as pencils, charcoal, or pastels to create varying textures and effects. When it comes to patterns, you can add intricate details such as feathers, flowers, or clouds to your angel's wings, hair, or clothing. You can also experiment with different patterns such as stripes, polka dots, or chevrons to add visual interest to your drawing. To incorporate patterns, you can use a range of techniques such as drawing freehand, using stencils, or tracing patterns from reference images. Remember to balance your use of texture and patterns with the overall composition of your drawing, ensuring that they enhance rather than overwhelm the angel's form. By adding texture and patterns, you can create a unique and captivating angel drawing that showcases your artistic skills and creativity.
Refining Lines and Final Touches
Refining lines and adding final touches is a crucial step in drawing an angel, as it allows you to perfect the overall appearance and create a more polished piece of art. To refine your lines, start by carefully examining your drawing and identifying any areas where the lines may be wobbly, uneven, or inconsistent. Use a fine-tip pen or a sharp pencil to gently correct these areas, paying close attention to the overall flow and movement of the lines. As you refine your lines, also pay attention to the proportions and measurements of your angel's features, ensuring that they are accurate and in harmony with one another. Once you have refined your lines, you can begin adding final touches, such as subtle shading, delicate textures, and intricate details. Use a range of techniques, including hatching, cross-hatching, and stippling, to create depth, dimension, and visual interest. You can also add subtle highlights and lowlights to enhance the overall sense of volume and form. Finally, take a step back and evaluate your drawing as a whole, making any necessary adjustments to the composition, balance, and overall aesthetic appeal. By refining your lines and adding final touches, you can transform your angel drawing into a stunning work of art that showcases your skill and creativity.