How To Make Whipped Butter
Imagine spreading a cloud-like, creamy butter on your warm toast or freshly baked muffin. That's the magic of whipped butter – a delightful culinary creation that elevates your dining experience. In this comprehensive guide, we'll explore the art of making whipped butter at home, transforming ordinary butter into a luxurious spread that's both light and flavorful. We'll begin by diving into the basics of whipped butter, understanding its composition and the science behind its airy texture. Then, we'll walk you through a detailed step-by-step process to create the perfect whipped butter, ensuring you achieve that ideal consistency every time. Lastly, we'll share expert tips and tricks for storing and serving your homemade whipped butter, allowing you to enjoy its creamy goodness for longer periods and impress your guests with beautiful presentations. Whether you're a culinary enthusiast or simply looking to add a touch of elegance to your breakfast table, mastering the art of whipped butter is a skill worth acquiring. So, let's start by understanding the basics of whipped butter and what makes it so special.
Understanding the Basics of Whipped Butter
Whipped butter has become increasingly popular in kitchens around the world, offering a creamy, spreadable alternative to traditional solid butter. This light and airy confection has captured the hearts of food enthusiasts and home cooks alike, thanks to its versatility and luxurious texture. In this comprehensive guide, we'll delve into the world of whipped butter, exploring its unique characteristics and the myriad ways it can elevate your culinary creations. We'll begin by examining what whipped butter is and the benefits it offers over regular butter, from its enhanced spreadability to its potential for reducing overall fat consumption. Next, we'll discuss the importance of choosing the right butter for whipping, as the quality and type of butter used can significantly impact the final product. Additionally, we'll explore the essential equipment needed for making whipped butter at home, empowering you to create this delightful spread in your own kitchen. By the end of this article, you'll have a thorough understanding of the basics of whipped butter, allowing you to confidently incorporate this delectable ingredient into your cooking and baking repertoire.
What is whipped butter and its benefits
Whipped butter is a delightful variation of traditional butter that has been aerated to create a lighter, fluffier texture. This process involves incorporating air into softened butter, resulting in a spreadable consistency that's both creamy and luxurious. The transformation occurs when butter is whipped at high speeds, causing tiny air bubbles to become trapped within its structure. This not only changes the texture but also alters the appearance, giving whipped butter a pale, almost cloud-like appearance compared to its solid counterpart. One of the primary benefits of whipped butter is its enhanced spreadability. Unlike regular butter that can be challenging to spread when cold, whipped butter remains soft and pliable even when refrigerated. This makes it ideal for effortlessly spreading on toast, bagels, or other baked goods without tearing delicate bread. The increased volume of whipped butter also means that a smaller amount can cover a larger surface area, potentially leading to reduced calorie intake for those watching their fat consumption. Whipped butter offers a unique mouthfeel that many find appealing. Its light and airy texture creates a luxurious sensation on the palate, melting quickly and distributing flavor more evenly across the taste buds. This can enhance the overall eating experience, making it a favorite among culinary enthusiasts and home cooks alike. Additionally, the increased surface area of whipped butter allows it to blend more easily with other ingredients in recipes, making it an excellent choice for baking or creating compound butters. From a nutritional standpoint, whipped butter contains the same beneficial components as regular butter, including fat-soluble vitamins like A, D, E, and K. However, due to its increased volume, whipped butter may contain slightly fewer calories per tablespoon compared to solid butter. This can be advantageous for those looking to reduce their calorie intake while still enjoying the rich flavor of butter. Another benefit of whipped butter is its versatility in the kitchen. Its soft texture makes it ideal for incorporating into frostings, creams, and other desserts where a smooth consistency is desired. It can also be easily flavored with herbs, spices, or honey to create custom compound butters for enhancing meats, vegetables, or bread. The light nature of whipped butter also makes it an excellent choice for finishing sauces or melting over hot dishes, as it incorporates smoothly without leaving a greasy residue. In conclusion, whipped butter offers a range of benefits that make it a valuable addition to any kitchen. Its improved spreadability, unique texture, and culinary versatility make it an attractive option for both everyday use and special occasions. Whether you're looking to elevate your breakfast routine or experiment with new recipes, understanding the basics of whipped butter opens up a world of delicious possibilities.
Choosing the right butter for whipping
Choosing the right butter for whipping is a crucial step in creating the perfect whipped butter. While it may seem like a simple task, selecting the appropriate butter can significantly impact the texture, flavor, and overall quality of your whipped creation. The ideal butter for whipping should have a high fat content, typically around 82% or higher. This higher fat content allows for better aeration and a smoother, creamier consistency in the final product. When shopping for butter, look for varieties labeled as "European-style" or "cultured" butter. These types of butter often have a higher butterfat content and a richer flavor profile, making them excellent choices for whipping. European-style butter is made with cultured cream, which gives it a slightly tangy taste and a softer texture, perfect for achieving a light and fluffy whipped butter. It's essential to consider the butter's temperature before whipping. Cold butter is more challenging to whip and may result in a grainy texture, while overly soft butter can lead to a greasy consistency. For optimal results, allow the butter to soften at room temperature for about 30 minutes before whipping. This will ensure that it's pliable enough to incorporate air easily but still firm enough to hold its shape. Unsalted butter is generally preferred for whipping, as it allows you to control the salt content in your final product. However, if you prefer a saltier taste, you can use salted butter or add salt to taste during the whipping process. Keep in mind that the salt content can affect the butter's moisture level, potentially impacting the whipping process. The quality of the butter also plays a significant role in the outcome of your whipped butter. Opt for fresh, high-quality butter from reputable brands or local dairies. Fresh butter will have a cleaner taste and better whipping properties compared to older or lower-quality alternatives. For those looking to experiment with flavors, consider using cultured or grass-fed butter. These varieties often have more complex flavor profiles, adding depth and richness to your whipped butter. Grass-fed butter, in particular, is known for its higher content of beneficial nutrients like omega-3 fatty acids and vitamins. Lastly, if you're aiming for a healthier option, you can explore plant-based alternatives like vegan butter or coconut oil. While these may not whip up exactly like traditional dairy butter, they can still produce a delicious spread with the right techniques and additives. By carefully selecting the right butter for whipping, you'll be well on your way to creating a luxurious, creamy whipped butter that will elevate any dish or baked good it accompanies. Remember that experimentation is key, and don't be afraid to try different butter varieties to find the perfect match for your taste preferences and culinary needs.
Essential equipment for making whipped butter at home
Creating delicious whipped butter at home is a surprisingly simple process, but having the right equipment on hand can make all the difference in achieving that perfect, fluffy texture. While you don't need an extensive array of specialized tools, a few key items will ensure your homemade whipped butter is a success every time. First and foremost, a stand mixer or electric hand mixer is essential for achieving the light, airy consistency that defines whipped butter. While it's technically possible to whip butter by hand, using an electric mixer will save you considerable time and effort, and produce more consistent results. A stand mixer is ideal, as it allows for hands-free operation and can handle larger quantities, but a good-quality hand mixer will also do the job admirably. Next, you'll need a suitable mixing bowl. If using a stand mixer, the bowl that comes with it will suffice. For hand mixers, opt for a large, deep bowl made of stainless steel or glass. The depth is crucial to prevent butter from splattering as you whip it, while the material helps maintain a consistent temperature during the whipping process. Temperature control is vital when working with butter, so a reliable kitchen thermometer is another must-have. Digital instant-read thermometers are particularly useful for quickly checking the butter's temperature, ensuring it's at the optimal level for whipping (around 65°F or 18°C). A silicone spatula is indispensable for scraping down the sides of the bowl during the whipping process, ensuring all the butter is incorporated evenly. Choose a heat-resistant spatula that's sturdy enough to handle the thickness of the butter. For those who want to add flavors to their whipped butter, a set of measuring spoons and cups is essential for accurately portioning out ingredients like honey, herbs, or spices. A fine-mesh strainer can also be useful for sifting powdered ingredients to prevent clumping. If you plan to make larger batches or store your whipped butter for later use, invest in airtight storage containers. Glass jars or BPA-free plastic containers with tight-fitting lids will keep your butter fresh and prevent it from absorbing odors from the refrigerator. Lastly, while not strictly necessary, a butter mold or butter dish can add a touch of elegance to your finished product. Silicone molds come in various shapes and sizes, allowing you to create beautiful, portion-sized pats of whipped butter for serving. By ensuring you have these key pieces of equipment on hand, you'll be well-prepared to create smooth, creamy whipped butter that rivals any store-bought variety. With practice and experimentation, you'll soon be crafting artisanal whipped butter that elevates every slice of bread, pat of pancakes, or ear of corn it graces.
Step-by-Step Guide to Creating Perfect Whipped Butter
Whipped butter is a delightful culinary creation that elevates the simple pleasure of butter to new heights. This versatile spread not only enhances the taste and texture of your favorite dishes but also adds a touch of elegance to any dining experience. In this comprehensive guide, we'll explore the art of creating perfect whipped butter, delving into the essential techniques and tips that will transform your butter into a light, airy, and irresistible treat. We'll begin by examining the crucial first step: preparing the butter through proper softening and cutting techniques. Next, we'll uncover the secrets of the whipping process, focusing on the optimal timing, speed, and texture to achieve that perfect consistency. For those looking to add a personal touch, we'll also explore various flavors and ingredients that can be incorporated to create unique and tantalizing whipped butter variations. By mastering these three key aspects, you'll be well on your way to becoming a whipped butter connoisseur. But before we dive into the step-by-step process, let's take a moment to understand the basics of whipped butter and why it has become a beloved staple in kitchens around the world.
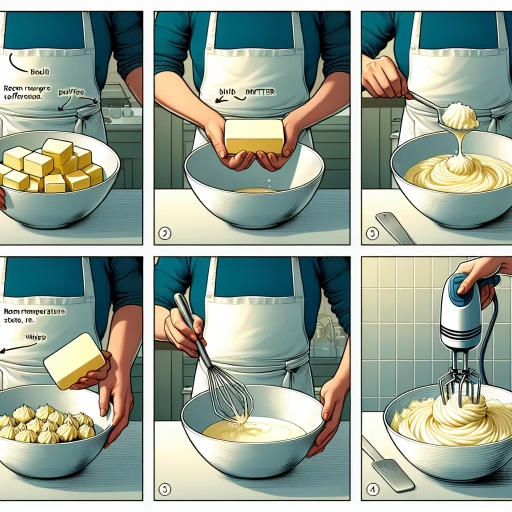
Preparing the butter: Softening and cutting techniques
Preparing the butter properly is a crucial step in creating the perfect whipped butter. The softening and cutting techniques you employ can significantly impact the final texture and consistency of your whipped butter. To begin, it's essential to start with high-quality unsalted butter, as this allows you to control the salt content and overall flavor of your final product. The first step in preparing your butter is softening it to the right temperature. Ideally, you want your butter to be at room temperature, which is around 65-68°F (18-20°C). This temperature ensures that the butter is pliable enough to whip easily but not so soft that it becomes greasy or melts. To achieve this, remove the butter from the refrigerator about 30-45 minutes before you plan to start whipping. If you're short on time, you can cut the butter into smaller pieces to speed up the softening process, but avoid using a microwave as this can lead to uneven softening and potential melting. Once your butter has reached the right temperature, it's time to cut it into manageable pieces. This step is crucial for ensuring even whipping and a smooth final texture. Start by unwrapping the butter and placing it on a clean cutting board. Using a sharp knife, cut the butter into roughly 1-inch cubes. This size allows for easy incorporation into your mixer and promotes even whipping throughout the process. For those who prefer a more precise method, you can use a butter cutter or a wire cheese slicer to create uniform slices. These tools can be particularly helpful when working with larger quantities of butter or if you're aiming for a very consistent texture in your whipped butter. As you cut the butter, pay attention to its consistency. It should be soft enough to leave a slight indentation when gently pressed with your finger, but not so soft that it loses its shape entirely. If you find that your butter has become too soft during the cutting process, you can place it back in the refrigerator for a few minutes to firm up slightly before proceeding with the whipping stage. By taking the time to properly soften and cut your butter, you're setting the stage for a successful whipping process. These preparatory steps ensure that your butter will whip evenly, incorporate air efficiently, and result in a light, fluffy texture that's perfect for spreading on bread, melting over vegetables, or using in various culinary applications. Remember, the care you take in these initial stages will be reflected in the quality of your final whipped butter product.
The whipping process: Timing, speed, and texture
The whipping process is a crucial step in creating perfectly whipped butter, and mastering the timing, speed, and texture is essential for achieving optimal results. When you begin whipping, start with softened butter at room temperature, as this allows for easier incorporation of air and a smoother final product. Timing is critical in the whipping process. Begin by whipping the butter at a low speed for about 30 seconds to break it down and create a smooth base. Gradually increase the speed to medium-high and continue whipping for 3-5 minutes. This duration allows enough time for air to be incorporated into the butter, creating a light and fluffy texture. However, be cautious not to overwhip, as this can lead to a greasy or separated consistency. The speed at which you whip the butter plays a significant role in achieving the desired texture. Start slow to prevent splattering and gradually increase the speed as the butter softens further. A medium-high speed is ideal for most of the whipping process, as it strikes a balance between incorporating air and maintaining control. Periodically stop the mixer to scrape down the sides of the bowl, ensuring all the butter is evenly whipped. As you whip, pay close attention to the changing texture of the butter. Initially, it will appear creamy and slightly glossy. As air is incorporated, the color will lighten, and the volume will increase. The ideal texture for whipped butter is light, airy, and easily spreadable. It should hold soft peaks when the beater is lifted, similar to whipped cream, but with a slightly denser consistency. To achieve the perfect texture, consider adding small amounts of liquid (such as milk or cream) during the whipping process. This can help create a smoother, more spreadable consistency. Add the liquid gradually, about a tablespoon at a time, to avoid over-thinning the butter. Temperature control is also crucial throughout the whipping process. If the butter becomes too warm, it may start to melt and lose its structure. If this happens, briefly refrigerate the bowl and beaters, then resume whipping. Conversely, if the butter is too cold, it won't whip properly and may remain dense or lumpy. By carefully managing the timing, speed, and texture during the whipping process, you can create perfectly whipped butter with a luxurious, cloud-like consistency that spreads effortlessly and melts beautifully on warm bread or vegetables. This attention to detail will elevate your culinary creations and impress your guests with a seemingly simple yet expertly crafted element of your dish.
Adding flavors and ingredients to enhance your whipped butter
Adding flavors and ingredients to enhance your whipped butter
Once you've mastered the art of creating perfectly whipped butter, it's time to elevate your culinary game by experimenting with various flavors and ingredients. This step allows you to personalize your whipped butter and create unique spreads that will impress your family and guests. The possibilities are nearly endless, ranging from sweet to savory and everything in between. For those with a sweet tooth, consider incorporating honey, maple syrup, or fruit preserves into your whipped butter. These additions not only introduce a delightful sweetness but also contribute to a more complex flavor profile. Cinnamon, vanilla extract, or citrus zest can add aromatic dimensions that pair wonderfully with breakfast pastries or warm slices of banana bread. For a decadent treat, try folding in small amounts of melted chocolate or cocoa powder to create a chocolate-infused spread that's perfect for croissants or as a dip for fresh strawberries. On the savory side, herbs and spices can transform your whipped butter into a gourmet accompaniment for various dishes. Fresh herbs like rosemary, thyme, or basil can be finely chopped and folded into the butter, imparting their aromatic qualities and enhancing the overall flavor. Garlic lovers can rejoice in the simplicity of creating a delicious garlic butter by adding roasted or freshly minced garlic to the mix. For those who enjoy a bit of heat, consider incorporating chili flakes, cayenne pepper, or even finely diced jalapeños for a spicy kick that pairs excellently with grilled meats or corn on the cob. Umami-rich additions like finely grated Parmesan cheese, sun-dried tomatoes, or truffle oil can create luxurious compound butters that elevate simple dishes to restaurant-quality status. These savory whipped butters are perfect for finishing steaks, melting over freshly cooked pasta, or spreading on crusty artisanal bread. When adding flavors and ingredients, it's essential to start with small amounts and taste as you go. This approach allows you to adjust the intensity of the flavors to your liking without overwhelming the butter's natural richness. Remember that some ingredients, particularly those with high water content like fresh herbs or citrus juice, should be added in moderation to maintain the butter's consistency. For optimal results, allow your flavored whipped butter to chill in the refrigerator for at least an hour before serving. This resting period allows the flavors to meld and develop, resulting in a more cohesive and flavorful spread. When storing your creation, use airtight containers or wrap tightly in plastic wrap to preserve freshness and prevent the butter from absorbing other flavors from the refrigerator. By exploring different flavor combinations and ingredients, you can transform simple whipped butter into a versatile culinary tool that enhances a wide variety of dishes. Whether you're preparing a special breakfast, hosting a dinner party, or simply looking to add a touch of elegance to your everyday meals, flavored whipped butter is sure to impress and delight your taste buds.Tips and Tricks for Storing and Serving Whipped Butter
Whipped butter has become a popular alternative to traditional stick butter, offering a lighter texture and easier spreadability. Whether you're a culinary enthusiast or simply looking to elevate your dining experience, mastering the art of storing and serving whipped butter can make a significant difference in your kitchen. This article will explore essential tips and tricks to help you make the most of this versatile ingredient. We'll delve into proper storage methods to maintain freshness and consistency, ensuring your whipped butter remains delectable for as long as possible. Additionally, we'll share creative serving ideas for various occasions, allowing you to impress your guests and add a touch of elegance to your meals. For those who enjoy making their own whipped butter, we'll address common issues and provide troubleshooting tips to help you achieve the perfect consistency every time. By the end of this article, you'll be equipped with the knowledge to store, serve, and even create whipped butter like a pro. But before we dive into these specifics, let's start by understanding the basics of whipped butter and what makes it unique.
Proper storage methods to maintain freshness and consistency
Proper storage methods are crucial for maintaining the freshness and consistency of whipped butter, ensuring that your culinary creation remains delightful from the first taste to the last. By following these guidelines, you can extend the shelf life of your whipped butter and preserve its light, airy texture. First and foremost, always store whipped butter in an airtight container to prevent it from absorbing odors from other foods in your refrigerator. Glass or ceramic containers with tight-fitting lids are ideal, as they don't retain odors and are easy to clean. If using plastic containers, opt for food-grade, BPA-free options to avoid any potential chemical transfer. Temperature control is key to maintaining the integrity of whipped butter. Store it in the main body of your refrigerator, where the temperature is most consistent, typically between 35°F and 38°F (1.7°C to 3.3°C). Avoid placing it in the door, as temperatures can fluctuate more frequently there due to opening and closing. If you prefer your whipped butter to be more spreadable, consider using a butter keeper or butter bell. These innovative devices allow you to store butter at room temperature while keeping it fresh by using water as a seal. To prevent the whipped butter from absorbing excess moisture or drying out, cover the surface with a layer of wax paper or parchment paper before sealing the container. This extra barrier helps maintain the butter's texture and prevents a hard crust from forming on top. If you've made a large batch, consider portioning it into smaller containers. This way, you can take out only what you need, reducing exposure to air and temperature changes for the remaining butter. For longer-term storage, whipped butter can be frozen for up to three months. Wrap it tightly in plastic wrap or aluminum foil, then place it in a freezer-safe container or resealable bag. When ready to use, thaw it in the refrigerator overnight. Keep in mind that freezing may slightly alter the texture, so it's best to use frozen whipped butter for cooking or baking rather than as a spread. If you've flavored your whipped butter with herbs or other perishable ingredients, be extra vigilant about storage times and temperatures. These additions can potentially reduce the shelf life, so it's best to consume flavored whipped butter within a week or two of preparation. Lastly, always use clean utensils when scooping out whipped butter to prevent introducing bacteria that could lead to spoilage. By following these storage methods, you'll ensure that your whipped butter remains fresh, flavorful, and ready to elevate any dish or bread it graces.
Creative serving ideas for different occasions
Creative serving ideas for different occasions can elevate your whipped butter presentation and make your meals more memorable. Whether you're hosting a casual brunch, an elegant dinner party, or a festive holiday gathering, there are numerous ways to showcase your homemade whipped butter that will impress your guests and add a touch of sophistication to your table. For a rustic breakfast or brunch, consider serving whipped butter in small Mason jars or vintage butter crocks. These charming containers not only keep the butter fresh but also add a cozy, farmhouse feel to your table setting. Pair the whipped butter with an assortment of freshly baked breads, muffins, and scones for a delightful morning spread. You can also create flavored butter varieties, such as honey-cinnamon or maple-pecan, to offer your guests a range of tasty options. When hosting a dinner party, presentation is key. Use butter molds to shape your whipped butter into elegant forms, such as flowers, shells, or leaves. Place these beautiful butter sculptures on chilled marble or slate serving boards for a stunning visual effect. Alternatively, pipe the whipped butter into rosettes or other decorative shapes using a pastry bag and star tip, arranging them artfully on a platter alongside warm dinner rolls or crusty baguette slices. For outdoor gatherings and picnics, consider individual servings of whipped butter in small, portable containers. Mini glass jars with tight-fitting lids or small plastic containers work well for this purpose. You can even personalize each container with guests' names or add decorative labels for a special touch. This approach not only looks charming but also ensures that the butter stays fresh and cool throughout the event. During holiday seasons, incorporate festive themes into your whipped butter presentation. For Thanksgiving, shape the butter into small pumpkins or turkeys using silicone molds. At Christmas, create butter snowflakes or stars, and dust them lightly with edible glitter for a magical effect. For Easter, mold the butter into cute bunnies or eggs, and serve them alongside hot cross buns or freshly baked brioche. For a unique and interactive experience, set up a "butter bar" at your next gathering. Offer a selection of plain whipped butter alongside various mix-ins like herbs, spices, honey, or fruit preserves. Provide small dishes and butter knives, allowing guests to create their own custom flavored butters. This not only serves as a conversation starter but also caters to individual tastes and dietary preferences. By thinking creatively about how you serve your whipped butter, you can transform a simple condiment into a memorable part of your dining experience. These innovative serving ideas not only showcase your culinary skills but also demonstrate thoughtfulness and attention to detail that your guests will appreciate.
Troubleshooting common issues when making whipped butter
When making whipped butter, you may encounter a few common issues that can affect the quality and texture of your final product. Troubleshooting these problems will help you achieve the perfect whipped butter consistency every time. One of the most frequent challenges is over-whipping, which can cause the butter to become grainy or separate. To avoid this, pay close attention to the texture as you whip and stop as soon as the butter reaches a light and fluffy consistency. If you've already over-whipped, try gently folding in a small amount of cold cream to bring it back together. Temperature plays a crucial role in the success of your whipped butter. If the butter is too cold, it may not whip properly and remain dense. Conversely, if it's too warm, it can become greasy and lose its ability to hold air. For best results, ensure your butter is at room temperature before whipping, typically around 65-70°F (18-21°C). If you're short on time, cut the butter into small cubes to help it soften more quickly, but avoid using a microwave as it can lead to uneven softening. Another common issue is the butter becoming too soft or melting during the whipping process, especially in warmer environments. To combat this, try chilling your mixing bowl and beaters in the refrigerator for about 15 minutes before use. You can also place a bowl of ice water underneath your mixing bowl to keep the butter cool as you whip. If your kitchen is particularly warm, consider working in short bursts, returning the butter to the refrigerator for a few minutes between whipping sessions to maintain the ideal temperature. Sometimes, homemade whipped butter may lack the smooth, creamy texture you desire. This can often be remedied by adding a small amount of neutral-flavored oil, such as canola or grapeseed oil, which helps to improve spreadability and mouthfeel. Start with just a teaspoon or two per stick of butter and adjust to your preference. Additionally, if you find your whipped butter lacks flavor, don't hesitate to experiment with adding herbs, spices, or even a touch of honey to enhance its taste profile. Lastly, if you're having trouble achieving the right consistency, consider the fat content of your butter. Higher fat content butter, such as European-style butter, tends to whip up better and hold its shape longer than lower fat varieties. If you're using a lower fat butter and struggling to get the desired texture, try incorporating a small amount of cream cheese or mascarpone into the mix. This will add richness and help stabilize the whipped butter, making it easier to achieve and maintain that perfect, fluffy consistency.