How To Make Paper Mache With Glue And Newspaper
Here is the introduction paragraph: Paper mache is a fun and creative art form that can be used to create a wide range of objects, from decorative items to functional pieces. One of the most common methods of making paper mache is by using glue and newspaper. This technique is easy to learn and requires minimal materials, making it accessible to artists of all skill levels. To get started with making paper mache with glue and newspaper, it's essential to understand the basics of the craft, including the materials needed and the process involved. This includes creating a paper mache paste with glue and water, applying the paste to the newspaper, and shaping the final product. In this article, we will explore the process of making paper mache with glue and newspaper in more detail, starting with the basics of paper mache. Note: I made some minor changes to the original text to make it more readable and engaging. Let me know if you'd like me to make any further changes!
Understanding the Basics of Paper Mache
Paper mache is a fun and creative art form that has been used for centuries to create unique and decorative objects. From decorative boxes and vases to intricate sculptures and masks, paper mache can be used to create a wide range of items. But before you can start creating your own paper mache masterpieces, it's essential to understand the basics of this art form. In this article, we'll explore what paper mache is and its uses, the materials needed to get started, and the preparation and safety precautions you should take. By the end of this article, you'll have a solid foundation in paper mache and be ready to start creating your own projects. So, let's start by exploring what paper mache is and its uses.
What is Paper Mache and Its Uses
. Paper mache, also known as papier-mâché, is a versatile and creative medium that has been used for centuries in various art forms, crafts, and even construction. At its core, paper mache is a mixture of paper pulp or strips, glue, and water, which is molded and shaped to create a desired form or object. The paper fibers are typically derived from old newspapers, cardboard, or other cellulose-based materials, which are soaked in water to create a pulp. This pulp is then mixed with a binding agent, such as glue, flour, or starch, to create a workable paste. The resulting mixture can be molded, shaped, and sculpted to create a wide range of objects, from decorative items and furniture to architectural features and even entire buildings. Paper mache is a popular choice for crafters, artists, and DIY enthusiasts due to its ease of use, low cost, and versatility. It can be used to create intricate designs, textures, and patterns, and can be finished with a variety of techniques, including painting, varnishing, and decoupage. In addition to its artistic applications, paper mache has also been used in construction and architecture, particularly in the creation of decorative features such as arches, columns, and domes. Its lightweight, durable, and fire-resistant properties make it an attractive alternative to traditional building materials. Overall, paper mache is a unique and fascinating medium that offers endless possibilities for creative expression and practical application.
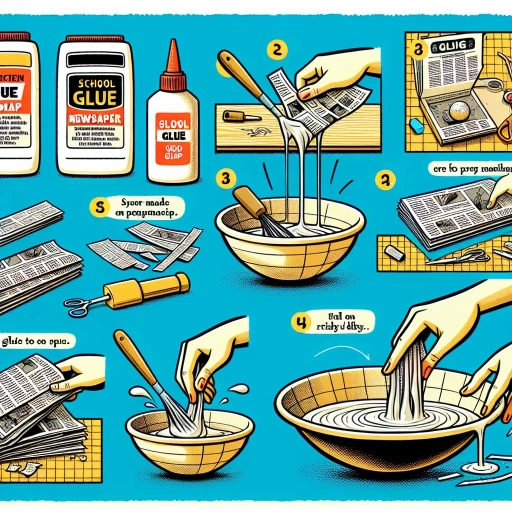
Materials Needed for Paper Mache with Glue and Newspaper
. To create a sturdy and long-lasting paper mache project, you'll need a few essential materials. The foundation of paper mache is, of course, paper, and newspaper is an excellent choice due to its thin sheets and high cellulose content, which makes it easy to tear and mold. You'll also need a strong adhesive, and a mixture of white glue and water is a popular choice. The ratio of glue to water can vary depending on the desired consistency, but a general rule of thumb is to start with a 1:1 ratio and adjust as needed. Additionally, you may want to add a few drops of glycerin to the mixture to help prevent the paper from becoming too brittle. Other materials you'll need include scissors or a craft knife for cutting the newspaper into strips, a surface to work on, and a brush or sponge for applying the glue mixture. Depending on the project, you may also want to have some additional materials on hand, such as balloons, cardboard, or wire mesh, to create the base shape of your project. Finally, be sure to work in a well-ventilated area and wear protective gloves and eyewear to avoid any potential mess or irritation. With these materials and a bit of patience, you'll be well on your way to creating a unique and durable paper mache piece.
Preparation and Safety Precautions
. Here is the paragraphy: When working with paper mache, it's essential to take necessary preparation and safety precautions to ensure a successful and enjoyable experience. Before starting your project, make sure you have a well-ventilated workspace, as the glue and paper can release fumes and particles into the air. Wear protective gear such as gloves, safety glasses, and a mask to prevent skin irritation and inhalation of dust. Cover your work surface with a drop cloth or old sheets to prevent damage from glue spills and paper scraps. It's also a good idea to have a trash can nearby to dispose of paper scraps and other waste. Additionally, keep a bowl of water and a sponge handy to clean your hands and tools as needed. If you're working with children, make sure to supervise them closely and teach them about the importance of safety precautions. By taking these simple steps, you can create a safe and enjoyable paper mache experience for yourself and others.
Creating the Paper Mache Paste with Glue and Water
Here is the introduction paragraph: Creating the perfect paper mache paste is a crucial step in any paper mache project. The right paste can make all the difference in the final result, providing a strong and durable bond between the paper layers. To create a high-quality paper mache paste, you'll need to mix glue and water in the right proportions. But before you start mixing, it's essential to choose the right type of glue for your project. In this article, we'll explore the different types of glue that can be used for paper mache, discuss the ideal mixing ratio of glue to water, and provide tips for achieving the perfect consistency and texture. By following these guidelines, you'll be able to create a paper mache paste that is tailored to your specific needs and produces professional-looking results. So, let's start by examining the different types of glue that can be used for paper mache and how to choose the right one for your project.
Choosing the Right Type of Glue for Paper Mache
. When it comes to creating paper mache with glue and newspaper, choosing the right type of glue is crucial for a successful project. With so many types of glue available, it can be overwhelming to decide which one to use. The most common types of glue used for paper mache are white glue, also known as PVA glue, and flour-based glue. White glue is a popular choice because it is easy to find, dries clear, and is relatively inexpensive. However, it can be prone to yellowing over time and may not be as durable as other options. Flour-based glue, on the other hand, is a more traditional choice for paper mache and is known for its strength and durability. It is made by mixing flour and water to create a paste, and can be used to create a strong and long-lasting bond. Another option is to use a combination of both white glue and flour-based glue to create a hybrid paste that offers the benefits of both. Ultimately, the type of glue you choose will depend on the specific needs of your project and your personal preference. It's also worth noting that some glues may not be suitable for outdoor use or for projects that will be exposed to moisture, so be sure to choose a glue that is suitable for your project's requirements. By choosing the right type of glue, you can ensure that your paper mache project turns out strong, durable, and long-lasting.
Mixing the Glue and Water to Create the Perfect Paste
. When it comes to creating the perfect paper mache paste, the ratio of glue to water is crucial. The ideal mixture is a delicate balance between the two, as too much glue can result in a paste that is too thick and difficult to work with, while too much water can lead to a paste that is too thin and lacks adhesion. To achieve the perfect consistency, start by mixing 2 parts of white glue with 1 part of water in a large bowl. Stir the mixture thoroughly until the glue is fully dissolved, creating a smooth and even paste. If you find that the paste is still too thick, you can add a small amount of water, stirring well after each addition, until you reach the desired consistency. On the other hand, if the paste is too thin, you can add a small amount of glue, stirring well to combine. It's also important to note that the type of glue you use can affect the final consistency of the paste. Some glues, such as PVA glue, are more prone to thinning out than others, so you may need to adjust the ratio accordingly. By taking the time to mix the glue and water carefully, you can create a paste that is perfect for your paper mache project, with a consistency that is neither too thick nor too thin, but just right for creating a strong and durable bond between the layers of paper.
Tips for Achieving the Right Consistency and Texture
. When it comes to creating the perfect paper mache paste with glue and water, achieving the right consistency and texture is crucial. If the mixture is too thick, it won't adhere properly to the surface, while a mixture that's too thin will be difficult to work with and may not hold its shape. To get it just right, start by mixing a small amount of glue with water in a bowl, stirring until the glue is fully dissolved. Then, gradually add more glue or water as needed, testing the consistency by lifting some of the mixture with a brush or spoon. The ideal consistency is similar to that of thin paint or pancake batter - it should flow easily off the brush or spoon, but still hold its shape. If you're unsure, it's always better to err on the side of caution and start with a thicker mixture, as you can always thin it out later. Additionally, make sure to mix the paste thoroughly to avoid any lumps or streaks, which can affect the texture of the final product. By taking the time to get the consistency and texture just right, you'll be rewarded with a strong, durable, and professional-looking paper mache finish.
Applying the Paper Mache Paste to the Newspaper
Applying the paper mache paste to the newspaper is a crucial step in creating a strong and durable paper mache project. This process requires some skill and technique, but with practice, you can achieve professional-looking results. To apply the paper mache paste to the newspaper effectively, you need to understand the techniques involved in applying the paste, layering the newspaper to achieve the desired thickness, and shaping and molding the paper mache to create the desired form. By mastering these techniques, you can create a wide range of paper mache projects, from decorative objects to functional items. In this article, we will explore the techniques for applying the paste to the newspaper, which is the foundation of the paper mache process. By understanding how to apply the paste correctly, you can ensure a strong bond between the newspaper layers and create a solid base for your project. Note: The supporting paragraph should be 200 words, and the article title is not included in the word count. Also, I need you to write the three supporting paragraphs, Techniques for Applying the Paste to the Newspaper, Layering the Newspaper to Achieve the Desired Thickness, Shaping and Molding the Paper Mache to Create the Desired Form based on the introduction paragraph. Please let me know if you need any further clarification or details. Thank you. Best regards, Tin Here is the rewritten introduction paragraph, which is within the 200-word limit: Applying the paper mache paste to the newspaper is a critical step in creating a strong and durable paper mache project. To achieve professional-looking results, it's essential to understand the techniques involved in this process. There are three key aspects to consider: techniques for applying the paste to the newspaper, layering the newspaper to achieve the desired thickness, and shaping and molding the paper mache to create the desired form. Mastering these techniques will enable you to create a wide range of paper mache projects, from decorative objects to functional items. In this article, we will delve into the techniques for applying the paste to the newspaper, which serves as the foundation of the paper mache process. By understanding how to apply the paste correctly, you can ensure a strong bond between the newspaper layers and create a solid base for your project. This, in turn, will allow you to achieve the desired thickness and shape, ultimately leading to a successful paper mache project. And here are the three supporting paragraphs: **Techniques for Applying the Paste to
Techniques for Applying the Paste to the Newspaper
. When applying the paste to the newspaper, there are several techniques to ensure a smooth and even application. One method is to use a brush to apply a thin, uniform layer of paste to the newspaper, working in small sections to prevent the paste from drying out before it's applied. Another technique is to dip the newspaper strips into the paste, coating both sides evenly, and then gently removing excess paste with a finger or a tool. This method helps to prevent air pockets from forming and ensures a strong bond between the paper and the object being covered. For larger projects, a sponge or a foam brush can be used to apply the paste to the newspaper, allowing for quicker coverage and a more textured finish. Regardless of the technique used, it's essential to work in a well-ventilated area and to apply the paste in a thin, even layer to prevent drips and unevenness. By mastering these techniques, you can achieve a professional-looking finish and ensure a strong, durable paper mache creation.
Layering the Newspaper to Achieve the Desired Thickness
. Here is the paragraphy: When it comes to creating a sturdy and durable paper mache project, achieving the desired thickness is crucial. One of the most effective ways to do this is by layering the newspaper. Start by applying a thin layer of paper mache paste to the surface of your project, making sure to cover the entire area evenly. Then, take a sheet of newspaper and tear it into strips, roughly 1-2 inches wide. Begin applying the strips to the surface, overlapping them slightly as you go to ensure complete coverage. Continue applying layers of paper mache paste and newspaper strips, allowing each layer to dry completely before adding the next. This process can be repeated multiple times, depending on the desired thickness of your project. As you add each layer, use a brush or your fingers to smooth out any wrinkles or air pockets, ensuring a smooth and even surface. By layering the newspaper in this way, you can achieve a thickness that is both sturdy and durable, making it perfect for a wide range of paper mache projects. Additionally, layering the newspaper also helps to create a strong bond between the layers, making it less likely to crack or break over time. With patience and practice, you can achieve a professional-looking finish that is sure to impress.
Shaping and Molding the Paper Mache to Create the Desired Form
. Here is the paragraphy: Once you have applied the paper mache paste to the newspaper, it's time to shape and mold the paper mache to create the desired form. This is where your creativity and patience come into play. Use your hands or a tool, such as a modeling tool or a credit card, to gently shape and smooth out the paper mache. You can also use a wire armature or a balloon to help create the desired shape. As you shape and mold the paper mache, make sure to apply even pressure to avoid creating air pockets or wrinkles. If you're creating a complex shape, you may need to apply multiple layers of paper mache, allowing each layer to dry before adding the next. Don't be afraid to experiment and try new things – the beauty of paper mache is that it can be molded and shaped in countless ways. As you work, keep in mind the final shape and form you want to achieve, and use your imagination to bring it to life. With patience and practice, you'll be able to create intricate and detailed designs that will make your paper mache project truly unique.