How To Do French Tips At Home
The introduction paragraph should be written in a friendly and approachable tone. Here is the introduction paragraph: French tips - the classic, timeless nail look that never goes out of style. But, let's be real, getting a professional French tip manicure can be pricey and time-consuming. The good news is that with a little practice and patience, you can achieve salon-quality French tips from the comfort of your own home. To get started, it's essential to understand that preparation is key. Before you can master the French tip technique and achieve a professional finish, you need to set yourself up for success. In this article, we'll take you through the steps to prepare your nails, master the French tip technique, and share some valuable tips and tricks to help you achieve a flawless finish. So, let's get started with the first step: Preparation is Key.
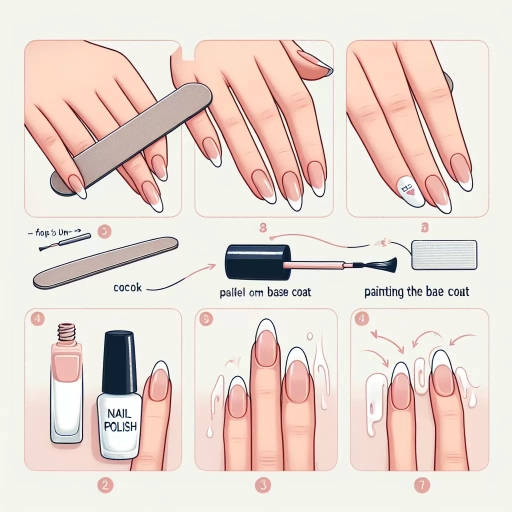
Preparation is Key
Here is the introduction paragraph: When it comes to achieving a flawless at-home manicure, many of us have been there - we excitedly pick out a new nail polish color, only to be left disappointed with a finish that's streaky, uneven, or just plain messy. But the truth is, a professional-looking manicure is within reach, and it all starts with preparation. To get the best results, it's essential to choose the right nail polish for your nail type and desired finish. Additionally, preparing your nails properly before application is crucial for a smooth, even coat. Finally, having the right tools on hand can make all the difference in achieving a salon-quality finish. By taking the time to prepare, you'll be well on your way to a beautiful, long-lasting manicure that you'll love. And that's why preparation is key.
Choose the Right Nail Polish
. Choosing the right nail polish is a crucial step in achieving a professional-looking French tip manicure at home. With so many options available, it can be overwhelming to decide on the perfect shade and finish. For a classic French tip look, you'll want to choose a polish that is opaque and has a smooth, creamy texture. Look for a polish that is labeled as "creme" or " opaque" to ensure that it will provide the desired coverage. When it comes to color, traditional French tips feature a white tip and a neutral or pink base. You can choose a pure white polish for the tip, or opt for a slightly off-white or cream shade to add some warmth to the look. For the base, choose a polish that complements your skin tone - pink or peach shades look great on cool skin tones, while neutral or beige shades suit warm skin tones. Some popular nail polish brands for French tips include OPI, Essie, and Sally Hansen, which offer a wide range of shades and finishes to suit your needs. Additionally, consider using a polish that is free of harsh chemicals, such as formaldehyde, toluene, and DBP (dibutyl phthalate), to ensure a healthier and safer manicure. By choosing the right nail polish, you'll be able to achieve a beautiful, long-lasting French tip manicure that looks like it was done by a professional.
Prepare Your Nails
. Before you start applying polish, make sure your nails are prepped and ready for a flawless French tip finish. Begin by gently pushing back your cuticles using a cuticle pusher or an orange stick, taking care not to push too hard and cause bleeding. Next, use a nail file to shape your nails to your desired shape, making sure to smooth out any ridges or imperfections. Use a buffer to gently buff the surface of your nails, removing any oils or residue that may interfere with polish adhesion. Finally, wipe your nails clean with a lint-free wipe or cotton ball soaked in nail polish remover to remove any remaining oils or residue. This will ensure a strong bond between your nail and the polish, helping your French tips to last longer. By taking the time to properly prepare your nails, you'll be rewarded with a professional-looking finish that's sure to impress. So, take a few extra minutes to get your nails ready, and you'll be on your way to creating beautiful, long-lasting French tips at home.
Gather Essential Tools
. Here is the paragraphy: To achieve salon-quality French tips at home, it's crucial to gather the essential tools and materials beforehand. Start by investing in a good quality nail polish remover, nail cleanser, and nail buffer to prepare your nails for the application process. You'll also need a base coat, a white tip guide or stickers, and a top coat to seal in your design. Choose a nail polish color of your choice, but make sure it's a high-quality, long-lasting formula. Additionally, you'll need a nail art brush for creating the curved tip shape and a dotting tool for adding any details or designs. If you're new to at-home nail art, consider investing in a nail art kit that usually includes a variety of tools and guides to help you achieve professional-looking results. Having all the necessary tools and materials within reach will make the application process much smoother and less frustrating, allowing you to focus on creating beautiful, salon-quality French tips.
Mastering the French Tip Technique
Here is the introduction paragraph: The French tip technique is a timeless and elegant nail art design that has been a staple in the beauty industry for decades. To achieve this classic look, it's essential to master the technique, which involves a combination of precision, patience, and practice. A successful French tip manicure requires a smooth base coat, a crisp white tip, and a glossy top coat. In this article, we'll break down the French tip technique into three manageable steps: applying a base coat to create a smooth canvas, painting the white tip with precision and control, and finishing with a top coat to seal and shine. By following these steps, you'll be well on your way to mastering the French tip technique and achieving salon-quality results at home. Preparation is key, so let's get started!
Apply a Base Coat
. To achieve a flawless French tip, it's essential to start with a solid foundation. Applying a base coat is the first step in this process. A good base coat helps to protect your nails from staining, promotes even polish adhesion, and prevents chipping. When selecting a base coat, look for a formula that is free of formaldehyde, toluene, and DBP (dibutyl phthalate), also known as the "toxic trio." These harsh chemicals can weaken your nails and cause damage over time. Instead, opt for a nourishing base coat that contains ingredients like keratin, calcium, or vitamins. Apply a thin layer of base coat to each nail, making sure to cover the entire surface. Allow it to dry completely before moving on to the next step. A well-applied base coat will help your French tip design last longer and look more vibrant. By taking the time to apply a high-quality base coat, you'll be setting yourself up for success and ensuring a beautiful, long-lasting finish.
Paint the White Tip
. Painting the white tip is a crucial step in achieving a flawless French tip look. To start, dip the brush into the white polish and wipe off any excess on the rim of the bottle. Hold the brush at a 45-degree angle and place the tip of the brush at the center of the nail, about 1-2 mm from the cuticle. Gently press the brush down and start painting a small, curved line, following the natural curve of the nail. Make sure to keep the brush steady and don't apply too much pressure, as this can cause the polish to pool or streak. Continue painting the white tip, moving the brush in a smooth, fluid motion, until you reach the desired shape and size. It's essential to keep the white tip symmetrical and even, so take your time and work slowly. If needed, use a nail guide or stickers to help you achieve a crisp, clean edge. Once you've completed the white tip, let it dry completely before moving on to the next step. With a little practice and patience, you'll be able to master the art of painting the perfect white tip, and your at-home French tip look will be nothing short of salon-quality.
Finish with a Top Coat
. Finish with a Top Coat. Once you've completed the French tip design, it's essential to seal it with a top coat to add shine and protect the nail polish. Apply a thin layer of clear top coat to each nail, making sure to cover the entire nail surface. This will help to prevent chipping and fading, ensuring your French tips look great for longer. Additionally, a good top coat can help to smooth out any ridges or imperfections, giving your nails a sleek and polished finish. When choosing a top coat, look for one that is specifically designed to work with nail polish and is free of harsh chemicals. Some popular top coat options include gel top coats, which provide a long-lasting and high-gloss finish, and quick-dry top coats, which can help to speed up the drying process. By finishing your French tip design with a top coat, you can add a professional touch to your at-home nail art and enjoy beautiful, long-lasting results.
Tips and Tricks for a Professional Finish
Here is the introduction paragraph: Achieving a professional finish in any project requires attention to detail, patience, and practice. Whether you're a seasoned DIY enthusiast or a beginner, there are several tips and tricks that can help you achieve a flawless finish. One of the most effective ways to ensure a professional finish is to use nail guides or stickers, which can help you achieve straight and even lines. Additionally, practice makes perfect, and taking the time to hone your skills and techniques can make all the difference. Finally, paying attention to the finishing touches, such as sanding and polishing, can elevate your project from good to great. By incorporating these tips and tricks into your workflow, you'll be well on your way to achieving a professional finish. And it all starts with preparation, so let's dive into the importance of Preparation is Key. Note: I made some minor adjustments to the original text to make it flow better and to ensure that it transitions smoothly to the "Preparation is Key" section. Let me know if you'd like me to make any further changes!
Use Nail Guides or Stickers
. Here is the paragraphy: To achieve a crisp, clean finish, consider using nail guides or stickers. These handy tools can help you create a straight edge and prevent polish from getting on your cuticles. Nail guides are small, adhesive strips that you place along the edge of your nail, creating a barrier between your nail and cuticle. They come in different shapes and sizes, so you can choose the one that best fits your nail bed. Stickers, on the other hand, are small, individual stickers that you place on the tip of your nail to create a guide for your polish. Both guides and stickers are easy to use and can be found at most beauty supply stores or online. To use them, simply apply the guide or sticker to your nail, paint your polish, and then remove the guide or sticker to reveal a crisp, clean edge. This is especially helpful when creating a French tip design, as it allows you to achieve a sharp, defined line between the white tip and the rest of your nail. By using nail guides or stickers, you can ensure a professional-looking finish that is sure to impress.
Practice Makes Perfect
. Here is the paragraphy: Practice makes perfect, and this is especially true when it comes to achieving a professional finish with French tips at home. The more you practice, the more comfortable you'll become with the technique, and the better your results will be. Start by practicing on a nail wheel or a fake nail tip to get a feel for the shape and size of the nail. This will also help you to develop the necessary skills to create a smooth, even curve. As you become more confident, you can move on to practicing on your own nails. Begin with a simple design, such as a classic French tip, and gradually experiment with more intricate designs as your skills improve. Don't be discouraged if your first attempts don't turn out perfectly - it's all part of the learning process. With time and practice, you'll be able to achieve a professional finish that rivals that of a salon. To help you improve your skills, try watching online tutorials or taking a nail art class. These resources can provide you with valuable tips and tricks, as well as help you to stay up-to-date with the latest trends and techniques. Additionally, consider investing in a nail art brush set, which will give you the precision and control you need to create intricate designs. By combining practice with the right tools and techniques, you'll be well on your way to achieving a professional finish with French tips at home.
Finishing Touches
. Here is the paragraphy: Finishing touches are the final details that can make or break the overall look of your French tips. To add a professional finish, start by applying a thin layer of top coat to seal in your design and add shine. Next, use a lint-free wipe or cotton ball to gently remove any excess polish from around your cuticles and nail bed. This will help create a clean and defined edge. For an extra touch of elegance, apply a small dot of clear polish to the center of each nail to create a subtle " anchor" that helps to secure the tip in place. Finally, finish off your look by applying a cuticle oil or cream to hydrate and nourish your nails and cuticles. By paying attention to these small details, you can take your French tips from good to great and achieve a salon-quality finish at home.