How To Clean Menstrual Cup
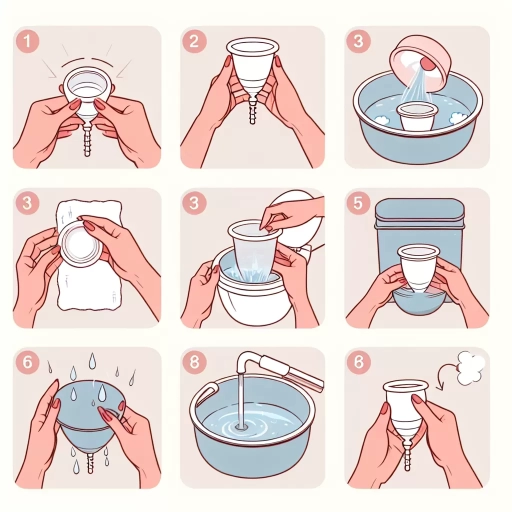
Here is the introduction paragraph: Cleaning a menstrual cup is an essential part of maintaining hygiene and preventing bacterial growth. A well-cleaned menstrual cup can last for years, making it a cost-effective and eco-friendly alternative to disposable products. To ensure your menstrual cup remains clean and safe to use, it's crucial to follow a proper cleaning routine. This involves preparing your menstrual cup for cleaning, following a step-by-step cleaning process, and sanitizing and storing it properly. In this article, we will guide you through the process of cleaning your menstrual cup, starting with the pre-cleaning preparation. Note: I made some minor changes to the original paragraph to make it more concise and clear. Let me know if you'd like me to revise anything!
Pre-Cleaning Preparation
Before you start cleaning, it's essential to prepare yourself and your environment to ensure a smooth and effective cleaning process. This preparation phase is crucial in preventing the spread of dirt, dust, and bacteria, and it also helps you to stay focused and avoid distractions. To begin with, you need to choose a clean and private space where you can clean without interruptions or distractions. Additionally, washing your hands thoroughly before cleaning is vital to prevent the transfer of dirt and bacteria to clean surfaces. Lastly, preparing mild soap and warm water is necessary to ensure that you have the right cleaning agents to tackle various cleaning tasks. By taking these simple steps, you can set yourself up for a successful cleaning experience. Now, let's start with the first step, choosing a clean and private space.
Choose a Clean and Private Space
When it comes to cleaning your menstrual cup, it's essential to choose a clean and private space to do so. This will help prevent any contamination or exposure to bacteria, ensuring your cup remains hygienic and safe to use. Look for a quiet and secluded area where you can comfortably clean your cup without distractions or interruptions. A bathroom or a designated cleaning area is ideal, as it provides a clean and private environment. Make sure the surface you're using is clean and dry, and consider laying down a towel or cloth to catch any spills or drips. Having a clean and private space will also help you feel more at ease and relaxed while cleaning your cup, which is crucial for a stress-free and effective cleaning process. By choosing a clean and private space, you'll be able to focus on thoroughly cleaning your cup, ensuring it's ready for its next use.
Wash Your Hands Thoroughly
Washing your hands thoroughly is a crucial step in pre-cleaning preparation when it comes to menstrual cups. Before handling your menstrual cup, it's essential to wash your hands with soap and warm water to prevent the transfer of bacteria and other microorganisms. This is especially important because menstrual cups are inserted into the vagina, where the risk of infection is higher. To wash your hands effectively, start by turning on the faucet to warm up the water. Then, apply a small amount of mild soap, preferably fragrance-free, to your hands. Rub your hands together to create a lather, making sure to cover all surfaces, including the backs of your hands, wrists, and between your fingers. Scrub your hands for at least 20 seconds, paying particular attention to the areas around your fingernails and the palmar surface of your hands. Rinse your hands thoroughly with warm water, making sure to remove all soap residue. Finally, dry your hands completely with a clean towel or air dryer. By washing your hands thoroughly, you can significantly reduce the risk of introducing bacteria into your menstrual cup and vagina, ensuring a safe and healthy menstrual cup experience.
Prepare Mild Soap and Warm Water
When preparing to clean your menstrual cup, it's essential to have the right cleaning agents on hand. A mild soap and warm water are the perfect combination for a gentle yet effective cleaning process. Look for a fragrance-free and oil-free soap that is specifically designed for cleaning menstrual cups or intimate areas. Avoid using harsh or abrasive soaps, as they can damage the silicone material of your cup or disrupt the natural pH balance of your vagina. Warm water is also crucial, as it helps to loosen any debris or residue that may be stuck to the cup. Fill a sink or a bowl with warm water, and add a small amount of mild soap. Mix the soap and water together to create a sudsy solution that will help to break down any tough stains or residue. This gentle cleaning solution will help to keep your menstrual cup clean and hygienic, while also being gentle on your skin and the environment. By using a mild soap and warm water, you can ensure that your menstrual cup is thoroughly cleaned and ready for use, while also maintaining the health and well-being of your vagina.
Step-by-Step Cleaning Process
Cleaning a menstrual cup is a crucial step in maintaining hygiene and preventing bacterial growth. To ensure a thorough cleaning, it's essential to follow a step-by-step process. The process begins with rinsing the menstrual cup with cold water, followed by applying mild soap and massaging the cup to remove any residue. After that, the cup should be rinsed thoroughly with warm water to remove any soap residue. By following these steps, individuals can ensure their menstrual cup is clean and ready for use. In this article, we will break down the step-by-step cleaning process, starting with the first step: rinsing the menstrual cup with cold water.
Rinse the Menstrual Cup with Cold Water
Rinse the menstrual cup with cold water to remove any visible debris or blood clots. This initial rinse helps prevent any stubborn stains from setting in and makes the cleaning process more effective. Cold water is recommended as hot water can cause the silicone material to degrade over time, reducing the lifespan of the cup. Additionally, cold water helps to close the pores of the silicone, making it more difficult for bacteria to penetrate and multiply. By rinsing the cup with cold water, you can ensure a clean and hygienic start to the cleaning process, setting the stage for a thorough and effective sanitization.
Apply Mild Soap and Massage the Cup
Apply mild soap and massage the cup to remove any remaining residue or stains. Use a fragrance-free and gentle soap that is specifically designed for cleaning menstrual cups. Avoid using harsh chemicals, abrasive cleaners, or scented soaps, as they can damage the cup's material or cause irritation. Gently massage the soap into the cup, making sure to cover all surfaces, including the stem and any ridges or crevices. Be thorough, but gentle, as rough scrubbing can scratch the cup. Rinse the cup thoroughly with warm water to remove all soap residue. This step is crucial in ensuring the cup is clean and hygienic for its next use. By massaging the soap into the cup, you are able to remove any remaining bacteria, blood, or other debris that may have accumulated during use. This helps to prevent the growth of bacteria and odor-causing microorganisms, keeping your menstrual cup fresh and clean. Additionally, using a mild soap and gentle massaging action helps to maintain the cup's texture and prevent any damage to the material.
Rinse the Cup Thoroughly with Warm Water
Rinse the cup thoroughly with warm water to remove any remaining debris or residue. This step is crucial in ensuring the cup is clean and hygienic for reuse. Warm water helps to loosen and flush out any stubborn particles, while also making the cup more comfortable to handle. Be sure to rinse the cup under running water for at least 30 seconds to ensure all areas are thoroughly cleaned. You can also use a soft-bristled toothbrush to gently scrub away any stubborn stains or residue, paying particular attention to the rim and stem areas. After rinsing, shake the cup vigorously to remove any excess water, and then proceed to the next step in the cleaning process. By rinsing the cup thoroughly with warm water, you can help prevent bacterial growth and keep your menstrual cup in good condition.
Sanitizing and Storing the Menstrual Cup
Sanitizing and storing a menstrual cup is a crucial step in maintaining hygiene and extending the life of the product. To ensure the cup remains clean and free of bacteria, it's essential to follow a proper sanitizing and storage routine. This can be achieved by soaking the cup in boiling water for 5-7 minutes, using a menstrual cup sanitizer or vinegar solution, or storing the cup in a breathable bag or case. By incorporating these methods into your routine, you can enjoy a safe and healthy menstrual cup experience. Soaking the cup in boiling water is an effective way to kill bacteria and sanitize the surface, making it an excellent first step in the process. Soak the Cup in Boiling Water for 5-7 Minutes.
Soak the Cup in Boiling Water for 5-7 Minutes
Sanitizing and storing your menstrual cup properly is crucial to prevent bacterial growth and maintain hygiene. To sanitize your menstrual cup, start by soaking it in boiling water for 5-7 minutes. This step is essential in killing any bacteria, viruses, or other microorganisms that may have accumulated on the cup during use. Fill a pot with enough water to cover the cup, and bring it to a rolling boil. Once boiling, carefully place the cup into the water, making sure it's fully submerged. Let it soak for 5-7 minutes, then remove it with a clean pair of tongs or a slotted spoon. Be cautious when handling the hot cup, as it may cause burns. After sanitizing, rinse the cup with cold water to stop the cooking process and remove any remaining bacteria. This step ensures your menstrual cup is clean and ready for storage. By following this simple yet effective method, you can rest assured that your menstrual cup is sanitized and safe to use for your next period.
Use a Menstrual Cup Sanitizer or Vinegar Solution
When it comes to sanitizing your menstrual cup, you have two effective options: a menstrual cup sanitizer or a vinegar solution. A menstrual cup sanitizer is a specialized product designed specifically for sanitizing menstrual cups. These sanitizers usually come in the form of tablets or sprays and are easy to use. Simply follow the instructions on the packaging, and your menstrual cup will be sanitized and ready for use. On the other hand, a vinegar solution is a more natural and cost-effective alternative. To make a vinegar solution, mix equal parts water and white vinegar in a bowl. Submerge your menstrual cup in the solution and let it soak for 5-10 minutes. The acid in the vinegar will help break down any bacteria and residue, leaving your menstrual cup clean and sanitized. After soaking, rinse your menstrual cup thoroughly with warm water and let it air dry. Both methods are effective in killing bacteria and other microorganisms that can accumulate on your menstrual cup, ensuring it remains hygienic and safe to use.
Store the Cup in a Breathable Bag or Case
When it comes to storing your menstrual cup, it's essential to keep it in a breathable bag or case to maintain its hygiene and longevity. A breathable bag or case allows for airflow, which helps to prevent the growth of bacteria and odor-causing microorganisms. You can store your menstrual cup in a cotton pouch, mesh bag, or a ventilated case specifically designed for menstrual cups. Avoid storing your menstrual cup in airtight containers or plastic bags, as they can create a humid environment that fosters bacterial growth. Additionally, make sure to store your menstrual cup in a clean and dry place, away from direct sunlight and moisture. By storing your menstrual cup in a breathable bag or case, you can ensure it remains clean and hygienic for your next use.