How To Repot Monstera
Monsteras are popular houseplants known for their unique, glossy leaves and ability to thrive in a variety of environments. However, like all plants, they require regular maintenance to continue growing and flourishing. One essential aspect of Monstera care is repotting, which involves transferring the plant to a new pot with fresh soil to provide it with the necessary nutrients and space to grow. But when is the right time to repot your Monstera, and what materials do you need to get started? In this article, we will explore the best practices for repotting your Monstera, including when to repot, the materials needed, and a step-by-step guide to ensure a successful transplant. To determine the ideal time for repotting, let's first discuss when to repot Monstera.
When to Repot Monstera
When to repot Monstera is a common question among plant enthusiasts, and the answer depends on several factors. Generally, Monstera plants prefer to be repotted during their active growing season, which typically occurs in the spring and summer months. However, there are also situations where repotting in the fall and winter may be necessary. Additionally, if the plant becomes root-bound, it may require repotting regardless of the time of year. In this article, we will explore the best times to repot Monstera, including repotting in the spring and summer, fall and winter, and when the plant becomes root-bound. By understanding these factors, you can provide your Monstera with the best possible care and promote healthy growth. For most Monstera plants, the ideal time to repot is during the spring and summer months when the plant is actively producing new growth.
Repotting Monstera in Spring and Summer
Repotting Monstera in Spring and Summer is ideal because it allows the plant to take advantage of the warmer temperatures and increased humidity, promoting healthy growth and development. During these seasons, Monsteras are actively producing new leaves and stems, making it the perfect time to provide them with fresh soil and a larger pot to accommodate their expanding root system. Spring and Summer repotting also gives the plant a boost of nutrients, as the new potting mix is rich in essential micronutrients that support the plant's growth spurt. Additionally, the warmer temperatures help to stimulate root growth, allowing the Monstera to establish itself quickly in its new pot. It's essential to choose a pot that is only one to two sizes larger than the original one, as Monsteras prefer to be slightly root-bound, and a pot that is too large can cause the soil to become too wet. By repotting in Spring and Summer, you'll be giving your Monstera the best chance to thrive and reach its full potential.
Repotting Monstera in Fall and Winter
Repotting Monstera in the fall and winter seasons is not recommended. During these periods, the plant is dormant, and its growth rate slows down significantly. Repotting during this time can cause unnecessary stress to the plant, making it more susceptible to disease and pests. Additionally, the cooler temperatures and reduced humidity in the fall and winter can make it challenging for the plant to recover from the repotting process. It's best to wait until the spring or summer when the plant is actively growing, and the temperatures are warmer, to repot your Monstera. This will give the plant the best chance to thrive and adjust to its new pot.
Repotting Monstera When the Plant Becomes Root-Bound
When a Monstera plant becomes root-bound, it's essential to repot it to provide the roots with more room to grow. A root-bound Monstera will start to show signs such as slow growth, yellowing leaves, and a decrease in the plant's overall health. To determine if your Monstera is root-bound, gently remove it from its pot and inspect the roots. If the roots have filled the pot and are circling or growing out of the drainage holes, it's time to repot. Choose a pot that is only one to two sizes larger than the original one, as Monsteras prefer to be slightly root-bound. Use a well-draining potting mix and gently tease out the roots to encourage new growth. Water the plant thoroughly after repotting and provide bright, indirect light to help it adjust to its new environment. With proper care, your Monstera should recover quickly from the repotting process and continue to thrive.
Materials Needed to Repot Monstera
When it comes to repotting a Monstera, having the right materials is crucial for a successful transition. A well-planned repotting process can help prevent shock and ensure the plant thrives in its new environment. To start, it's essential to choose the right potting mix that caters to Monstera's unique needs. This involves selecting a mix that provides the right balance of moisture, nutrients, and aeration. Additionally, selecting a suitable pot size and type is vital to accommodate the plant's growth and prevent waterlogging. Lastly, having the right tools on hand can make the repotting process much smoother and less stressful. By gathering all the necessary materials, you'll be well-prepared to give your Monstera the best chance to flourish. In this article, we'll dive deeper into the materials needed to repot a Monstera, starting with the importance of choosing the right potting mix.
Choosing the Right Potting Mix for Monstera
When it comes to repotting your Monstera, choosing the right potting mix is crucial for its continued growth and health. Monsteras prefer a well-draining potting mix that is rich in organic matter, as this will help to retain moisture while preventing waterlogged soil. A mix with a slightly acidic pH, ranging from 5.5 to 6.5, is ideal for Monsteras. You can opt for a pre-made potting mix specifically designed for tropical plants or create your own mix using a combination of peat moss, perlite, and vermiculite. Peat moss helps to retain moisture, while perlite and vermiculite improve drainage and aeration. Avoid using regular potting soil, as it can compact and prevent proper drainage, leading to root rot and other issues. By selecting the right potting mix, you'll be providing your Monstera with the best possible environment to thrive in its new pot.
Selecting a Suitable Pot Size and Type for Monstera
When selecting a suitable pot size and type for Monstera, it's essential to consider the plant's growth habits and needs. A pot that is too small can restrict the plant's root growth, while a pot that is too large can cause the soil to become too wet. A general rule of thumb is to choose a pot that is only 1-2 sizes larger than the current one. This will give the roots enough room to grow without becoming waterlogged. In terms of pot type, Monsteras prefer well-draining pots with good aeration to prevent root rot. Look for pots made from materials like terracotta, ceramic, or unglazed clay, which allow for air exchange and moisture release. Avoid plastic or metal pots, as they can retain too much moisture and cause root rot. Additionally, consider a pot with a wide mouth to make it easier to remove the plant when repotting. A pot with a saucer or tray can also help to catch excess water and prevent mess. By choosing the right pot size and type, you can provide your Monstera with the best conditions for healthy growth and development.
Gathering Essential Tools for Repotting Monstera
When it comes to repotting a Monstera, having the right tools on hand is crucial for a successful and stress-free experience. To start, you'll need a new pot that is only one to two sizes larger than the current one, as Monsteras prefer to be slightly root-bound. A well-draining potting mix is also essential, as it will help prevent waterlogged soil and root rot. A pair of clean, sharp pruning shears or scissors will come in handy for trimming away any dead or damaged roots, as well as cutting back overgrown stems. A gentle root rake or chopstick can be used to carefully loosen the roots and remove the plant from its pot. A soft-bristled brush or a small, dry paintbrush can be used to gently sweep away any debris or old potting mix from the roots. Additionally, a watering can or cup will be necessary for watering the plant after repotting. It's also a good idea to have some twine or a stake on hand to provide support for the plant as it adjusts to its new pot. Finally, a pair of gloves can be worn to protect your hands from the plant's sap, which can cause skin irritation in some people. By gathering all of these essential tools, you'll be well-prepared to give your Monstera the best chance at thriving in its new pot.
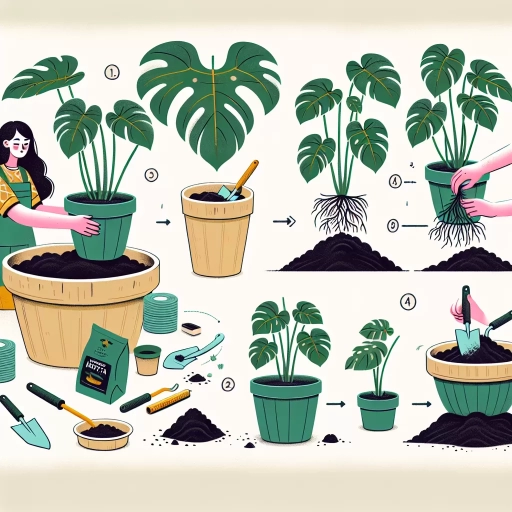
Step-by-Step Guide to Repotting Monstera
Repotting a Monstera plant can be a daunting task, especially for those new to plant parenthood. However, with the right guidance, it can be a straightforward process that gives your plant the room it needs to thrive. In this article, we will take you through a step-by-step guide on how to repot your Monstera plant. To start, you'll need to prepare your Monstera plant for repotting, which involves inspecting the roots and choosing the right potting mix. Next, you'll need to carefully remove the plant from its old pot, taking care not to damage the roots or disturb the soil. Finally, you'll plant the Monstera in its new pot, making sure it's securely positioned and watered properly. By following these steps, you'll be able to give your Monstera plant the best chance to grow and flourish. So, let's get started by preparing your Monstera plant for repotting.
Preparing the Monstera Plant for Repotting
Preparing the Monstera plant for repotting is a crucial step to ensure a successful transition to a new pot. Before starting the repotting process, inspect the plant for any signs of pests or diseases, and treat it accordingly. Prune any dead or damaged leaves to prevent the spread of disease and encourage healthy growth. Water the plant thoroughly a day or two before repotting to make the soil easier to handle. Remove any decorative rocks or moss from the top of the soil, as these can get in the way of the repotting process. Gently turn the pot on its side and carefully slide out the plant, taking care not to damage the roots or disturb the soil. If the plant is stuck, run a knife or spatula around the inside of the pot to loosen it. Once the plant is removed, inspect the roots to see if they have become root-bound, and gently tease them apart with your fingers or a blunt instrument to encourage new growth. This is also a good opportunity to trim any circling or damaged roots to prevent them from causing problems in the new pot. By taking the time to properly prepare the Monstera plant for repotting, you can help ensure a smooth transition and give the plant the best chance to thrive in its new home.
Removing the Monstera Plant from Its Old Pot
When removing the Monstera plant from its old pot, it's essential to do so carefully to avoid damaging the roots or disturbing the soil. Start by gently grasping the base of the plant's stem, just above the soil line, and slowly rotating the pot back and forth while pulling upwards. This will help loosen the plant from the pot without causing any damage. If the plant is stuck, you can run a knife or spatula around the inside of the pot to release it. Once the plant is free, carefully lift it out of the pot, taking care not to touch or disturb the roots. If the roots have become pot-bound, you may need to gently tease them apart with your fingers or a blunt instrument to encourage new growth. It's also a good idea to inspect the roots for any signs of rot or damage, and trim them back if necessary. By removing the plant from its old pot in a careful and gentle manner, you can help minimize stress and ensure a successful repotting process.
Planting the Monstera in Its New Pot
When planting the Monstera in its new pot, gently remove the plant from its old container, taking care not to damage the roots or disturb the soil. If the plant is stuck, you can run a knife or spatula around the inside of the pot to loosen it. Once removed, inspect the roots to see if they have become root-bound, which can happen if the plant has outgrown its container. If the roots are circling or growing out of the drainage holes, use a pair of sterile scissors or pruning shears to gently trim them back, making sure not to damage the main root system. Next, place a layer of fresh potting mix in the bottom of the new pot, leaving enough space for the plant's root ball. Position the Monstera in the pot, making sure the soil level is the same as it was in the old pot. Fill in the sides with more potting mix, gently firming it around the roots as you go to prevent air pockets from forming. Finally, water the plant thoroughly to settle the soil and provide enough moisture to support establishment in its new home.