How To Draw A Cute Bunny
 Drawing a cute bunny is a rewarding and enjoyable artistic endeavor that can be mastered with few simple steps. This guide will introduce you to making this delightful creation, perfect for both budding artists and those looking to spice up their portfolio with an element of charm. We'll delve into three main areas to help you birth your masterpiece: Understanding the Basics of Drawing, Steps to Draw a Cute Bunny, and Tips and Techniques for Making Your Bunny Cute. Initially, we'll ground ourselves in the fundamental principles that govern the art of drawing, equipping you with the necessary skills and understanding to not just achieve this task but excel in any future artistic endeavor. Next will be a step-by-step guide for creating your bunny, crafted carefully to cater to people of diverse artistic abilities. Finally, we'll sprinkle in some effective tips and techniques to enhance the cute factor of your work, because details matter in bringing your cute bunny to life. Now, let's explore the art world starting with the backbone of any drawing: understanding the basics.
Understanding the Basics of Drawing
Understanding the basics of drawing may seem quite intimidating at a first glance, however, it's like a puzzle. Piece by piece, once put together, create a delightful, aesthetic picture. Clearing the haze around it are primarily three essential elements - Shapes and Lines, Shading and Texturing, and Perspective and Proportion. Shapes and Lines are the skeleton of any artwork. They define the structure and provide a certain direction to the drawing. Secondly, Shading and Texturing bring depth, they breathe life into the 2D representation, evoking emotions and defining the mood of the piece. The third factor, Perspective and Proportion, is the cherry on top - it delicately lifts the artwork to a whole new level, adding a much-coveted dimension of realism. Grasping these three aspects can vastly improve your drawing competencies and take you one step closer to creating masterpieces. Now, let's delve deeper into our first focus area: The Importance of Shapes and Lines. You’ll see that understanding this first layer is a crucial part of your drawing journey.
The Importance of Shapes and Lines
Understanding the basics of drawing goes far beyond accurate representation of a figure or portrayal of an object. One overlooked but critical component is the understanding and use of shapes and lines. Shapes and lines form the building blocks of drawing, being integral to portraying perspective, depth, and detail. In essence, they give your illustrations structure and a sense of realism. Consider a cute bunny illustration, for instance. The artist doesn't dive straight into details like fur texture or eye twinkle. Instead, it's more practical to chalk out a rough outline using basic shapes and lines. The bunny's body might be a rounded rectangle, the head could be represented by a circle, while the ears might be tall ovals. Lines help decide the positioning of the bunny; a slight tilt in the line used to draw the body might give the illusion of the bunny turning or hopping. Drawing is essentially piecing together various shapes and lines until they form a recognizable image. More complex shapes help create more intricate designs – a hexagon might morph into the detail of a eye, while an artist might use a series of small curvy lines to mimic the softness of the bunny's fur. Shadows and highlights can also be represented by certain shapes and lines - perhaps a circle for a spot of light reflecting off the bunny's eye or a dark triangle for a shadow under its chin. The importance of shapes and lines extends to the stylistic aspects of drawing. Different types of lines—curved, straight, thick, thin, long, short—can provide an array of emotions and themes. Curvy, wavy lines can depict softness and fluidity, which would work perfectly in our cute bunny scenario, while straight, sharp lines might suggest rigidity or tension. Learning to identify shapes and lines in everyday objects and visuals can be a great practice for novice artists. It forces them to break down complex designs into simpler elements, thereby making it easier to understand and recreate. It also cultivates an eye for detail, proportion, and balance. This skill is invaluable when it comes to creating your drawings, as it brings your cute bunny from a flat scribble to a lifelike doodle. To conclude, shapes and lines are the nuts and bolts of drawing. Understanding and mastering them allows you to build elaborate and composite illustrations, regardless of whether you're sketching a quaint sunset or you're in the process of penning down the cutest bunny.
The Role of Shading and Texturing
The Role of Shading and Texturing As with many other aspects of visual art, understanding the basics of drawing includes mastering the interrelated concepts of shading and texturing. Shading and texturing are essential to providing depth, realism, and visual interest to drawings, serving to elevate them from rudimentary sketches to intricate, lifelike renderings. Shading is a technique that manipulates light and dark to suggest three-dimensionality. By carefully depicting the way light hits and shadow falls on an object - such as the curve of a cute bunny's cheek or the arch of its ear - a flat, two-dimensional sketch instantly gains depth and volume. Skilled shading can create the illusion of a variety of surfaces including the soft fur of a bunny or the roughness of tree bark. Adept artists often employ a range of shading techniques, such as hatching, cross-hatching, stippling or smudging to achieve a variety of effects. Complementing shading, texturing brings to life the tactile nature of an object. It gives the viewer an idea of what the surface feeling of an object might be. For instance, in drawing a cute bunny, the artist would use texturing techniques to convey the fluffiness of the bunny’s fur or the smoothness of its small nose. Combining various pencil strokes, harnessing the power of erasers, manipulating the pressure applied to the drawing tool - these are all ways to create textural variation. In essence, shading and texturing are key to making your drawings more convincing and enjoyable to the viewer. They help to create the right context and atmosphere, allowing your bunny drawing to look not merely like a sequence of lines on a page, but rather a fluffy, lovable creature ready to hop right off the paper. Understanding and mastering these techniques are vital stepping stones towards more advanced drawing skills, giving your artwork a depth and realism that commands attention.
Mastering Perspective and Proportion
Mastering perspective and proportion in art is a vital yet often overlooked aspect when one is trying to understand the basics of drawing, particularly when the subject is as charming as a cute bunny. This crucial skill allows an artist to create depth and dimension, thus making their drawings appear three-dimensional and realistic. A basic understanding of perspective will help you comprehend how objects decrease in size as they get further from our line of sight. It’s all about mimicking the way we humans perceive depth in the real world. To create a credible representation of a cute bunny, serious attention must be paid to the size relationships between the different parts of the bunny's anatomy. All elements, from the fluffy tail, elongated ears, to delicate paws, should be relative in size to one another to maintain the proportionality and, ultimately, create a cohesive and believable drawing. Proportion, on the other hand, is more about the sizes and shapes of different parts of an object in relation to each other. Consider the size and placement of the bunny’s eyes in relation to its ears, the length of the body compared to the hind legs, and the size of its tail compared to its body. By ensuring these aspects are in proportion, you inherently create an aesthetically pleasing depiction, which mirrors life's natural patterns. Successfully mastering these principles affect the overall spatial impression of the final drawing, capturing the character of the subject with a sense of accuracy and life-like realism. Indeed, when honed, the mastering of perspective and proportion can empower an artist—be they beginner or expert—to bring to life, often poignantly, anything from an everyday object to a cute bunny. The sheer accuracy and realism that can be attained by polishing these techniques will elevate your artistry to a professional standard, contributing a richness and depth to your work that is held in high esteem in the world of art. Remember, practice is key. The more you draw, the better you will get at judging and rendering appropriate perspectives and proportions, ensuring your cute bunny looks as authentic as it is adorable. Paying heed to these skills will indeed pave the way for you to become a more aware, adept, and expressive artist.
Steps to Draw a Cute Bunny
Drawing a cute bunny can be accomplished effortlessly with the right guidelines. It doesn't matter whether you are a budding artist seeking to practice your craft or someone who wishes to indulge in a creative break; understanding Steps to Draw a Cute Bunny proves to be beneficial. This insightful article will guide you through three crucial stages of conjuring up a lovely bunny on paper, beginning with crafting an uncomplicated outline followed by delving deep into adding personality-specific details. Finally, we shall culminate our bunny sketch journey by focusing on applying the finishing touches. This process promises to make drawing not just a pastime but a delightfully engaging experience. As the first step in this creative journey, you will be introduced to the concept of starting with a simple outline. This stage is fundamental and critical as it forms the basic structure of your drawing. This preliminary sketch helps to shape the bunny and lays the foundation for the rest of the art you are going to create. Mastering an uncomplicated outline is, therefore, an essential skill in the whole process, paving the way for the next steps.
Starting with a Simple Outline
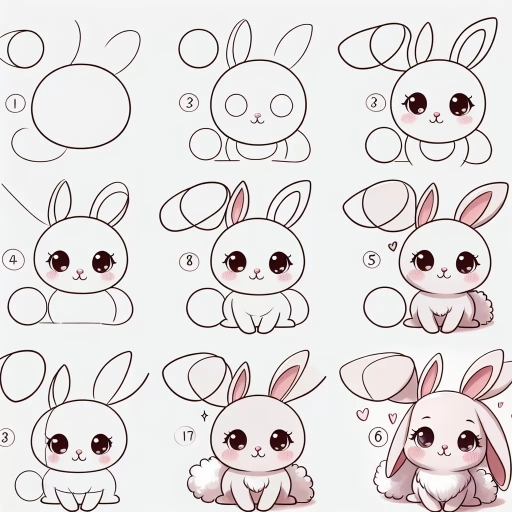
When embarking on the journey to draw a cute bunny, starting with a simple outline is the foundational step. It serves as the skeleton to which succeeding layers of details are appended, shaping an illustration that brims with life. Outlining is not the arduous task it’s often perceived to be. In fact, it's akin to mapping a path before trekking a terrain, ensuring that you know where you're heading and that you're unlikely to be lost. A simple outline for drawing a cute bunny, for example, begins with two intersecting shapes: a circle for the head , and an oblong for the body. Think in terms of geometry - simple circles, ovals, lines, and curves. Imagining the sketch as a compilation of these basic shapes allows for a more manageable, less intimidating view of the artistic process. Each shape you sketch will form a component of the bunny, from its adorable round head to its soft, fluffy tail. This method of breaking down a complex figure into simple shapes not only simplifies the drawing process but also enhances accuracy. Creating an outline also offers room for flexibility. You can experiment with the shapes: elongate the body for a slimmer rabbit or enlarge the head for a younger, wide-eyed bunny. In essence, outlines allow you to explore characteristics and features before committing to final lines. Once your basic outline is complete, you can build on it, craft details and breathe life into your sketch. You can add cuteness by sketching large, sparkly eyes, rosy cheeks, or a small button nose. Similarly, do not forget about the bunny’s whiskers and long ears – two definitive features that contribute significantly to its cute quotient. In conclusion, starting with a simple outline is an essential yet overlooked element of drawing. Although it appears to be a rudimentary step, it sets the groundwork for the detailed, adorable character to come. Clever use of basic geometric shapes and lines can build an appealing image, facilitate ease in drawing, and result in a cute bunny that appeals to art novices and enthusiasts alike. A canvas marked with a simple outline is, after all, the birthplace of great pieces of art. And so, the journey to illustrate a cute bunny begins here.
Adding Details and Personality
Adding details and personality to your drawing is the secret to transforming your sketch from a regular rabbit into an adorable, charming bunny that people can't help but love. It's a process that demands creativity, keen observation, and an understanding of basic rabbit anatomy. Let's delve a little deeper into this process. First, think about your bunny's character: Is it a big, goofy creature with hips that sway as it hops or a tiny, timid guy with wide, startled eyes? Each personality trait you decide on will affect the way you add details to your bunny. For example, a goofy bunny might inspire you to draw oversized hind legs for exaggerated hops, while a timid bunny might have oversized eyes and ears to capture its timid look. To create a life-like bunny, it's important to pay special attention to its fur. Instead of sketching individual hairs, create an illusion of fluffiness through patches of carefully placed lines. Vary the length and direction of your lines for a natural, fur-like texture. Pay attention to areas of shadow and light, these can help provide volume and depth making the bunny look more 3-dimensional. Don't neglect the bunny's facial expressions as well. These can effectively highlight its personality. Round, upward-curved eyes can make it look innocent or cheerful, while downward-curved eyebrows can capture a look of constant worry or fear. Adding a few accessories can also boost your bunny's personality. Is your bunny a classy lady? Try adding a tiny bow to the base of an ear. Or maybe your bunny's a scholar, then a pair of round glasses precariously resting on its nose could work. Lastly, and perhaps most importantly, enjoy the process. Let your intuition guide you as you add these details. Experiment with different features and accessories. Remember, the goal is not to create a scientifically accurate representation of a rabbit, but a cute, heart-warming bunny that speaks to your audience's emotions. It's these details and added elements of personality that turn a simple sketch into a meaningful masterpiece. With patience and practice, you'll soon be creating bunnies that are not just cute, but brimming with personality and charm!
Applying Final Touches
When completing your adorable bunny illustration, applying final touches is a critical phase. It is during this juncture of creative process that your bunny transitions beyond a simple sketch and becomes an endearing, adorable creature, filled with life and personality. What makes your bunny cute? It's largely influenced by the attentive application of those final, artistic details. Understanding the nature of rabbits can also enhance the authentic charm of your illustration. A bunny's fur is soft, making it one of the most prominent attributes of your drawing. Use your artistic tools to create the look of dense and plush fur. Paint or trace it with varying thickness of strokes and curves to bring out the fluffiness. Pay special attention to the spots where the fur is normally fluffier like around the cheeks, edges of the ears, tail and paws. Remember, eyes are often regarded as the windows to the soul, and it's no different for your bunny depiction. Create larger, captivating eyes as this is an essential element to boost the cuteness quotient. Incorporate glittering highlights within the eyes to add an sparkle of innocence and curiosity, common traits in cute bunnies. The colour of the bunny should also be considered as a part of the final touches. While deciding the hue, focus on the shades that are appealing to the eye and gives a soft perception. Pastel shades of gray, brown and white are typically associated with bunnies, but don't hesitate to use your creativity. Lastly, a bunny's environment adds more to its charisma. Although not a compulsory feature, adding elements like a grassy meadow or colorful flowers could not only provide a sense of familiarity, but also enhance the overall aesthetic of your creation. Applying final touches is a careful blend of precision and creativity, giving your bunny sketch the desired appeal. It transforms an outline into a tangible portrayal that triggers emotions and captures viewer's hearts. This crucial phase of your drawing process is like lending the final bits of life to your cute bunny. No matter how well you've sketched the structure, its the finishing touches that breathes life into it and elevates it from ordinary to extraordinary. In conclusion, the final touches might seem minute, but their influence in your art is immense and profound.
Tips and Techniques for Making Your Bunny Cute
Bunnies are innately adorable, but with a pinch of creativity, their cuteness can be amplified tenfold. Several techniques can contribute to achieving an irresistibly cute bunny, resulting in an engaging visual treat that melts hearts. Enhanced by the art of digital storytelling, three predominant strategies set the foundation for a truly captivating bunny: Drawing oversized eyes, adding fluffy textures, and utilizing expressive facial features. Each technique plays a distinct role in creating a charming high-quality image, contributing to the bunny's overall appeal and magnifying its cuteness factor. Let's delve into our first tip- oversized eyes. In the world of cartoon aesthetics, big, sparkly eyes are a hallmark of endearing characters as they evoke vulnerability and innocence. Learning to draw oversized eyes will give your bunny a fresh, adorable perspective that instantly captures attention and appeal. This technique, coupled with the additional ones that will be explored later in this article, will fundamentally change your approach to bunny-cutification in the most delightful way.
Drawing Oversized Eyes
Drawing oversized eyes can transform an ordinary bunny sketch into an instantly adorable character, standing out from other cartoon drawings. This technique creates the kind of appeal associated with children's movies, plush toys, and cute, animated characters from our favorite cartoons. Moreover, in the world of character sketching and design, the eyes are inarguably the most expressive facial features and can therefore potentially make or break your drawing. Size, along with shape and position, is one of the primary variables when it comes to the eyes. By drawing the eyes larger than normal, you create a sense of innocence and charm that can easily evoke protective and nurturing responses among viewers—feelings that are typically associated with cuteness. However, simply enlarging the eyes won't cut it. The trick also lies in perfecting the glossy texture that brings the eyes to life. Light and shadow are paramount to create this effect. Highlight the top of the eyes with a lighter shade for brightness, and darken the bottom part for some contrast. This will give your drawing a shiny, sparkly look that draws attention immediately. Also, consider the space around the eyes. An important tip is to leave enough 'white space' around the pupils. This makes the eyes look fully open—the signature look of the surprised and innocent charm that we all adore in cuddly creatures. Finally, remember to keep the eyes symmetrical and aligned properly on the bunny's face. This will maintain the balance in your drawing and contribute to a cohesive cartoon look. By emphasizing the eyes, you give personality to the bunny—a pivotal feature, not just in anime and cartoon drawing but in all artforms. Remember, art is subjective, and practice makes perfect. The more you draw, the better you get. The more you observe, the more you learn. Hence, keep these tips in mind, and let your unique style shine through the strokes of your pencil!
Adding Fluffy Textures
Adding Fluffy Textures
Creating an adorable bunny drawing can be made more intriguing by adding fluffy textures. It’s an essential technique that can transform your artwork from simple to eye-catching, amplifying its cuteness to another level. The infusion of fluffy textures not only increases the aesthetic appeal, but also encourages the viewer's tactile imagination, making your bunny appear soft and cuddly. Let's dive deep into the world of textures! Start by sketching a rough outline of the bunny which should be light so it can be easily adjusted or erased. Here is where the magic begins - indicating fluffiness. To add a fluffy texture, use a combination of dark and light pencil strokes that follow the contour of the bunny's body. Strokes should be short and curved, resembling a cloud-like pattern. The fluffy texture comes to life through this interplay of strokes and lines, creating depth and giving your bunny a three-dimensional look. It should look like tufts of fur are coming out from the skin. Now, bear in mind, the key to achieving an authentic fluffy texture lies in accurate shading and highlighting. Take note of your light source and darken the areas on the opposite side, juxtaposing it with lighter regions to produce a realistic fur effect. Adding different gradients creates depth and volume, making the fur look extra fluffy. Remember to layer your shades gradually, taking your time to keep the fluffiness soft and not harsh. The shadows within the fluff help to emphasize the texture, creating an illusion of individual hair strands. When it comes to making your bunny feel fluffy to the audience’s eyes, think diversity. Vary the size, shape, and direction of the tufts of fur on different parts of the body. As an example, the fur on a bunny’s belly should look and feel different than the fur on its ears or feet. Such distinctions in texture can enhance the realism of your work, making the bunny more tangible to viewers. Finally, practice is essential for perfecting the technique of adding fluffy textures. Over time, you’ll learn how to control the pressure on the pencil to achieve different effects, how to mix colors for a richer texture, and how to use the eraser for high-lighting. With consistency, you'll be able to bring your cute, fluffy bunny to life with ease and style. In summary, adding fluffy textures to your bunny drawing involves careful strokes, thoughtful shading, and an understanding of light and volume. It brings your bunny to life, and elevates its cuteness, providing a more engaging and delightful experience to the audience. Deepening your skill in this technique transforms not only your bunny drawings but also broadens your artistry, enhancing your overall drawing abilities.Utilizing Expressive Facial Features
Utilizing expressive facial features is a crucial element in bringing a cute bunny to life on paper. While there are a plethora of methods to instill cuteness in your drawings, amplifying the facial features of your bunny enhances it's endearing and charming appearance, thereby creating a greater emotional connection with your audience. With the fine art of exaggeration, aspiring artists can make eyebrows larger for expressions of surprise, eyes wide and round for an innocent, charming look, and make cheek puffs large for a cuddly demeanor. The eyes, in particular, hold significant power when it comes to ramping up the cuteness level. Drawing large eyes compared to the rest of the bunny's face can inject a level of cuteness that is hard to resist. Adding that extra sparkle or gleam in the eye can also elevate your bunny's cuteness quotient. The mouth and nose should be kept simple and small, as it is in harmony with the overall facial balance. Whiskers can be included but should not be overly emphasized, as it might take away the focus from the rest of the adorable face. In addition, the use of colors plays a vital role in making the bunny look cute. Utilizing soft pastel tones, like baby pink or powder blue, instills a gentle and adorable vibe. Sticking to light and warm colors adds a youthful and innocent appeal. However, to master the art of drawing endearing and expressive facial features, one crucial aspect is observing real bunnies and understanding the bone structure, muscle movement, and common expressions. You can integrate this with popular cartoon characterization of bunnies to create a blend of realism and exaggerated cuteness. Overall, the effective use of exaggerated but balanced facial features, coupled with the right use of colors and observations from real-life references can significantly contribute to making your bunny look irresistibly cute. Remember, consistency in practice and experimenting with different expressions can amplify your prowess in creating cute bunny illustrations.