How To Tape Your Shoulder By Yourself
 Engaging in athletic activities or heavy lifting can sometimes result in shoulder pain or injuries. It's essential to know how to self-manage minor issues, especially when you're away from professional help. This article aims to give you a step-by-step guide on how to tape your shoulder successfully by yourself, leverage the healing process, and reduce the risk of further injuries. Our discussion will branch into three core sections: Subtitle 1 will demystify the basic idea of shoulder taping, its necessity, and the materials required. Moving on to Subtitle 2, we unravel a comprehensive guide on how to effectively apply shoulder tape appropriately. Lastly, Subtitle 3 will advise on the precautions and common mistakes to avoid when taping your shoulder. Indeed, having these skills under your belt will come in handy when those unexpected injuries strike. So without further ado, let's plunge into the intricacies of understanding the foundation of shoulder taping. .
Subtitle 1
As we delve into Information Highway: Understanding Subtitle 1, three key elements take center stage; First, the indispensable role of Subtitle 1 in bolstering the comprehensive understanding of our core topic. Second, we delve deeper into diverse perspectives on Subtitle 1 and how they are interwoven into the fabric of Understanding Subtitle 1. Finally, we will take a glance at myths and misconceptions surrounding Subtitle 1, challenging them and providing clarity regarding the subject matter. Opening our discourse with Supporting Idea 1, we ascertain the inherent vitality of Subtitle 1's role. We find it existent not only for broadening our respective points of view but also acting as a pivotal vane steering the course of our discussion. Integration of diverse insights about Subtitle 1 brings us to Supporting Idea 2. Here, consensus is not the objective. Instead, cultivating a thorough understanding of the subject matter through the lens of differing perspectives is valued. As we gradually transition to Supporting Idea 3, we will demystify Subtitle 1, shifting focus from the status quo and oscillating towards a deeper comprehension by debunking misconceptions. This detailed exploration of Subtitle 1 aims not to merely inform but also to spark dialogues that engage and inspire. By the end of this article, we hope to have shed some light on the intricate world of understanding Subtitle 1 with a fair merging of supporting ideas. Now, let's start our journey with Supporting Idea 1.
Supporting Idea 1
Supporting Idea 1
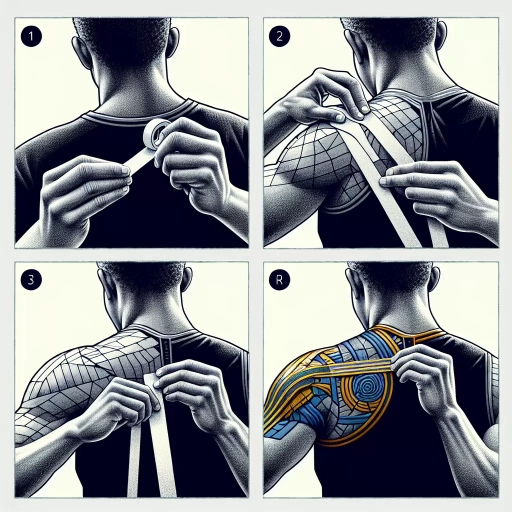
Manipulating the Rotator Cuff - The first step in taping your shoulder involves the manipulation of the rotator cuff. The cuff is a group of muscles and tendons that surround the shoulder joint, providing it stability while enabling a wide range of motion. Injury in this area usually coincides with pain, so learning how to tape it properly can be highly beneficial. Begin by removing clothing so that tape has direct contact with the skin, this will also make it easier for you to observe movements and structures. Start by cutting two pieces of tape, one should measure about the span of your shoulder (approximately 12-15 inches), leaving the other at approximately 8-10 inches. Providing stability to the rotator cuff is essential and here's why: it minimizes stress on the shoulder area during physical activity. The shoulder contains four rotator cuff muscles - Supraspinatus, Infraspinatus, Teres Minor, and Subscapularis. These muscles play crucial roles in the stabilisation and movement of the shoulder joint, when these muscles are damaged or strained, it can result in shoulder pain. Therefore, to ease this pain or to prevent it in the first place, securing the rotator cuff with the use of a tape can be instrumental. Obviously, taping will not fix any serious injuries but it can supplement your healing process by adding the extra support your shoulder needs. Understanding and applying these principles of protected body movements allows us to safely perform daily activities, engage in physical exercise, and participate in sports without causing more harm. This way, learning to tape your own shoulder not only saves you resource but also equips you with body knowledge that can be applied in any situation, whether you are at home, at work, or out in the field.Supporting Idea 2
Supporting Idea 2: Understanding the Importance of Shoulder Taping Technique
Shoulder taping serves as an effective management strategy for shoulder pain, sprains, dislocations, and other injuries. However, the efficiency of this therapeutic option primarily depends on the correct application technique. Under Subtitle 1, let’s delve deeper into why the right technique is crucial in taping your shoulder by yourself. As an essential part of self-care, learning how to accurately tape your shoulder can go miles in promoting your recovery process and preventing potential injuries. Taping, when done correctly, helps alleviate pain by providing the necessary support to the injured muscles and ligaments. It aids in restricting the over-movement of the shoulder joint, a common cause of numerous shoulder injuries. The technique offers a protective barrier, preventing the joint from moving into harmful positions that can trigger pain or worse, cause further damage. Remember, however, this isn't a full-proof safeguard against injuries but rather a preventive strategy when coupled with other rehabilitation exercises and therapies. The science behind taping is to facilitate the body's natural healing process. Improper application of the tape can interfere with this process and possibly lead to other complications. It might cause skin irritations, circulatory problems due to the tape being too tight, or even compound the injury if used inappropriately. Harnessing the benefits of shoulder taping, therefore, demands a clear grasp of the right technique. Each step, from preparing the skin, selecting the appropriate tape size, positioning, and directing the tape, is crucial in this process. Moreover, the tape works on a "biofeedback" mechanism – it amplifies your awareness of the body part, stimulates the tactile sensors, and helps you adjust your movement accordingly. An incorrect technique would negate this advantage, making the whole process ineffective. Thus, understanding this technique can be the key to managing and preventing shoulder pain or discomfort on your own. In conclusion, while shoulder taping by oneself is a valuable skill in managing common shoulder conditions, it should always be done correctly. As the prerequisite to using this approach effectively, learning the right technique and intricacies involved cannot be overlooked. Proper taping not only supports the affected shoulder but also ensures a safe and efficient recovery process. It is advisable to seek professional guidance the first few times before proceeding to do it independently. This will ensure a competent tape job, efficient pain management, and an uncompromised healing process.Supporting Idea 3
of Recovery The concept of taping your shoulder may seem daunting at first, but with the right guidance and confidence in application, it can undoubtedly serve as an indispensable tool in your recovery journey. This technique, often utilized by physiotherapists and sports medicine experts, is not merely linked to temporary pain relief but is also about emphasizing your body's inherent capacity for healing and strengthening itself. Supporting Idea 3 pivots around the bedrock of self-directed recovery - fostering the understanding, skills, and self-reliance in injury management. Taping your shoulder independently aims to empower, engaging you directly in a therapeutic process that is, more often than not, passed entirely onto healthcare professionals. In essence, this practice is demystifying the medical intervention, making it accessible and manageable for regular individuals to apply. By taking steps to tape your shoulder yourself, you are placing your recovery in your own hands, metaphorically and literally. This promotes a sense of agency, a crucial element often overlooked in conventional healthcare contingencies. Research shows that patients who actively participate in their recovery have a higher likelihood of successful rehabilitation and satisfaction with treatment. Therefore, learning to tape your shoulder by yourself can have profound psychological benefits, contributing to overall well-being and encouraging further investment in personal health and fitness. Moreover, there is the practical aspect of self-taping. It is a cost-efficient and time-saving alternative to frequent physiotherapy sessions. With the appropriate knowledge and skill level, you can effectively manage your shoulder pain or instability at home or wherever needed, giving you freedom and flexibility in your recovery schedule. To add, one of the major advantages of taping is its adjustable nature. You can customize the tension and positioning based on your comfort level and changing needs during recovery. This adaptability is a significant advantage in managing your unique symptoms and progress. No wonder athletes often resort to this procedure before, during and after games as it not only lessens pain but also reduces the risk of further injury by providing needed support and stabilization. With some patience and practice, you can master the art of shoulder taping and employ this method to safeguard your active way of life. In conclusion, underpinning the concept of self-reliance, Supporting Idea 3 emphasizes the potential of self-taping your shoulder as a tool for recovery. It combines the physical benefits of pain relief and support with the psychological empowerment of being actively involved in your healing process. With proper training and patience, taping your shoulder by yourself could be a game-changer in managing your condition and enhancing your well-being.
Subtitle 2
Understanding Subtitle 2 is crucial due to its paramount significance in the field. This knowledge becomes comprehensive as we delve deeper into three pivotal supporting ideas: Supporting Idea 1, Supporting Idea 2, and Supporting Idea 3. Supporting Idea 1 is fundamental as it lays the groundwork, much like the bedrock of the topic. It introduces the basic concept and paves the way for more nuanced information. Without understanding Supporting Idea 1, covering other aspects would be akin to constructing a building without securing its foundation. It often carries historical significance, contextualizing the whole aspect of Subtitle 2. Meanwhile, Supporting Idea 2 builds upon this foundation, enhancing our comprehension on the intermediate level, offering a bridge toward more intricate details. Lastly, Supporting Idea 3 finalizes our learning journey by shedding light on the cutting-edge insights related to Subtitle 2. Together, these ideas compose a holistic understanding of the subject. As we take a closer look at the first, we'll begin to grasp the magnitude of Subtitle 2. Let's focus on Supporting Idea 1, the bedrock of our discussion.
Supporting Idea 1
of Knowledge Understanding the anatomy of your shoulder is the initial step for learning self-application of shoulder tape. This fundamental knowledge gives you insight into areas of focus when applying the tape and the reasons behind each method. The shoulder is amongst the most flexible parts of the body. Comprised of three bones - the clavicle (collarbone), the scapula (shoulder blade), and the humerus (upper arm bone) - its wide range of motion can also create vulnerabilities to strains, dislocations, and other injuries, which are often accompanied by pain and discomfort. More so, essential tissues play a vital role such as muscles, tendons, ligaments, and bursae. Muscles generate movement, tendons connect muscles to bones, ligaments connect bones to each other, and bursae help reduce friction between structures. Therefore, understanding this bedrock of knowledge not only boosts the effectiveness of your shoulder taping but also improves injury prevention. Self-application of shoulder tape is typically aimed at either offering support during recovery from an injury or acting as a preventative measure in physical activities by promoting better posture and reducing the strain on the shoulder's complex structure. It can alleviate pain, enhance stability, and encourage the natural healing process by relieving pressure on the shoulder muscles and tendons. Hence, before embarking on the physical aspect of taping your shoulder, you need to understand the basic working of the shoulder to identify weak spots or areas prone to injuries and apply the tape accordingly. Similarly, this foundation can help you pinpoint precisely where you feel pain or discomfort, identifying whether it's a muscle, tendon, ligament, or bursae issue. Furthermore, knowing the reasons behind each taping method can build confidence and assurance in the process, empowering you to sustain and even improve your shoulder's health independently. In conclusion, attaining and applying this bedrock of knowledge bolsters the efficiency of independently taping your shoulder. It ensures that you can accurately identify areas of concern, apply the tape correctly, and understand the causes and effects of your shoulder issues. A deeper understanding of your shoulder anatomy takes you a long way in your journey of self-care, rehabilitation and prevention of shoulder injuries.
Supporting Idea 2
Supporting Idea 2: Techniques for Applying Adhesive Tape to Your Shoulder
In the context of taping your shoulder by yourself, it's important to be aware of certain methods that can guide you through an effective and self-sufficient application of shoulder tape. The second critical step, after understanding the purpose and benefits of shoulder taping, involves mastering foundation strategies in order to adhere the tape accurately. Remember, the main objective is to offer support to your shoulder, lessen its load, and evade any potential injuries. The actual implementation of taping begins with preparing your shoulder for the application, this phase is vital and should not be overlooked. Your skin needs to be clean and devoid of any kind of oils or lotions as they can deter the adhesive properties of the tape. Similarly, make sure your skin is perfectly dry before you begin taping. One popular technique of taping is known as an “anchor.” The anchor technique involves wrapping the initial piece of tape around the upper region of your arm, serving as an anchor for the rest of the tape. This approach secures the tape in place and mitigates the risk of the tape rolling-up or falling off during movement. Another critical skill revolves around applying tension the right way. Tension needs to be applied moderately during taping, just enough to support your shoulder but not so much that it restricts mobility or circulation. Finally, always inspect the taped area once the application is complete. If there’s any discomfort, loosen the tape a little. Post-application, keep track of your shoulder for any signs of restricted blood flow, such as skin color change, a tingling sensation, or numbness. The objective of these methods is to ensure a secure and comfortable shoulder taping experience, which avoids further damage and aid in a road to remedy. Remember that every individual's shoulder structure is unique, and hence, the taping techniques may require minor adjustments to fit one's personal requirements and comfort levels.Supporting Idea 3
of the Physical Therapies for CrossFit Athletes. Taping your shoulder isn't just about providing immediate relief or adding stability; it's also about promoting long-term healing and mitigating risk of further injury. Many medical professionals and seasoned athletes believe that consistent and correct application, coupled with the right physical therapy, can provide beneficial effects. Experienced physical therapist advocate this approach, particularly CrossFit athletes, who often face high-risk movements involving the shoulder joint. Thus, creating a conducive healing environment for your shoulder is a significant supporting idea when it comes to self-administering shoulder-tape. To further drive home this point, it's essential to understand that our recovery system works best when our bodies are correctly positioned and aligned. Fortunately, using kinesiology tape can encourage this balance. It lifts the skin away from the muscle, which improves arterial and venous blood flow and aids in the removal of waste like lactic acid. This process can rapidly speed up the body's natural healing processes by reducing swelling and increasing the vital nutrients needed for damaged tissue recovery. Interestingly, this healing process can even be enhanced further. Recent studies have discovered the influential role of kinesiology tape in stimulating proprioceptors in our skin. By amplifying the sensory signals from these receptors, the tape actually encourages greater awareness of the shoulder's positioning and movement. In the context of CrossFit, this heightened body awareness can allow athletes to adjust form and technique rapidly, minimizing injury risk while optimizing performance. Of course, it's crucial to remember that taping your shoulder won't be effective if you neglect other essential elements such as a well-planned bilateral exercise regime, adequate rest and recovery periods, and professional advice. Taping works best as a compliment to an integrated, comprehensive approach to shoulder health. When done right, taping your shoulder will not just provide temporary relief but promote overall shoulder stability, mobility and long-term wellbeing. In conclusion, kinesiology shoulder tape does much more than just offer symptomatic relief. By complimenting other aspects of physical therapy, it supports injury prevention, helps optimise athletic performance, and promotes faster healing. Embracing proper taping strategies can therefore be transformative –not just in recovery from shoulder injuries for CrossFit athletes, but for any individuals reliant on healthy shoulder function.
Subtitle 3
Subtitles are one of the vital components in content accessibility, providing numerous benefits, with three main ideas substantiating this argument. Firstly, they enhance comprehension by providing a textual context that supplements the audiovisual content. Secondly, subtitles have demonstrated immense potential in education, particularly language learning. Lastly, they significantly contribute to improving the user experience by ensuring content is accessible to a broader audience, including non-native speakers and people with hearing impairments. Each of these areas presents essential benefits, making subtitles a fundamental component in diverse content types, including films, video games, and online content. As we delve into these ideas, we commence by dissecting the role of subtitles in enhancing comprehension.
Supporting Idea 1
Understanding the anatomy and function of the shoulder, specifically in terms of its stability and mobility, is crucial in comprehending the mechanism behind taping a shoulder. This understanding is especially important when applying the tape by oneself. This section will focus on the supporting idea that a mindful understanding of the correct techniques and precautions can provide a foundation for self-taping. The shoulder is a complex structure made up of three bones - the collarbone (clavicle), the shoulder blade (scapula), and the upper arm bone (humerus). These bones are interconnected by a network of muscles and tendons that together constitute the rotational joint. Any injury or strain to the shoulder can affect a person's ability to move their arm without experiencing pain or discomfort. Thus, the principle of taping, in this case, rests on supporting these muscles and tendons while minimizing the risk of further injury or strain. Taping the shoulder by oneself can indeed be a tricky task, primarily due to the shoulder's location on the human body. It requires a certain degree of flexibility and dexterity. One must ensure the correct tension in the tape - too loose, and it will not provide adequate support; too tight, and it might restrict blood flow. It is also necessary to position the tape in such a way that it does not restrict the shoulder's movement but supports the affected area. Preparation before taping is a key aspect. The skin should be clean and dry, excess hair should be shaved off, and any open wounds or sensitive areas should be covered. One should always test a small piece of tape on the skin to check for any sensitivity or allergic reaction. Use a mirror to help in placing the tape correctly. Besides technical considerations, it's important to tune into the body's feedback. Post taping, the shoulder should feel supported and pain should decrease. If this is not the case, if the pain persists or the tape causes discomfort, it may mean that the taping has been done incorrectly. It is crucial to revisit the technique or seek professional help if needed. In conclusion, self-taping a shoulder is a technique that, done correctly, can provide immense relief for shoulder-related issues. It requires understanding the anatomy, procedure, and precautions of taping. And while it may seem daunting at first, with some practice and patience, it can be an invaluable skill for maintaining shoulder health and managing pain.
Supporting Idea 2
Preparation A successful shoulder taping process starts with proper preparation. This is essential to ensure that the process is as comfortable, effective, and pain-free as possible. Prior to taping your shoulder, it's imperative to clean the skin thoroughly to remove dirt, sweat, and oils, which can interfere with the adhesive in the tape. Using warm water with mild soap will work in most cases, however, in cases of sensitive or allergic skin types, it may be beneficial to use hypoallergenic skin cleansers. Once the skin is clean and dry, prefacing the taping process with a skin protectant is advised to further guard against potential adverse reactions and promote the lifespan of the tape adhesion. Also, the use of pre-tape foam underwrap is highly recommended to create a protective barrier between the adhesive tape and the skin. Among its benefits, pre-tape foam underwrap provides a smooth surface for applying the tape and adds a layer of comfort that can help reduce potential skin irritation. Before taping, the assessment of the shoulder to be taped is crucial. Identifying the specific area or muscle group involves understanding the functions they play in typical shoulder movements. Knowing the cause of your shoulder discomfort or the results of any diagnosis provided by a healthcare provider could help guide the taping process. These non-medical tips should not replace professional medical advice – always consult with a healthcare professional for serious injuries. If the aim of self-taping your shoulder is to procure added support during physical activities or sports, it's important to know your common shoulder movement patterns for these activities. Different sport disciplines could require different emphasis on certain muscle groups. Insight into these movement patterns can help inform how and where to apply tape for optimal shoulder support. The above steps come together to make the shoulder taping process more effective and beneficial. Whether the goal is to alleviate discomfort, aid recovery, or provide added support, preparation is key to ensuring successful shoulder taping. Proper preparation not only sets the stage for a smooth taping process but also ensures maximum efficacy of the tape and minimizes potential irritation and discomfort. Remember, taping is not a stand-alone solution, but it can be a valuable adjunct to a comprehensive care plan including therapy, exercise, or other interventions recommended by a healthcare provider.
Supporting Idea 3
Supporting Idea 3: Using The Right Taping Techniques for Shoulder Injury Prevention The appropriate taping methodology is a critical component when it comes to the self-application of shoulder tape to prevent or treat injuries. Correctly applying shoulder tape can provide stability, support, and enhanced proprioception - the body's ability to perceive its own position in space. A well-executed technique enables the tape to mimic the action of the shoulder muscles, thus reducing strain and risk of injury. To start, ensure your shoulder is clean and dry. Apply pre-wrap if you have sensitive skin to help protect against irritation. The anchor strips should be applied first, parallel to the collarbone and around the upper arm, avoiding excessive tension to prevent circulation complications. These strips are the foundation for your taping application, helping to stabilize the tape and increase its effectiveness. The next step in the process involves the application of the primary, or functional, strips. These strips are applied over the muscles that need support, typically the deltoids and rotator cuff muscles. Each strip should start from the anchor and extend down the muscle, following its natural movement. The tension applied shouldn't be overly tight as it may restrict movement and cause discomfort. The goal here isn't to immobilize the shoulder, but to provide a supportive structure that emulates the function of the muscles. One popular technique is the 'Cross Taping Method'. In this, two pieces of tape are applied in a cross pattern over the shoulder to create a 'X'. This method is particularly effective for global support of the entire shoulder. For concentrated support, 'Strip Taping' could be employed, where individual strips of tape are used to give focussed stabilization to distinct muscle groups. Lastly, testing the applied tape through some basic shoulder movements is necessary to evaluate the accuracy of the application. There should be a sense of relief or support without any significant restriction in movement. Whether you're an athlete looking for injury prevention or an individual trying to manage a shoulder ailment, understanding the correct self-taping procedures can be a game-changer. However, it's equally imperative to remember that taping is a preventative measure - not a substitute for professional medical consultation and care. It's always best to consult with a professional physiotherapist or a healthcare provider before attempting to tape your shoulder yourself.