How To Make Drawers
Here is the introduction paragraph: Making drawers is a rewarding woodworking project that can add functionality and style to any room in your home. Whether you're a seasoned carpenter or a DIY novice, building drawers can be a fun and challenging project. To get started, it's essential to understand the key steps involved in making drawers. In this article, we'll take you through the process of creating beautiful and functional drawers, from planning and designing the perfect drawer for your needs, to building the drawer box and frame, and finally, adding the finishing touches and hardware. By following these steps, you'll be able to create custom drawers that fit your style and meet your storage needs. So, let's begin by planning and designing your drawers, the first crucial step in bringing your project to life.
Planning and Designing Your Drawers
Planning and designing your drawers is a crucial step in creating a functional and organized space. When it comes to designing your drawers, there are several key factors to consider. First, you need to measure the space and determine the size of your drawers to ensure they fit perfectly and make the most of the available space. Next, you need to choose the type of drawers and materials that suit your needs and style, whether it's a modern and sleek look or a traditional and rustic feel. Finally, you need to create a detailed design and plan that takes into account the layout, functionality, and aesthetics of your drawers. By considering these factors, you can create a drawer system that is both functional and beautiful. In this article, we will explore each of these factors in more detail, starting with the importance of measuring the space and determining the size of your drawers.
Measuring the Space and Determining the Size
To accurately measure the space and determine the size of your drawers, start by taking precise measurements of the area where the drawers will be installed. Record the width, height, and depth of the space, taking into account any obstructions, such as plumbing or electrical fixtures. Next, consider the type of items you plan to store in the drawers and the frequency of use. This will help you determine the optimal drawer size and configuration. For example, if you're building drawers for a kitchen, you may want to include a mix of small, medium, and large drawers to accommodate utensils, cookware, and dinnerware. Measure the items you plan to store and calculate the minimum drawer size required to fit them comfortably. Additionally, consider the style and design of the surrounding cabinetry and the overall aesthetic you want to achieve. You may want to choose a standard drawer size, such as 12, 18, or 24 inches wide, or opt for custom sizes to fit your specific needs. Once you have determined the size and configuration of your drawers, use a tape measure and calculator to double-check your measurements and ensure accuracy. It's also a good idea to create a sketch or drawing of your design to visualize the layout and make any necessary adjustments before beginning construction. By carefully measuring the space and determining the size of your drawers, you can create a functional and efficient storage solution that meets your needs and enhances the overall look of your room.
Choosing the Type of Drawers and Materials
When it comes to choosing the type of drawers and materials for your project, there are several factors to consider. The type of drawers you choose will depend on the intended use, the style of your furniture, and the level of functionality you need. For example, if you're building a dresser or chest of drawers, you may want to consider using traditional drawer slides, which provide smooth and quiet operation. On the other hand, if you're building a kitchen or bathroom cabinet, you may want to consider using soft-close drawer slides, which provide a soft and gentle closing action. In terms of materials, you'll want to choose a type of wood or material that is durable, easy to work with, and fits your budget. Some popular options include solid hardwoods like oak, maple, and cherry, as well as engineered woods like plywood and MDF. You'll also want to consider the type of finish you want to apply to your drawers, such as a stain, paint, or varnish. Additionally, you may want to consider adding decorative elements, such as drawer pulls or knobs, to give your drawers a personalized touch. Ultimately, the type of drawers and materials you choose will depend on your specific needs and preferences, so be sure to take the time to research and plan carefully before making your final decision.
Creating a Detailed Design and Plan
When creating a detailed design and plan for your drawers, it's essential to consider several factors to ensure they meet your needs and fit perfectly in the available space. Start by measuring the area where the drawers will be installed, taking into account any obstacles, such as plumbing or electrical fixtures. Next, decide on the type of drawers you want to build, considering factors like the style, material, and functionality. Think about the size and number of drawers, as well as the type of hardware and handles you'll use. You should also consider the interior features, such as dividers, shelves, or inserts, to maximize storage and organization. Additionally, think about the construction method, including the type of joints, drawer slides, and materials you'll use. It's also crucial to create a detailed sketch or drawing of your design, including measurements and specifications, to ensure accuracy and precision during the building process. By taking the time to create a thorough design and plan, you'll be able to create drawers that are both functional and aesthetically pleasing, and that meet your specific needs and requirements.
Building the Drawer Box and Frame
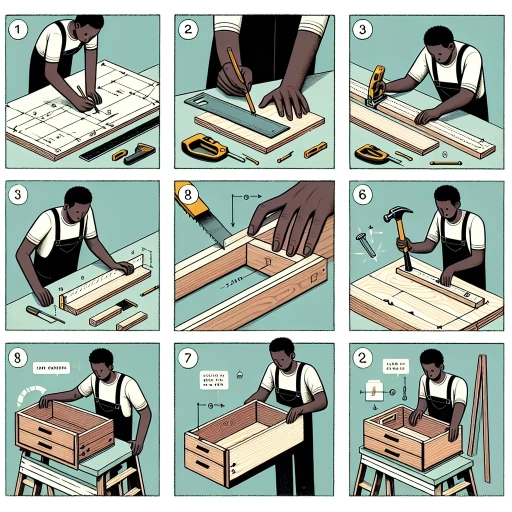
Building a drawer box and frame is a fundamental aspect of furniture making, requiring attention to detail and precision. To create a sturdy and functional drawer, it's essential to follow a step-by-step approach. The process begins with cutting and assembling the drawer box, where careful measurement and accurate cutting are crucial to ensure a snug fit. Next, the drawer frame and slides must be constructed, providing the necessary support and smooth operation. Finally, the drawer box is attached to the frame, completing the assembly. By following these key steps, you'll be able to create a high-quality drawer that will last for years to come. In this article, we'll delve into the specifics of each stage, starting with the critical process of cutting and assembling the drawer box.
Cutting and Assembling the Drawer Box
Cutting and assembling the drawer box is a crucial step in building a functional and sturdy drawer. To start, cut the sides, back, and bottom of the drawer box from 1/2-inch plywood or MDF, using a table saw or circular saw. Cut the pieces slightly oversized to allow for easy assembly and adjustment. Next, cut the drawer box's front and back panels from 1/4-inch plywood or MDF, using a jigsaw or a coping saw. These panels will provide additional support and help to create a smooth, even surface. To assemble the drawer box, use 1 1/4-inch wood screws to attach the sides and back to the bottom panel, making sure to align the edges carefully. Use clamps to hold the pieces in place while screwing. Then, attach the front and back panels to the sides, using 1 1/4-inch wood screws. Make sure the panels are flush with the top and bottom edges of the sides. Finally, use wood glue and 1 1/4-inch wood screws to attach the drawer box's top panel, making sure it is flush with the top edges of the sides. Allow the glue to dry completely before sanding and finishing the drawer box. By following these steps, you can create a sturdy and functional drawer box that will provide years of reliable service.
Constructing the Drawer Frame and Slides
When constructing the drawer frame and slides, it's essential to focus on precision and durability to ensure smooth operation and longevity. Begin by cutting the frame components, including the sides, back, and bottom, using a table saw or a miter saw. Assemble the frame using wood glue and 2 1/4" wood screws, making sure the corners are square and the frame is level. Next, attach the slides to the frame, typically using a slide attachment system or screws. The slides should be evenly spaced and aligned with the frame's edges. For a soft-close drawer, install a soft-close slide system, which includes a damper and a catch. The damper slows down the drawer's closing motion, while the catch holds the drawer in place when closed. To add extra support and stability, consider adding a center support or a drawer glide system. Finally, sand and finish the frame to match the surrounding cabinetry, ensuring a seamless integration. By following these steps, you'll create a sturdy and functional drawer frame and slide system that will provide years of trouble-free service.
Attaching the Drawer Box to the Frame
Attaching the drawer box to the frame is a crucial step in building a functional and sturdy drawer. To do this, you will need to use drawer slides, which are metal tracks that allow the drawer to move in and out of the frame smoothly. Start by attaching the slides to the frame, making sure they are evenly spaced and aligned with the drawer box. Next, attach the slides to the drawer box, ensuring they are securely fastened with screws. It's essential to use the correct type of screws, as they will be bearing the weight of the drawer and its contents. Once the slides are attached, place the drawer box into the frame, ensuring it is properly aligned and seated. Finally, attach the drawer front to the drawer box, using screws or nails to secure it in place. With the drawer box attached to the frame, you can now add the finishing touches, such as handles or knobs, to complete your drawer.
Adding Finishing Touches and Hardware
The final touches on a piece of furniture can make all the difference in its overall appearance and functionality. When it comes to adding finishing touches and hardware to a drawer, there are several key elements to consider. First, the drawer surfaces must be sanded and finished to a high standard to ensure a smooth and durable finish. Additionally, the right hardware, such as handles and knobs, can add a touch of style and sophistication to the drawer. Finally, features like soft-close slides can enhance the user experience and make the drawer more functional. In this article, we will explore each of these elements in more detail, starting with the importance of sanding and finishing the drawer surfaces.
Sanding and Finishing the Drawer Surfaces
Sanding and finishing the drawer surfaces is a crucial step in the drawer-making process. It not only enhances the appearance of the drawers but also protects the wood from damage and wear. To start, use a coarse-grit sandpaper (about 120-150 grit) to sand the entire surface of the drawer, paying particular attention to any areas with imperfections or rough spots. This will help to smooth out the wood and remove any debris or dust. Next, switch to a finer-grit sandpaper (220-240 grit) and sand the surface again, this time focusing on creating a smooth, even finish. Be sure to sand with the wood grain to avoid scratching the surface. Once you've achieved a smooth finish, use a tack cloth to remove any dust or debris from the sanding process. Now it's time to apply a finish to the drawer surfaces. Depending on the type of wood and the desired look, you can choose from a variety of finishes, such as stain, polyurethane, or wax. Apply the finish according to the manufacturer's instructions, making sure to follow any recommended drying times and application techniques. Finally, once the finish is dry, use a clean, soft cloth to buff the surface and create a high-gloss finish. With the drawer surfaces sanded and finished, you can now move on to adding the final touches, such as hardware and any decorative trim or molding.
Installing Drawer Handles and Knobs
Installing drawer handles and knobs is a straightforward process that can elevate the functionality and aesthetic of your drawers. To begin, ensure you have the necessary tools and materials, including a screwdriver, drill, and the handles or knobs themselves. Start by measuring the distance between the screw holes on the handle or knob and the corresponding holes on the drawer. This will help you determine the correct placement and alignment. Next, mark the spot where you want to install the handle or knob, taking into account the style and design of your drawer. Use a level to ensure the mark is straight and even. Then, drill pilot holes for the screws, being careful not to damage the surrounding material. Insert the screws into the holes and attach the handle or knob, tightening the screws firmly to secure it in place. For a more polished look, consider adding a decorative backplate or rosette to cover the screw holes. Finally, test the handle or knob to ensure it is securely attached and functions smoothly. With these simple steps, you can add a professional touch to your drawers and enhance their overall functionality.
Adding Soft-Close Slides and Other Features
Adding soft-close slides and other features can elevate the functionality and user experience of your drawers. Soft-close slides, in particular, provide a smooth and quiet closing action, preventing drawers from slamming shut and reducing wear and tear on the drawer and surrounding cabinet. To install soft-close slides, start by attaching the slide's mounting bracket to the drawer's side panel, ensuring it's level and secure. Next, attach the slide's roller or bearing to the cabinet's side panel, making sure it's aligned with the mounting bracket. Finally, attach the drawer to the slide, adjusting the slide's tension to achieve a smooth and quiet close. Other features you may consider adding include drawer dividers, which help keep contents organized and prevent clutter from building up. You can also add a drawer liner, such as a non-slip mat or a decorative paper, to protect the drawer's bottom and add a touch of style. Additionally, consider installing a drawer lock or latch to secure the drawer and prevent unauthorized access. By incorporating these features, you can create a functional and user-friendly drawer system that meets your specific needs and enhances the overall quality of your project.