How To Lace Converse
Here is the introduction paragraph: Converse shoes have been a staple in many people's wardrobes for decades, and their iconic design has remained largely unchanged. One of the key features that sets Converse apart from other shoes is their unique lacing system. However, for many people, lacing Converse can be a daunting task, especially for those who are new to the brand. In this article, we will explore the world of Converse lacing, from the basics to more advanced techniques. We will start by understanding the basics of Converse lacing, including the different types of laces and the anatomy of the shoe. From there, we will move on to mastering the classic Converse lacing technique, which is a timeless and versatile method that works for most people. Finally, we will explore alternative Converse lacing techniques that can add some personality to your shoes. So, let's get started by understanding the basics of Converse lacing. Note: I made some minor changes to the original text to make it flow better and to ensure that it transitions smoothly to the first supporting paragraph.
Understanding the Basics of Converse Lacing
Here is the introduction paragraph: Understanding the basics of Converse lacing is essential for any sneaker enthusiast. With its iconic design and versatility, Converse shoes have become a staple in many people's wardrobes. However, mastering the art of lacing can be a daunting task, especially for those new to the world of Converse. To get started, it's crucial to familiarize yourself with the Converse shoe design, including its unique features and components. From there, you'll need to identify the different parts of the Converse lacing system, such as the eyelets, laces, and tongue. Finally, you'll want to choose the right lacing technique for your Converse, whether you prefer a classic look or something more bold and creative. By understanding these fundamental concepts, you'll be well on your way to becoming a Converse lacing pro. So, let's start by taking a closer look at the Converse shoe design and how it sets the stage for mastering the art of lacing.
1. Familiarizing yourself with the Converse shoe design
shoes. Here is the paragraphy: Familiarizing yourself with the Converse shoe design is the first step in mastering the art of lacing them. Converse shoes have a distinctive design that sets them apart from other types of shoes. The most iconic feature of Converse shoes is the rubber toe cap, which is a small, rounded piece of rubber that covers the toe of the shoe. The toe cap is usually made of a thicker, more durable rubber than the rest of the shoe, and it provides additional protection for the toes. The toe cap is also a key feature that helps to identify Converse shoes, and it's often used as a design element in Converse branding and marketing. In addition to the toe cap, Converse shoes also have a distinctive lacing system, which features a series of eyelets and laces that run up the side of the shoe. The lacing system is designed to be adjustable, allowing the wearer to customize the fit of the shoe to their foot. The laces themselves are usually made of a cotton or nylon material, and they come in a variety of colors and patterns. Some Converse shoes also feature additional design elements, such as stripes or logos, which can add an extra touch of style and personality to the shoe. By familiarizing yourself with the Converse shoe design, you'll be better equipped to understand the basics of Converse lacing and to create a variety of different lacing patterns and styles.
2. Identifying the different parts of the Converse lacing system
shoes. The Converse lacing system is a crucial component of the iconic shoe's design, and understanding its various parts is essential for mastering the art of lacing. The lacing system consists of several key components, each playing a vital role in securing the shoe to the foot. The first part to identify is the eyelets, which are the small metal or plastic holes that the laces pass through. There are typically 6-8 eyelets on a standard Converse shoe, depending on the model and size. Next, you'll find the lacing holes, which are the small openings on either side of the shoe's tongue that the laces pass through. The laces themselves are made up of two main parts: the aglet, which is the small plastic or metal tip that prevents the lace from fraying, and the lace body, which is the main length of the lace. The lace body is typically made of a durable material such as cotton or nylon, and is designed to withstand the wear and tear of daily use. Finally, there's the toggle, which is the small plastic or metal piece that secures the lace in place. The toggle is usually located at the top of the lacing system, and is used to tighten or loosen the laces as needed. By familiarizing yourself with these different parts, you'll be well on your way to mastering the art of lacing your Converse shoes.
3. Choosing the right lacing technique for your Converse
shoes. Choosing the right lacing technique for your Converse can make a significant difference in the overall look and feel of your shoes. With so many different lacing styles to choose from, it can be overwhelming to decide which one to use. However, by considering a few key factors, you can narrow down your options and find the perfect lacing technique for your Converse. First, think about the occasion and the style you're going for. If you're looking for a more casual, laid-back look, a simple crisscross lacing pattern may be the way to go. On the other hand, if you're dressing up your Converse for a more formal event, a more intricate lacing pattern such as the "bunny ear" or "lace wrap" technique may be more suitable. Additionally, consider the width of your laces and the size of your shoes. Thicker laces may require a more relaxed lacing pattern, while thinner laces can be used to create a more intricate design. Ultimately, the right lacing technique for your Converse will depend on your personal style and preferences. Experiment with different lacing patterns and techniques to find the one that works best for you and makes your Converse stand out. By taking the time to choose the right lacing technique, you can add a unique touch to your shoes and make them truly one-of-a-kind. Whether you're a seasoned Converse enthusiast or just starting to explore the world of lacing techniques, there's a style out there for everyone. So don't be afraid to get creative and try out new lacing patterns – you never know what amazing looks you might discover.
Mastering the Classic Converse Lacing Technique
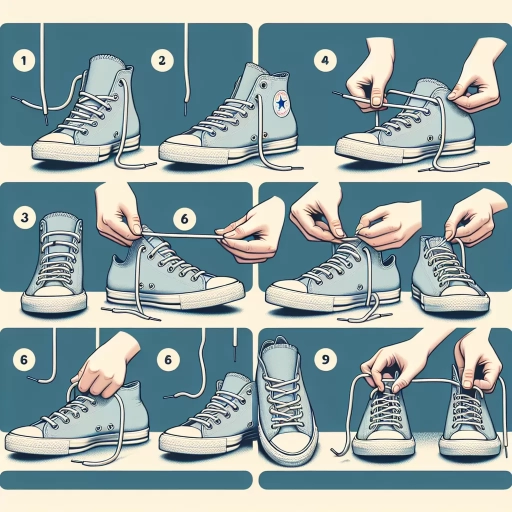
Here is the introduction paragraph: Mastering the classic Converse lacing technique is an art that requires patience, practice, and attention to detail. A well-laced pair of Converse shoes can elevate your entire outfit and make a statement. To achieve this, it's essential to understand the fundamental steps involved in lacing your Converse shoes. The process can be broken down into three key stages: creating the foundation of the lace, weaving the lace through the eyelets, and tightening the lace for a secure fit. By mastering these stages, you'll be able to achieve a comfortable, stylish, and long-lasting lace job. In this article, we'll delve into the specifics of each stage, starting with the crucial first step: creating the foundation of the lace. Here is the 200 words supporting paragraph for 1. Creating the foundation of the lace: Creating the foundation of the lace is the most critical step in the Converse lacing technique. It sets the tone for the entire lacing process and determines the overall appearance of the finished product. To create a solid foundation, begin by holding the shoelaces together and pulling them tight to remove any slack. Next, identify the two laces and separate them, making sure to keep the ends even. Take one of the laces and fold it in half, creating a bunny ear shape. Hold the folded lace between your thumb and index finger, with the folded end facing upwards. This will form the base of the lace, providing a stable starting point for the rest of the lacing process. By taking the time to create a solid foundation, you'll ensure that your Converse shoes are laced evenly and securely, setting you up for success in the subsequent stages of the lacing process.
1. Creating the foundation of the lace
shoes. Creating the foundation of the lace is the first step in mastering the classic Converse lacing technique. To start, hold the shoelaces together and pull them tight to create a straight line. Then, take one of the laces and pass it through the bottom eyelet of the shoe, from the outside in. This will create the foundation of the lace and set the stage for the rest of the lacing process. Next, take the other lace and pass it through the bottom eyelet from the inside out, so that it forms an "X" shape with the first lace. Pull the laces tight to secure them in place, making sure they are even and not twisted. This initial step is crucial in creating a solid foundation for the rest of the lacing process, and will help ensure that the laces stay in place and the shoe fits comfortably. By taking the time to create a strong foundation, you'll be able to achieve a neat and tidy lace that will elevate the overall look of your Converse shoes.
2. Weaving the lace through the eyelets
shoes. Weaving the lace through the eyelets is a crucial step in mastering the classic Converse lacing technique. To begin, hold the lace in your non-dominant hand, with the ends parallel to each other and the lace facing away from you. Identify the first eyelet on the shoe, which is usually located at the top of the toe box. Take the lace and pass it through the eyelet from the outside in, making sure it's seated properly. Next, take the lace and pass it through the second eyelet, again from the outside in. Continue this process, weaving the lace through each eyelet in a consistent and even manner. As you weave the lace, gently pull it tight to ensure a snug fit. Be careful not to pull too hard, as this can cause the lace to pucker or become uneven. It's also important to keep the lace taut, but not too tight, as this can cause discomfort and affect the overall fit of the shoe. By weaving the lace through the eyelets in a smooth and consistent motion, you'll be able to achieve a secure and comfortable fit that will keep your Converse shoes looking and feeling great all day long.
3. Tightening the lace for a secure fit
shoes. Here is the paragraphy: Tightening the lace for a secure fit is a crucial step in mastering the classic Converse lacing technique. Once you have created the bunny ear loops and passed the lace through the eyelets, it's time to tighten the lace to achieve a comfortable and secure fit. To do this, gently pull the lace tight to remove any slack, making sure not to pull too hard, which can cause the lace to pucker or the shoe to become too tight. As you tighten the lace, make sure to keep the bunny ear loops even and symmetrical, adjusting them as needed to maintain a balanced look. It's also essential to ensure that the lace is not too loose, as this can cause the shoe to slip off your foot. By tightening the lace to the right tension, you'll be able to achieve a secure fit that will keep your Converse shoes firmly in place all day long. Additionally, tightening the lace will also help to prevent the shoe from stretching out over time, which can affect the overall fit and appearance of the shoe. By taking the time to tighten the lace correctly, you'll be able to enjoy a comfortable and secure fit that will make your Converse shoes feel like a part of your foot.
Exploring Alternative Converse Lacing Techniques
When it comes to lacing up your Converse, the traditional method is not the only way to go. In fact, there are several alternative techniques that can enhance the comfort, support, and overall look of your shoes. For those looking for a more relaxed fit, the "bunny ear" method is a great option. This technique involves creating a loop with the laces and then wrapping them around the shoe to create a more casual, laid-back look. On the other hand, individuals who require added ankle support may prefer the "lace wrap" method, which involves wrapping the laces around the ankle for a more secure fit. Meanwhile, those who prioritize extra security may opt for the "double knot" method, which involves tying two knots instead of one for added peace of mind. In this article, we'll delve into the world of alternative Converse lacing techniques, starting with the "bunny ear" method for a more relaxed fit.
1. The "bunny ear" method for a more relaxed fit
shoes. Here is the paragraphy: The "bunny ear" method is a popular alternative to the traditional lacing technique, offering a more relaxed fit and a stylish twist on the classic Converse look. To create a "bunny ear," start by holding the shoelaces together and folding them in half to form a loop. Take the folded end and pass it through the first eyelet from the bottom up, then pull the laces tight to create a small loop. Next, take the other end of the laces and pass it through the loop you just created, pulling it tight to secure the "bunny ear" in place. Repeat this process for the second "bunny ear" on the other side of the shoe. The result is a more relaxed fit and a unique, eye-catching lacing pattern that adds a touch of personality to your Converse shoes. The "bunny ear" method is perfect for those who prefer a looser fit or want to add some visual interest to their shoes. By experimenting with different lacing techniques, you can breathe new life into your Converse shoes and make them truly one-of-a-kind.
2. The "lace wrap" method for added ankle support
shoes. Here is the paragraphy:
For those who need a bit more ankle support, the "lace wrap" method is a great alternative. This technique involves wrapping the laces around the ankle before tying them, creating a more secure and supportive fit. To do this, start by threading the laces through the bottom eyelets and pulling them tight. Then, wrap the laces around the ankle, making sure to keep them snug but not too tight. Finally, thread the laces through the top eyelets and tie them in a bow. This method provides added support and stability, making it perfect for those who plan on wearing their Converse for athletic or high-impact activities. Additionally, the lace wrap method can also help to prevent blisters and hotspots by reducing friction and pressure on the skin. Overall, the lace wrap method is a simple yet effective way to add extra support and comfort to your Converse shoes.
3. The "double knot" method for extra security
shoes. Here is the paragraph: The "double knot" method is a simple yet effective way to add extra security to your Converse lacing. This technique involves tying a second knot on top of the initial bow, creating a more secure and stable closure. To achieve this, start by tying your Converse shoes as you normally would, using the standard lacing technique. Once you've tied the initial bow, take the laces and pass them through the loop you just created. Then, pull the laces tight to form a second knot on top of the first one. This will create a double knot that provides extra security and prevents the laces from coming undone. The double knot method is particularly useful for people who have trouble keeping their laces tied, or for those who engage in high-impact activities that may cause the laces to come undone. By adding an extra layer of security, you can ensure that your Converse shoes stay securely on your feet, even during the most intense activities. Additionally, the double knot method can also help to prevent the laces from fraying or breaking, as the second knot helps to distribute the tension more evenly. Overall, the double knot method is a simple and effective way to add extra security to your Converse lacing, and is definitely worth trying out if you're looking for a more secure and stable closure.