How To Tie Dye Patterns
Tie dye is a timeless and versatile art form that has been a staple of fashion and self-expression for centuries. From its origins in ancient cultures to its modern-day applications, tie dye has evolved into a dynamic and creative medium that allows individuals to express their unique style and personality. Whether you're a seasoned artist or a curious beginner, tie dye offers a world of possibilities for experimentation and innovation. In this article, we'll delve into the world of tie dye and explore the fundamental principles, creative techniques, and advanced methods that will help you unlock your full potential as a tie dye artist. We'll start by understanding the basics of tie dye, including the materials, tools, and techniques required to get started. From there, we'll move on to creating unique tie dye patterns, exploring the various folding, binding, and dyeing methods that can be used to achieve stunning and one-of-a-kind designs. Finally, we'll push the boundaries of tie dye with advanced techniques, including multi-color dyeing, resist methods, and innovative folding techniques. So, let's begin our journey into the world of tie dye by understanding the basics of this ancient and fascinating art form.
Understanding the Basics of Tie Dye
Tie dye is a fun and creative way to add some personality to your clothing and textiles. To get started with tie dye, it's essential to understand the basics of the process. This includes choosing the right fabric, preparing the dye, and understanding the various folding techniques that can be used to create unique patterns. By mastering these fundamental steps, you can unlock a world of creative possibilities and achieve professional-looking results. When it comes to tie dye, the type of fabric you use can make all the difference in the final product. Therefore, it's crucial to choose the right fabric for your project, which is why we'll start by exploring the different types of fabrics that work well with tie dye.
Choosing the Right Fabric
Choosing the right fabric is a crucial step in achieving the desired tie-dye pattern. Natural fibers such as cotton, linen, and rayon are ideal for tie-dye as they absorb dye well and produce vibrant colors. Cotton is the most popular choice for tie-dye due to its softness, durability, and ability to hold dye. Linen and rayon are also great options, but they may require additional preparation before dyeing. Synthetic fibers like polyester and nylon can also be used, but they may not produce the same level of color intensity as natural fibers. It's also important to consider the weight and weave of the fabric, as loose weaves and lightweight fabrics may not hold dye as well as denser fabrics. Additionally, pre-washed and pre-shrunk fabrics are recommended to ensure that the dye penetrates evenly and the fabric doesn't shrink after dyeing. By selecting the right fabric, you can ensure that your tie-dye project turns out with the desired colors and patterns.
Preparing the Dye
Preparing the dye is a crucial step in the tie-dye process. To start, you'll need to mix the dye powder with soda ash, a fixative that helps the dye bind to the fabric. The ratio of dye to soda ash is usually 1:1, but this can vary depending on the type of dye and fabric you're using. It's also important to wear protective gloves and work in a well-ventilated area, as the dye can be hazardous to your skin and respiratory system. Once you've mixed the dye and soda ash, you'll need to add hot water to create the dye solution. The temperature of the water will depend on the type of dye you're using, but it's usually around 100°F to 110°F. Stir the solution well to ensure the dye is fully dissolved, and then let it sit for about 10 minutes to allow the soda ash to activate. This will help the dye penetrate the fabric more evenly and create a more vibrant color. Finally, you can add any additional ingredients, such as salt or vinegar, to enhance the color and texture of the dye. With your dye solution prepared, you're now ready to start folding and binding your fabric to create your unique tie-dye design.
Understanding the Folding Techniques
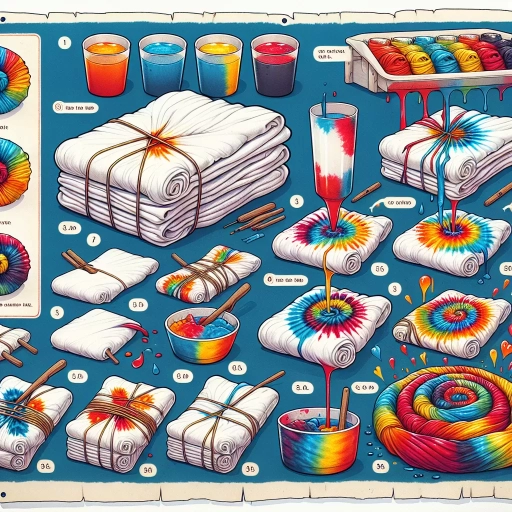
Understanding the folding techniques is a crucial step in creating unique and intricate tie-dye patterns. There are several folding techniques that can be used to achieve different effects, and mastering these techniques can help you create a wide range of designs. The most common folding techniques include the accordion fold, the spiral fold, and the bunny ear fold. The accordion fold involves folding the fabric into a series of pleats, which creates a striped or zig-zagged pattern. The spiral fold involves folding the fabric into a spiral shape, which creates a circular or swirling pattern. The bunny ear fold involves folding the fabric into a series of small triangles, which creates a geometric or abstract pattern. In addition to these basic folding techniques, you can also experiment with more complex folds, such as the twist fold or the fold and bind technique. The twist fold involves twisting the fabric into a rope-like shape, which creates a textured or dimensional pattern. The fold and bind technique involves folding the fabric into a series of small folds and then binding them with string or rubber bands, which creates a resist pattern. By combining different folding techniques and experimenting with different folds, you can create a wide range of unique and intricate tie-dye patterns.
Creating Unique Tie Dye Patterns
Tie dye is a timeless and versatile art form that allows individuals to express their creativity and add a personal touch to their clothing and textiles. One of the most exciting aspects of tie dye is the ability to create unique and intricate patterns. By experimenting with different folding techniques, binding methods, and dyeing processes, artists can achieve a wide range of effects and designs. In this article, we will explore three innovative folding techniques that can help you take your tie dye game to the next level: The Bullseye Fold, The Spiral Fold, and The Bunny Ear Fold. Each of these techniques offers a distinct approach to creating unique patterns and designs. By mastering these folds, you can unlock a world of creative possibilities and produce truly one-of-a-kind tie dye pieces. Let's start by exploring The Bullseye Fold, a technique that involves folding the fabric into a series of concentric circles to create a stunning, target-like pattern.
The Bullseye Fold
The Bullseye Fold is a popular technique used to create unique and visually striking tie-dye patterns. This method involves folding the fabric into a series of concentric circles, resembling a bullseye target, to achieve a distinctive and symmetrical design. To create a Bullseye Fold, start by folding the fabric into a series of pleats, with each pleat slightly overlapping the previous one. The folds should be made in a circular motion, working from the center of the fabric outwards. As you fold, make sure to maintain even tension and keep the edges aligned to ensure a crisp, symmetrical pattern. Once the fabric is fully folded, bind it with rubber bands or string to hold the folds in place. The resulting pattern will feature a series of concentric circles, with the dye penetrating the fabric in a gradient-like effect. The Bullseye Fold is a versatile technique that can be used to create a wide range of designs, from subtle and muted to bold and vibrant. By experimenting with different folding techniques, dye colors, and binding methods, you can achieve a unique and eye-catching tie-dye pattern that's sure to turn heads.
The Spiral Fold
The Spiral Fold is a popular technique used in tie-dye to create unique and intricate patterns. To achieve this fold, start by laying your fabric flat and identifying the center point. From the center, fold the fabric outwards in a spiral motion, creating a series of concentric circles. The key to a successful Spiral Fold is to maintain a consistent folding pattern, ensuring that each layer is evenly spaced and symmetrical. As you fold, you can adjust the tightness of the spiral to control the density of the pattern. A tighter spiral will result in a more intricate design, while a looser spiral will produce a more subtle effect. Once you have completed the fold, bind the fabric with rubber bands or string to hold it in place, and then proceed with the dyeing process. The Spiral Fold is a versatile technique that can be used to create a wide range of patterns, from bold and graphic to soft and organic. By experimenting with different folding techniques and dye colors, you can achieve a unique and personalized design that reflects your individual style. Whether you're a seasoned tie-dye artist or just starting out, the Spiral Fold is a great technique to add to your repertoire, offering endless possibilities for creative expression.
The Bunny Ear Fold
The Bunny Ear Fold is a popular technique used in tie-dye to create unique and intricate patterns on fabric. This fold involves folding the fabric into a series of bunny ear-like shapes, which are then bound together with rubber bands or string to create resistance areas where the dye cannot penetrate. The result is a beautiful, multi-colored design with a distinctive texture and visual interest. To achieve the Bunny Ear Fold, start by folding the fabric into a series of triangles, with the right sides together. Then, take the top layer of the fabric and fold it back, creating a bunny ear shape. Repeat this process, folding the fabric back and forth, creating multiple bunny ear shapes. Once you have achieved the desired number of folds, bind the fabric together with rubber bands or string, making sure to apply even pressure to create consistent resistance areas. The Bunny Ear Fold can be used to create a variety of patterns, from simple and subtle to complex and bold. By experimenting with different folding techniques, binding methods, and dye colors, you can create truly unique and eye-catching designs that add an extra layer of visual interest to your tie-dye projects. Whether you're a seasoned tie-dye artist or just starting out, the Bunny Ear Fold is a fun and creative technique to add to your repertoire.
Advanced Tie Dye Techniques
Tie dye is a timeless and versatile technique that has been used for centuries to create unique and eye-catching designs on fabric. While traditional tie dye methods can produce beautiful results, advanced techniques can take your designs to the next level. In this article, we will explore three advanced tie dye techniques that can help you create stunning and intricate designs: using multiple colors, creating ombre effects, and adding additional design elements. By mastering these techniques, you can create complex and visually striking patterns that will set your designs apart from the rest. One of the most exciting aspects of advanced tie dye is the ability to experiment with multiple colors, which can add depth and dimension to your designs. By using multiple colors, you can create intricate patterns and designs that are truly one-of-a-kind. Let's take a closer look at how to use multiple colors in your tie dye designs.
Using Multiple Colors
Using multiple colors is a great way to add depth and visual interest to your tie-dye designs. To achieve a multi-colored effect, you can use a variety of techniques, such as folding, twisting, or pleating the fabric to create resistance areas where the dye can't penetrate. You can also use stencils or stickers to create intricate designs and patterns. When working with multiple colors, it's essential to consider the color theory and how the different hues will interact with each other. You can create harmonious color combinations by using analogous colors, complementary colors, or triadic colors. Analogous colors are next to each other on the color wheel, such as blue, green, and yellow, and create a smooth transition between colors. Complementary colors, on the other hand, are opposite each other on the color wheel, such as blue and orange, and create a bold and contrasting effect. Triadic colors are equally spaced from each other on the color wheel, such as blue, yellow, and red, and create a balanced and vibrant effect. By experimenting with different color combinations and techniques, you can create unique and stunning tie-dye designs that showcase your creativity and style. Additionally, you can also use different shades of the same color to create an ombre effect, or use metallic or neon colors to add an extra dimension to your design. With practice and patience, you can master the art of using multiple colors in tie-dye and create truly breathtaking pieces of art.
Creating Ombre Effects
Creating ombre effects in tie-dye is a fascinating technique that involves gradating colors from light to dark to achieve a mesmerizing, multi-tonal effect. To create an ombre effect, you'll need to fold and bind your fabric in a way that allows the dye to penetrate the fabric in a gradual, layered manner. One approach is to use a series of rubber bands or twist ties to create a series of small, concentric folds in the fabric, with each fold slightly overlapping the one before it. As you apply the dye, the folded areas will resist the color, creating a subtle, gradient-like effect. Another technique is to use a shibori method, where you fold and bind the fabric in a series of accordion-like pleats, allowing the dye to seep into the fabric in a gradual, ombre-like pattern. To enhance the ombre effect, you can also experiment with different dyeing techniques, such as using multiple colors or applying the dye in a series of layers, allowing each layer to dry before adding the next. By carefully controlling the amount of dye and the way it's applied, you can achieve a stunning, ombre-effect tie-dye that's sure to turn heads. Whether you're looking to add a touch of sophistication to a simple t-shirt or create a show-stopping piece of art, the ombre effect is a versatile and eye-catching technique that's sure to elevate your tie-dye game.
Adding Additional Design Elements
Adding additional design elements to your tie-dye project can elevate it from a simple, monochromatic design to a complex, visually striking piece of art. One way to add extra design elements is through the use of stencils. You can create your own stencils using cardstock or acetate, or purchase pre-made stencils in various shapes and designs. Apply the stencil to your fabric, and then use a resist or dye to create a design within the stencil. Another way to add design elements is through the use of shibori techniques, such as folding, twisting, or pleating the fabric to create unique patterns and textures. You can also use beads, sequins, or other embellishments to add visual interest to your design. Additionally, you can use natural materials like leaves, flowers, or branches to create unique, organic designs. By experimenting with different design elements and techniques, you can create a truly one-of-a-kind tie-dye piece that showcases your creativity and skill.