How To Draw Lips Step By Step
Drawing lips can be a challenging task, especially for beginners. However, with practice and patience, anyone can master the art of drawing realistic and beautiful lips. To get started, it's essential to understand the basics of lip structure, including the shape, proportions, and anatomy of the lips. Once you have a solid grasp of the basics, you can move on to sketching the basic shape and proportions of the lips, taking into account the unique characteristics of the individual you're drawing. Finally, adding details and texture to the lips can bring your drawing to life and give it a more realistic appearance. In this article, we'll take a step-by-step approach to drawing lips, starting with the foundation of understanding the basics of lip structure.
Understanding the Basics of Lip Structure
The lips are a vital part of our facial structure, playing a significant role in our overall appearance and ability to express emotions. Understanding the basics of lip structure is essential for various fields, including cosmetics, dentistry, and facial reconstruction. To gain a deeper understanding of the lips, it is crucial to recognize the Cupid's bow and its importance, identify the different parts of the lips, and understand the relationship between the lips and the surrounding facial features. By examining these aspects, we can appreciate the complexity and beauty of the lips. Let's start by recognizing the Cupid's bow and its importance, a distinctive feature that sets the tone for the rest of the lip structure.
Recognizing the Cupid's Bow and Its Importance
The Cupid's bow is a distinctive feature of the lips that plays a crucial role in their overall shape and appearance. Located at the upper lip, it is the curved shape formed by the meeting of the two medial peaks, which are the highest points of the Cupid's bow. The Cupid's bow is essential in defining the lip's contours and is a key element in creating a natural and aesthetically pleasing lip shape. When drawing lips, accurately capturing the Cupid's bow is vital, as it sets the tone for the rest of the lip structure. A well-defined Cupid's bow can add depth, dimension, and sensuality to the lips, making them more visually appealing. Conversely, a poorly drawn Cupid's bow can result in lips that appear unnatural, asymmetrical, or even unattractive. Therefore, recognizing and accurately rendering the Cupid's bow is a fundamental skill for anyone looking to master the art of drawing lips.
Identifying the Different Parts of the Lips
The lips are a complex and intricate facial feature, comprising several distinct parts that work together to form their unique shape and function. To accurately draw lips, it's essential to understand the different components that make up this facial feature. The Cupid's bow, also known as the vermilion border, is the curved shape of the upper lip, formed by the meeting of the two philtral columns. The philtral columns are the two ridges of skin that run from the nose to the Cupid's bow, creating a distinctive groove in the center of the upper lip. The vermilion zone, also known as the lip body, is the fleshy part of the lip that contains the mucous membrane and is responsible for the lip's color and texture. The oral commissures are the corners of the mouth, where the lips meet, and the labial fissure is the groove that runs along the edge of the lips, separating them from the surrounding skin. The lip margins are the edges of the lips, where they meet the surrounding skin, and the lip tubercle is the small bump at the center of the lower lip. By understanding the different parts of the lips and how they relate to each other, artists can create more accurate and detailed drawings of this complex facial feature.
Understanding the Relationship Between the Lips and the Surrounding Facial Features
The lips are an integral part of the facial structure, and their shape and appearance are closely tied to the surrounding facial features. The Cupid's bow, the curve of the upper lip, is influenced by the shape of the nose and the philtrum, the groove between the nose and the upper lip. A well-defined Cupid's bow is often associated with a more prominent nose and a deeper philtrum. The shape of the lower lip is also influenced by the jawline and the chin, with a stronger jawline often resulting in a more defined lower lip. The fullness of the lips is also related to the overall facial structure, with fuller lips often found on individuals with a more rounded face shape. Understanding the relationship between the lips and the surrounding facial features is essential for creating a realistic and harmonious drawing of the lips. By taking into account the shape and proportions of the nose, philtrum, jawline, and chin, artists can create a more accurate and aesthetically pleasing representation of the lips.
Sketching the Basic Shape and Proportions of the Lips
Sketching the basic shape and proportions of the lips is a crucial step in creating a realistic and visually appealing portrait. To achieve this, artists can employ several techniques to ensure accuracy and harmony. Firstly, using simple shapes to block out the lip form allows for a solid foundation, enabling the artist to focus on the overall structure and proportions. Additionally, measuring and proportioning the lips in relation to the face is essential to maintain a natural and balanced appearance. Finally, creating a soft, gentle curve for the lip line adds a touch of subtlety and nuance to the overall lip shape. By mastering these techniques, artists can confidently sketch the basic shape and proportions of the lips, setting the stage for a stunning portrait. Let's start by exploring how to use simple shapes to block out the lip form.
Using Simple Shapes to Block Out the Lip Form
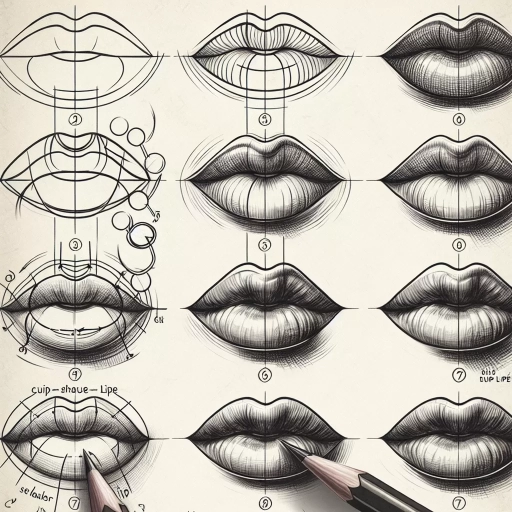
When sketching the basic shape and proportions of the lips, using simple shapes to block out the lip form is a helpful technique. Start by drawing a horizontal line to represent the width of the mouth, and then add a gentle, curved line above it to indicate the Cupid's bow. The Cupid's bow is the curved shape of the upper lip, and it's essential to capture its subtle curve to achieve a natural look. Next, draw a slightly curved line below the horizontal line to represent the lower lip. The lower lip should be slightly fuller than the upper lip, so make sure to add a bit more curvature to this line. Use simple shapes, such as circles or ovals, to help you block out the overall shape of the lips. For example, you can use a small circle to represent the center of the mouth, and then use gentle, curved lines to connect it to the Cupid's bow and the lower lip. By using simple shapes to block out the lip form, you can create a more accurate and proportionate drawing of the lips. This technique also helps to simplify the drawing process, allowing you to focus on capturing the subtle nuances of the lip shape and proportions.
Measuring and Proportioning the Lips in Relation to the Face
Measuring and proportioning the lips in relation to the face is a crucial step in drawing realistic and harmonious lips. To start, measure the width of the face and divide it into thirds both horizontally and vertically. The lips should be positioned at the intersection of the horizontal and vertical lines, with the cupid's bow (the curve of the upper lip) aligned with the top of the nose. The width of the lips should be approximately one-third of the width of the face, with the mouth being slightly wider than the nose. The height of the lips should be about one-quarter of the height of the face, with the upper lip being slightly thinner than the lower lip. When measuring the proportions of the lips, it's also important to consider the shape and size of the surrounding facial features, such as the nose, eyes, and jawline. By carefully measuring and proportioning the lips in relation to the face, artists can create a more balanced and realistic portrait.
Creating a Soft, Gentle Curve for the Lip Line
When creating a soft, gentle curve for the lip line, it's essential to consider the overall shape and proportions of the lips. Start by sketching a subtle, smooth curve that follows the natural contours of the mouth. The upper lip should be slightly thinner and more curved than the lower lip, with a gentle dip in the center. To achieve this, use short, gentle strokes to build up the shape, gradually increasing the pressure and thickness of the line as you move from the center outwards. Pay attention to the subtle nuances of the lip line, such as the slight upturn at the outer corners and the gentle downward slope at the center. By carefully crafting the curve of the lip line, you can create a soft, inviting shape that adds depth and dimension to your drawing. As you refine the shape, remember to keep the lines smooth and fluid, avoiding any harsh or angular edges that can detract from the overall softness of the lips. By taking the time to carefully craft the lip line, you can create a beautiful, realistic shape that draws the viewer's eye and adds a touch of elegance to your drawing.
Adding Details and Texture to the Lips
When it comes to creating realistic and captivating lip art, adding details and texture is crucial. A well-defined lip shape, subtle shading, and intricate texture can make all the difference in achieving a lifelike appearance. To take your lip art to the next level, it's essential to focus on three key aspects: defining the lip contours and edges, adding shading and dimension, and creating realistic texture and patterns. By mastering these techniques, you'll be able to create lips that look and feel incredibly realistic. In this article, we'll delve into each of these aspects, starting with the foundation of any great lip art: defining the lip contours and edges. By establishing a clear and precise lip shape, you'll set the stage for adding depth, dimension, and texture, ultimately bringing your lip art to life.
Defining the Lip Contours and Edges
Defining the lip contours and edges is a crucial step in drawing realistic lips. To start, use a gentle pencil stroke to outline the shape of the lips, paying attention to the Cupid's bow, the curve of the upper lip, and the shape of the lower lip. The Cupid's bow should be defined by two small curves that meet at the center of the upper lip, while the lower lip should be slightly fuller and more rounded. Next, refine the edges of the lips by adding subtle curves and contours that follow the natural shape of the mouth. The edges of the lips should be soft and subtle, with a slight tapering towards the corners of the mouth. To add depth and dimension to the lips, use a range of values and shading techniques to create a sense of volume and curvature. By carefully defining the lip contours and edges, you can create a realistic and attractive mouth that draws the viewer's eye.
Adding Shading and Dimension to the Lips
Adding shading and dimension to the lips can elevate the overall realism and allure of your drawing. To achieve this, start by identifying the areas where the light source is coming from and where the shadows would naturally fall. Typically, the upper lip will have a slight shadow underneath it, while the lower lip will have a more pronounced shadow due to its curvature. Use a range of pencils, from 2H to 6B, to create a gradual transition from light to dark. Begin by applying gentle, soft strokes to the upper lip, gradually increasing the pressure and darkness as you move towards the lower lip. Pay attention to the Cupid's bow, where the curve of the upper lip meets the philtrum, as this area tends to be slightly lighter. To add depth and dimension, use a blending stump or tortillon to smooth out the transitions between shades, creating a seamless gradient. Finally, use a fine-tip pen or a sharp pencil to define the lip edges and add subtle texture, such as fine lines or wrinkles, to give your drawing a more realistic and nuanced appearance.
Creating Realistic Texture and Patterns on the Lips
Creating realistic texture and patterns on the lips can elevate your drawing to the next level. To achieve this, start by observing the natural texture of the lips, which is characterized by tiny wrinkles, fine lines, and subtle creases. Use a range of pencils, from 2H to 6B, to create a range of values and textures. Begin by lightly sketching the overall shape of the lips, then gradually build up layers of texture and pattern. Use short, gentle strokes to suggest the soft, plump texture of the lips, and longer, more confident strokes to define the edges and contours. To create a more realistic appearance, pay attention to the way the light catches the texture of the lips, creating subtle highlights and shadows. You can also use a blending stump or tortillon to smooth out the texture and create a more subtle, nuanced appearance. Additionally, consider adding subtle patterns, such as the fine lines that radiate from the cupid's bow or the gentle curves of the lip's natural shape. By carefully observing and rendering the texture and patterns of the lips, you can create a drawing that is both realistic and visually appealing.