How To Make A Paper Flower
 Diving into a world adorned with colorful creativity and boundless imagination, the art of crafting paper flowers comes to life offering endless possibilities. This article is designed to ignite your creative spark while furnishing you with the knowledge you need to create exquisite paper blooms right from your home. We'll kick off by guiding you through the process of assembling the necessary materials and configuring your workspace adequately; an essential launching pad for your journey into this aesthetic endeavor. We delve deeper into the heart of the art as we flow into a detailed, step-by-step process ensuring you can construct your paper flower seamlessly. And finally, to keep your creative rivers flowing, we present a foray into various creative concepts and inspirations to help you design uniquely splendid paper flowers. By venturing into the rich realms of paper flower crafting, you are stepping into a universe of creativity, so let's start with the first petal - understanding the essential materials and setting up your ideal workspace.
1. Essential Materials and Setting Up Your Workspace
Setting up a workspace conducive for creativity and productivity requires careful selection of essential materials and thoughtful arrangement. This process is neither arbitrary nor should be taken lightly, as it lays the fundamental groundwork that influences an artist's output. As part of setting up your workspace, there are three main elements we should pay attention to: these are choosing the right type of paper, gathering necessary tools, and organizing your workspace. Choosing the right type of paper is fundamental as it's the canvas for your creativity. Its type greatly affects the resulting image or design; from its texture to its capacity to hold certain mediums. Coupled with this, gathering the necessary tools is equally important. The tools you choose impact your working style and final product. Lastly, organizing your workspace optimizes your creative process. A well-arranged workspace creates a conducive environment that can boost your productivity and comfort during your creative sessions. Now, before visualizing the perfect workstation in your mind, let's first delve into the crucial task of selecting the appropriate type of paper for your artistic journey.
1.1 Choosing the Right Type of Paper
1.1 Choosing the Right Type of Paper Choosing the right type of paper is a vital ingredient in the process of crafting a paper flower. The type of paper you choose could make or break the final outcome of your project, making it a critical decision. First and foremost, the paper must be pliable enough to mould into the shape and design of your preference, yet firm enough to retain its form. This delicate balance is the key to achieving an aesthetically pleasing paper flower. Lightweight papers such as tissue paper or crepe paper are often ideal choices for paper flowers because they're easy to work with and highly adjustable. Crepe paper, in particular, has a crinkly texture that allows for flexibility and stretch, making it a popular pick. It is also available in a vibrant array of colours, allowing you to create paper flowers as lifelike or as imaginative as you desire. On the other hand, using heavier papers such as cardstock or construction paper can give your paper flowers a sturdier and more structured look. These papers, while a little more challenging to fold and shape, are excellent for creating paper flowers with precise edges and uniform shapes. When picking out a type of paper, it's also crucial to consider its colour and print. You might want to match the colour palette to the occasion or the room where the paper flowers will be displayed. Or, if you're looking for a creative twist, try using printed or patterned paper. This can add a layer of visual interest and dimension to your paper flowers. Remember, a key part of the setup process in paper flower making is setting aside a workspace in which you have all your materials – especially your chosen paper – within easy reach. Having your workspace also helps in maintaining a clean and organized area where your creativity can flourish. So when you've settled on the right type of paper, be sure to store it correctly. Keep it flat and away from moisture to ensure it stays in its best condition. In summary, the type of paper you use plays a significant role in the output of your paper flower. Take time to consider your options; after all, even the most simple and delicate paper flower can brighten a room and bring a smile to someone's face.
1.2 Gathering Necessary Tools
1.2 Gathering Necessary Tools The initial phase in the wonderful journey to creating a delightful paper flower is gathering the essential tools. To ensure your workspace is well-organized and capable of supporting your crafting endeavor, you'll need a few key tools. These must-have tools are paramount to streamline the process and make it as efficient, enjoyable, and creative as possible. First among them are the right types of paper. Different paper types offer varying degrees of flexibility and composition which can intensely impact your final result. For intricate designs and sophisticated flower models, consider using such materials as construction paper, crepe paper or even simple printer paper for a start. Alongside paper, you'll need the right cutting tools. Precision is elemental in this craft and straightforward scissors might not always suffice. Consider investing in a pair of craft scissors - known for their sharpness and precision - or a craft knife to bring depth and accuracy to your work. A cutting mat could also be of immense benefit to protect your work surface and assist with carb measurements. Glue is yet another important tool to have. Depending on the complexity of your design, you might decide on having liquid glue, a glue stick, or even a glue gun for stronger bonds and tougher paper materials. Equally important are shaping tools or craft wires to lend your flowers a realistic feel. These can mold, twist, and wrap your flowers into natural, visually-appealing shapes. Remember, while these tools lay the foundation, creativity and a vision lend the magic. Depending on your design and personal touch, you may also need markers for coloring and detailing, stencils for specific shapes, or even glitter to add an attractive sparkle. Creating a paper flower is all about experimentation and personal expression; with a well-prepared workspace and necessary tools at hand, you're all set to take on this artistic pursuit. Therefore, gather these tools and ready your workspace. As you delve into the world of DIY paper flower crafting, not only will these tools make the process smoother, but they will also turn your creations into a truly enjoyable, satisfying art-making experience.
1.3 Organizing Your Workspace
1.3 Organizing Your Workspace In the delightful craftsmanship of creating paper flowers, methodically organizing your workspace plays a pivotal role. Before embarking on each artistic journey, having a clearly designated and well-ordered workspace promotes both concentration and creativity. Regarding the process of creating paper flowers, this area does not only serve as a physical location but also as a cradle that nurtures your artistic spirits. Specific areas are to be allocated for different materials and tools showed in section 1. First, you should have a clean, bright, and broad table surface. The size should be enough to house your essential tools and roll out the paper without obstruction. Keep everything within an arm's reach, but make sure to keep sharp tools like scissors and blades out of the pathway of your working hand to prevent possible accidents. Utilizing a system for keeping your materials organized can also offer significant assistance. For instance, allocate separate containers or compartments for storing different types of paper, stamps, stencils, and other paraphernalia. Label everything neatly so you can easily access your resources. An old adage says, time is gold; in our case, every minute used in searching for a piece of paper, a scissor, or a stamp is a minute stolen from the joy of creation. Furthermore, arranging your materials in order of color, size, or category can also significantly enhance your workflow. This system not only helps you find the right materials easily but also stimulates your creative process as you visually perceive the array of possibilities. Good lighting is also as instrumental as the surface of your workspace and organizing your materials. Optimal lighting is a key element that can affect the way you see and work with colors. Natural light is the best, but desk lamps with day-light bulbs can also offer a great alternative. To summarize, organizing your workspace in paper flower creation instills efficacy and artistic fluidity. This involves optimizing your table space, systematizing the categorization and storage of your materials, and ensuring proper illumination in your workspace. By ensuring these elements are in place, you create an efficient, stress-free environment, leading to a smoother and more enjoyable process of crafting your beautiful paper flower creations.
2. Step-by-step Process of Creating a Paper Flower
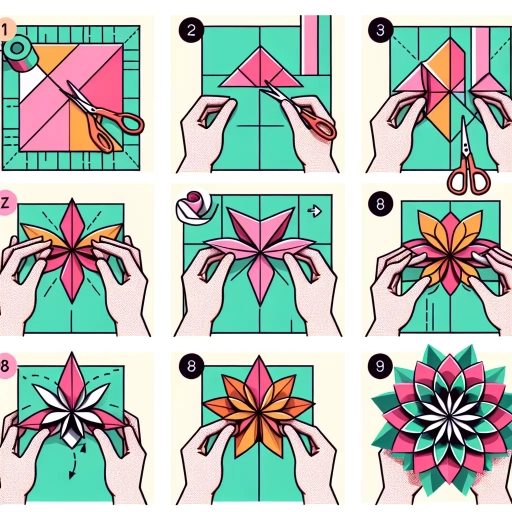
Creating a paper flower is a delicate, enjoyable, and artistic DIY process that involves three key steps, which will be elaborated in this article. The first phase is the preparation of the petals and leaves, where you get the chance to bring your creativity to life. The second stage is the assembly of the flower, where your artistic skills will be tested as you carefully place each petal and leaf to form an exquisite bloom. Finally, the finishing touches are important as this brings the flower to life, ensuring the final appearance is realistic, vibrant and appealing. In this exploration, we'll focus on how to transform a simple paper into a stunning flower using simple tools and materials. Ready your scissors, decorative paper, and craft glue, as we delve into the world of paper artistry, starting with the first step - preparing the petals and leaves.
2.1 Preparing the Petals and Leaves
Creating a stunning paper flower involves meticulous preparation, and stage 2.1 focuses on the key elements: the petals and leaves. Start by selecting the right kind of paper. Cardstock or craft paper are perfect for this because of their sturdiness and flexibility that mimic a real flower's resilience. Before you start cutting, conceptualize the petal shape based on the type of flower you're creating. Gerberas require elongated oval petals, while roses need heart-shaped petals. Once you've decided, sketch this design onto your selected paper. Next, use sharp, craft-grade scissors to cut-out your sketched petals. Be gentle yet firm, keeping in mind the natural ebb and flow of real petals. For a more authentic look, slightly mix your petal sizes - real flowers aren't uniformly perfect! Remember, the number of petals you would need depend on the degree of fullness you want for your paper flowers. The more petals, the fuller your flower would be. Leaves are equally important in adding depth and interesting contrast to your paper flower. Simply sketch and cut out leaf-like shapes from a green card stock or a color that complements your petals. You could make them as textured and realistic as you prefer, maybe even adding veins. When all the elements are ready, arrange them and see if more adjustments are needed. In the course of preparing the petals and leaves, remember that your connection to the craft can shape the result as much as your scissor's sharp edges. Stay patient, allow your creativity to flow, and let each petal or leaf you cut reflect your artistic touch. Whether you're crafting a single blossom for a special gift or a bouquet as room decor, this stage of preparation sets the foundation for a beautifully crafted paper flower that could bloom indefinitely, mirroring the lasting impact of your effort and artistry.
2.2 Assembling the Flower
2.2 Assembling the Flower
Creating the perfect paper flower relies heavily on successfully assembling all the individual parts together. This step, though possibly perceived as mundane, has an extraordinary potential to transform simple paper pieces into a grand ensemble of beauty. Every detail matters – from the way you curve your petals to the angle at which they are positioned. To begin, it is essential to select the elements you want to include in your flower. Most paper flowers contain a center, petals, and leaves. Depending on your design, you may want to opt for various sizes, shapes, and colors. It's vital to consider the harmony of these components aesthetically to achieve an eye-pleasing result. The protagonist of the flower, the petals, should be approached creatively yet precisely. They can be pinched, curled, or layered in a multitude of ways to give your flower an individualized personality. Remember to balance uniformity with spontaneity; nature is orderly yet unpredictable. The challenge here is to highlight the whimsical beauty of a real flower, blending the randomness with a sense of pattern and rhythm. The assembling process often starts from the center to the outward ends. The center, like the heart of your artwork, is usually a tightly coiled piece of paper, giving the flower an intriguing depth and texture. Once firmly secured, the petals can be gently attached around it. The direction you choose to adhere the petals can create various visual effects contributing to the flower's 3D appearance. Finally, incorporating leaves and other details will complete the artistic impression of a real-life bloom. Moreover, the adhesive you employ plays a vital role. It should provide a sturdy hold while not interfering with the aesthetics of your paper flower. Choosing a clear-drying adhesive can save you from visible, unappealing glue spots. In this stage of 'Assembling the Flower,' precision, patience, and creativity go hand in hand. Remember, the beauty of your final product lies in the effort and passion you pour into constructing and arranging each tiny detail. As you refine your technique, the process will feel less like a task and more like an enjoyable journey — an exploration of the delicate artistry inherent in every single blossom. Hence, learning the art of assembling a paper flower is not just about crafting; it's about appreciating nature's masterpieces and mirroring them through your hands.2.3 Finishing Touches
After crafting the basic shape of your paper flower, finishing touches are what make it come to life and stand out. This involves additional shaping, coloring, and detailed craftwork that will give personality and aesthetic appeal to your creation. The first step of the finishings is typically shaping the petals to mimic the natural, unique contours of a real flower. This can be achieved by curling, bending, or folding each petal in specific ways depending on the kind of flower you're replicating. For instance, if you're making a rose, the edges of each petal could be slightly curled inward to imitate the rose's blossoming effect. These changes might seem minor, but they provide an essential touch of authenticity. Next, consider coloring your flower. While plain paper flowers can be beautiful in their simplicity, adding color can provide an extra layer of vibrancy and realism. This can be easily achieved with watercolor paints or colored pens. Your choice of color has a profound effect on the overall look. If you're going for a soft, romantic vibe, pastels or light colors might be the best choice. Alternatively, if you're creating a tropical theme, bold, vibrant colors can create an eye-catching effect. Adding detail with crafty elements like glitters, fairy dust, pearls, or tiny ribbons can also heighten the aesthetic appeal of your paper flower. Be careful not to overload - just a touch of these details will do the trick. Lastly, layering and arranging is key. Arrange your flower components in layered tiers to add depth and complexity to your flower, the larger ones at the base with smaller, more intricately-shaped petals toward the center. The magic of these finishing touches lies in their ability to transform a simple craft into a piece that carries your personal touch and carries a sense of realism. Through these, your paper flower becomes much more than just a craft item - it becomes a piece of art, a manifestation of your creativity and imagination.
3. Creative Ideas and Inspirations for Paper Flower Designs
Papercraft is a realm of endless creativity, bringing ideas to life in the form of beautiful, delicate flowers. With an array of designs to explore, paper flowers can transform any crafts project into a stunning work of art. This article delves into the ins and outs of paper flower creations, providing you with copious inspiration along the way. We begin by exploring the different types of paper flower designs, showcasing the broad range of possibilities this craft presents. Then, we take these creations a step further, discussing how paper flowers can be incorporated into decorations to uplift the aesthetics of any space. Finally, we delve into advanced techniques of adding colors and textures to your creations, aiding in the creation of truly realistic and eye-catching designs. As we start our creative journey, let's first delve into the fascinating world of various types of paper flower designs, each offering a unique charm and complexity to those who craft them. Immerse yourself in the creativity of terms such as Iris folding, origami, or quilling, and unveil the diverse forms of paper blossoming around you.
3.1 Different Types of Paper Flower Designs
Unfolding the beauty of paper flowers brings a creative buzz like no other. Within the realm of paper flower designs, there are three primary types that excel not just in technique but in aesthetic appeal as well. The first is the timeless and classic Rose. The intricate folds and delicate spirals of the Rose-style paper flowers add a touch of elegance to any craft or room decor. Made by carefully cutting and folding circular shapes into an array of petals, they weave an enchanting tale of delicate artistry. The second delightful design is the Dahlia, a distinctive bloom that characterizes beauty in complexity. With its layered petals presenting a burst of charm, the Dahlia-style paper flowers can bring contrast to a relatively simple ambience. In contrast to the simplicity of its counterparts, these larger pom-pom-like formations are assembled by folding squared sheets of paper and arranging them in a sequential manner. The end product is a beautiful blend of texture and depth, thus creating a multi-dimensional piece of art that captures the viewer's attention. Lastly, the Lilies, with their trumpet-like structure, add an element of surprise to the spectrum of paper flower designs. The Lilies-style paper flowers maintain a balance between the detailed creation of a Rose and the bold statement of a Dahlia. The creation of a Lilly involves crafting individual petals and attaching them together to build the unmistakable silhouette of this design. Infusing creativity in these three different types of paper flower designs involves keen observation, a deep understanding of patterns, and an appreciation of detail. However, allowing your own inspirations to intertwine with these traditional art forms can result in novel designs that are not only unique but are a direct extension of your individual creativity. Hence, regardless of what type your paper flower adheres to, it is the unique twists and turns — guided by your creative vision and understanding of the craft — that drive these forms to blossom into fascinating pieces of art.
3.2 Incorporating Paper Flowers into Decorations
When mulling over creative ideas and inspirations for paper flower designs, one unique concept that deserves due attention is 3.2: Incorporating Paper Flowers into Decorations. The allure of paper flowers isn't just confined to their visual appeal - it's also in the versatility, flexibility, and innovative ways they can be used to accentuate your home or event decor. Not limited by practicality or season, paper flowers can bloom year-round in your interiors, lending a touch of nature-inspired beauty that needs no special care to thrive. A cluster of paper roses or daisies can instantly uplift a living room when placed in a simple vase. These home-grown paper blooms can creatively replace real flowers and can be color-coordinated with your existing decor, achieving a cohesive and visually harmonious look. Planning a party? Nothing says celebration better than paper flower garlands strung over doorways or wrapped around pillars. The colors and designs can be as varied and vibrant as the event itself, filling the party space with a refreshing floral vibe. Remember, the choices of paper hues, petal designs, and flower sizes are all in your hands, allowing you to add a very personalized touch to your event. Wedding decor too can get a charming twist with paper flowers. Think beyond traditional table centerpieces and consider grand paper flower backdrops for photographs or paper flower-adorned archways for the exchange of the vows. They add a dreamy, romantic touch that actual flowers may not be able to deliver, and moreover, they don’t wilt or faint under the heat or pressure of the big day. Lastly, don’t disregard the smaller details like gift wrapping or table setting. A small paper flower attached to a gift instantly elevates its appearance, making the receiver feel even more special. They can also be used as adorable napkin holders or placemat accents, adding an element of surprise and delight to a dinner setup. In a world increasingly conscious about eco-friendliness, paper flowers are a win-win. They can be made from upcycled or recycled papers and, if stored properly, reused several times, significantly reducing waste and environmental impact. Broadly, incorporating paper flowers into decorations not only enhances your decor aesthetics but also mirrors your commitment to sustainable practices, adding appeal to your design ethos.