How To Draw A Plane
Understanding the Basics of Drawing
A. The Importance of Basic Shapes
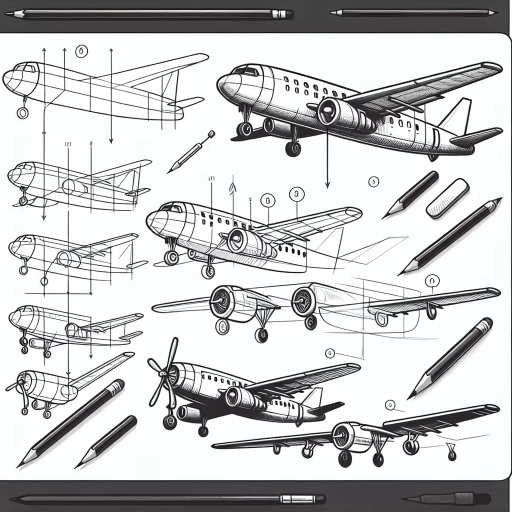
Mastering the art of drawing commences with understanding basic shapes and forms. This is because every complex object can be broken down into simpler shapes. For instance, a plane includes geometric forms such as rectangles and triangles. These shapes make it easier to draw an intricate object like a plane. They not only provide a clear structure for the final image but also offer a starting point that reduces intimidation for novices. Hence, by learning to analyze objects in terms of their constituent shapes, one can improve their drawing skills.
B. Utilizing Perspectives and Shadows
Perspective and shadows can add depth, making a drawing appear three-dimensional. One-point perspective, two-point perspective, and three-point perspective are fundamental modes that every artist needs to understand. With these techniques, you can create a realistic representation of a plane, with each part proportionally accurate. Shadows, on the other hand, provide a sense of light source, further contributing to the depth and realism of the drawing. Together, perspective and shadows bring a sense of realism, crucial for drawing a convincing plane.
C. Mastering Detailing
While shapes and perspective form the building blocks, details bring a piece of art to life. Detailing involves adding unique features to your drawing to make it stand out. In the context of drawing a plane, these details might include the texture of the plane, identifying insignia, door and window placements etc. Learning to balance nuances without over-complicating the image is a vital skill for any artist. While including details, remember that less is often more. Overcrowding the drawing can take away from its overall appeal.
Step-by-Step Guide on How to Draw a Plane
A. Drafting the Base Structure
As mentioned earlier, every complex drawing begins with a simple structure. In this phase, you'll create a rough sketch of the plane using simple shapes. Start by drawing the main body (fuselage) as a long, thin rectangle, followed by the wings and tail in triangular shapes. This draft structure serves as a blueprint for your final drawing. It's also crucial to keep the perspective in mind during this stage to ensure your plane has a 3-dimensional appearance.
B. Adding Detailed Features
Once the baseline structure is ready, you can start adding detail. This step involves refining the simple shapes into more accurate representations of the parts of the plane. Convert the rectangles and triangles into curves where necessary, add windows along the fuselage, show the design on the wings and tail, and outline the engines. It's essential at this stage to zoom in on each section of the shape and keep the overall picture in mind.
C. Final Touches and Shading
The final stage of the process is where your plane starts to come alive. Add the all-important details that make the plane unique. For instance, the airline logo, door placements, or even passengers inside the plane. Post that, apply shading to give your airplane a sense of depth. Remember, the shading should align with the light source you have in mind. For instance, if the light is coming from the top, the bottom of the plane should be darker.
Practicing and Improving Your Drawing Skills
A. Regular Practice
As with any other skill, practicing regularly is the key to mastering drawing. One can start by drawing simple shapes and gradually move on to more complex objects like a plane. It’s advisable to spend some time every day honing your sketching skills. Regular practice will not only improve your technique but will also help you get comfortable with different drawing tools.
B. Learning from Others
Another way to enhance your drawing skills is by learning from others. You can do this either by attending online or physical art classes or by observation. Studying the work of others provides insight into different techniques and styles of drawing. You can understand their use of perspective, shading, and detailing, helping you to develop your approach.
C. Experimenting with Styles and Techniques
Experimenting helps you find your unique style. Try different genres, tools, and techniques. For instance, you could draw a plane from a variety of perspectives or use different techniques for shading. Experimentation is a fantastic learning experience, and over time, you'll find what works best for you, making your drawings stand out.