How To Plant Potatoes In A Bucket
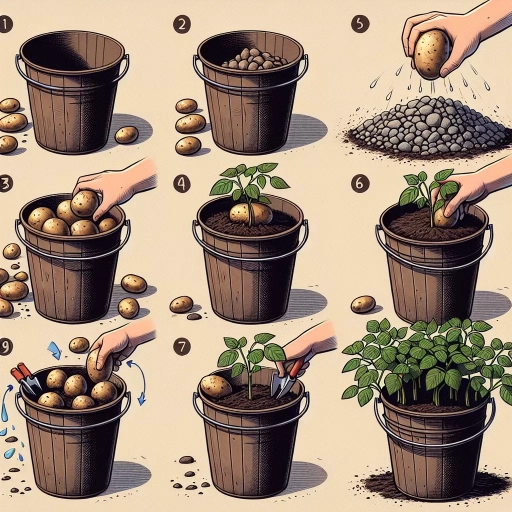
Growing potatoes in a bucket is a fun and rewarding experience that can be done by anyone, regardless of their gardening experience. This method of growing potatoes is perfect for small spaces, such as balconies, patios, or rooftops, and can produce a high yield of delicious potatoes. To successfully grow potatoes in a bucket, it's essential to start with the right materials and follow a few simple steps. First, you'll need to choose the right bucket and potatoes for your project. This involves selecting a bucket that is large enough to hold the potatoes and has drainage holes to prevent waterlogged soil. You'll also need to choose a variety of potato that is suitable for container growing. Once you have the right bucket and potatoes, you'll need to prepare the bucket for planting by adding soil and other necessary nutrients. Finally, you'll need to plant and care for the potatoes, including providing them with the right amount of sunlight and water. By following these simple steps, you can enjoy a bountiful harvest of delicious homegrown potatoes. So, let's start by choosing the right bucket and potatoes for your project.
Choosing the Right Bucket and Potatoes
When it comes to growing potatoes in a bucket, choosing the right bucket and potatoes is crucial for a successful harvest. The size and material of the bucket play a significant role in determining the health and yield of the potatoes. Additionally, selecting the right type of potatoes suitable for bucket planting is essential to ensure they thrive in the container. Furthermore, preparing the potatoes for planting is a critical step that requires attention to detail. In this article, we will explore these key factors to help you make informed decisions when growing potatoes in a bucket. First, let's start with the size and material of the bucket, as this will set the foundation for a healthy and productive potato crop.
Size and Material of the Bucket
When it comes to choosing the right bucket for planting potatoes, size and material are two crucial factors to consider. The ideal bucket size will depend on the variety of potatoes you plan to grow, as well as the space available for the bucket. A general rule of thumb is to choose a bucket that is at least 12-15 inches deep and 24-36 inches wide. This will provide enough room for the potato plants to grow and for the tubers to form. However, if you're short on space, you can also use smaller buckets, such as 5-gallon buckets, which can still produce a decent crop. In terms of material, it's best to choose a bucket made from a durable, food-grade plastic or a natural material like wood or clay. Avoid using buckets made from metal or other materials that may leach chemicals into the soil. Additionally, make sure the bucket has drainage holes in the bottom to prevent waterlogged soil and root rot. Some popular options for potato buckets include large plastic tubs, wooden barrels, and clay pots. Ultimately, the size and material of the bucket will depend on your personal preferences and the specific growing conditions in your area.
Types of Potatoes Suitable for Bucket Planting
There are several types of potatoes that are well-suited for bucket planting, including 'Nicola', 'Charlottes', 'Maris Peer', 'Pentland Javelin', and 'Shetland Black'. These varieties are compact, produce smaller tubers, and mature quickly, making them ideal for container growing. 'Nicola' is a popular choice for bucket planting, as it produces high yields of creamy, yellow fleshed tubers. 'Charlottes' are another popular variety, known for their waxy texture and sweet flavor. 'Maris Peer' is a heritage variety that produces small, round tubers with a delicious, nutty flavor. 'Pentland Javelin' is a high-yielding variety that produces long, thin tubers, while 'Shetland Black' produces small, dark-skinned tubers with a rich, earthy flavor. When selecting a variety for bucket planting, look for those that are specifically bred for container growing or have a compact growth habit, as these will produce the best results.
Preparing the Potatoes for Planting
Preparing the potatoes for planting is a crucial step in ensuring a healthy and productive harvest. To start, select seed potatoes that are certified disease-free and suitable for your region's climate. Avoid using store-bought potatoes, as they may be treated with chemicals that inhibit sprouting. Next, inspect the seed potatoes for any signs of damage or rot, and discard any that are affected. If the seed potatoes are large, cut them into smaller pieces, making sure each piece has at least one "eye" each. Allow the cut pieces to air dry for a day or two to form a callus over the cut area, which will help prevent rot. Finally, chit the seed potatoes by placing them with the "eyes" facing upwards in a light, cool place for 2-4 weeks. This will encourage the seed potatoes to produce short, green shoots before planting, giving them a head start on the growing season. By properly preparing the potatoes for planting, you'll be rewarded with a robust and healthy crop of delicious homegrown potatoes.
Preparing the Bucket for Planting
Preparing a bucket for planting is a crucial step in ensuring the health and success of your plants. To create a thriving environment, it's essential to consider a few key factors. First, you'll need to ensure proper drainage to prevent waterlogged soil, which can be achieved by drilling holes in the bottom of the bucket. Additionally, adding a layer of gravel or small rocks can help with drainage and prevent the soil from washing away. Finally, filling the bucket with a high-quality soil mix will provide your plants with the necessary nutrients for growth. By taking these steps, you can create a well-draining and fertile environment for your plants to flourish. In the next section, we'll take a closer look at the importance of drilling holes for drainage and provide a step-by-step guide on how to do it effectively.
Drilling Holes for Drainage
Drilling holes for drainage is a crucial step in preparing the bucket for planting potatoes. This process allows excess water to escape, preventing waterlogged soil that can lead to root rot and other problems. To drill holes for drainage, start by selecting a drill bit that is slightly larger than the desired hole size. A 1/4 inch or 1/2 inch drill bit is usually sufficient. Next, position the drill bit at the bottom of the bucket, about 1-2 inches from the edge. Gently apply pressure and slowly drill through the plastic, creating a hole that is about 1-2 inches deep. Repeat this process several times, spacing the holes evenly around the bottom of the bucket. It's also a good idea to drill a few holes in the sides of the bucket, about 2-3 inches from the bottom, to provide additional drainage. By drilling holes for drainage, you can ensure that your potato plants receive the right amount of moisture, without becoming waterlogged. This simple step can make a big difference in the health and productivity of your potato plants.
Adding a Layer of Gravel or Small Rocks
Adding a layer of gravel or small rocks at the bottom of the bucket is a crucial step in preparing it for planting potatoes. This layer serves several purposes, including improving drainage, preventing waterlogged soil, and reducing the risk of root rot. By allowing excess water to drain freely, the gravel or small rocks help to prevent the soil from becoming waterlogged, which can be detrimental to the health of the potato plants. Additionally, the layer of gravel or small rocks helps to prevent the soil from washing away, ensuring that the soil remains in the bucket and the roots of the plants can grow freely. Furthermore, the gravel or small rocks can also help to regulate the temperature of the soil, keeping it cooler in the summer and warmer in the winter, which can promote healthy growth and development of the potato plants. Overall, adding a layer of gravel or small rocks to the bottom of the bucket is a simple yet effective way to create a well-draining and healthy environment for the potato plants to thrive.
Filling the Bucket with Soil
Filling the bucket with soil is a crucial step in preparing it for planting potatoes. To start, choose a high-quality potting soil that is well-draining and rich in organic matter. Avoid using soil from your garden, as it can compact and prevent proper drainage in the bucket. Instead, opt for a potting mix specifically designed for containers. Fill the bucket to a depth of about 6-8 inches, leaving enough space for the potato seedlings to grow. As you fill the bucket, gently firm the soil to prevent settling and ensure good contact with the bucket's sides. It's also essential to moisten the soil as you fill the bucket, but avoid overwatering, which can lead to waterlogged soil and poor drainage. Once the bucket is filled, use a gentle rake or your hands to create a smooth, even surface. This will help prevent washing away the soil when watering and ensure the potato seedlings have a stable growing environment. By filling the bucket with the right soil and preparing it properly, you'll be well on your way to growing healthy and productive potato plants.
Planting and Caring for the Potatoes
When it comes to planting and caring for potatoes, there are several key factors to consider in order to achieve a bountiful harvest. One of the most important considerations is planting the potatoes at the right depth, which can make all the difference in the health and productivity of the plants. Additionally, providing adequate water and sunlight is crucial for the potatoes to grow and thrive. Furthermore, adding mulch and fertilizer can provide the necessary nutrients and protection for the plants to reach their full potential. By following these simple yet crucial steps, gardeners can enjoy a successful potato crop. In this article, we will explore the importance of planting potatoes at the right depth, and how it sets the stage for a healthy and productive harvest.
Planting the Potatoes at the Right Depth
When planting potatoes in a bucket, it's crucial to get the depth right to ensure a healthy harvest. The ideal depth for planting potatoes is 2-4 inches deep, depending on the variety. This allows the tubers to form and grow without being exposed to sunlight, which can cause them to turn green and become toxic. Planting too shallow can also lead to the tubers being exposed to the elements, making them more susceptible to disease and pests. On the other hand, planting too deep can cause the stems to become leggy and weak, reducing the overall yield. To achieve the right depth, start by adding a 2-3 inch layer of good quality potting soil to the bottom of the bucket. Then, place the seed potatoes on top of the soil, with the "eyes" facing upwards. Add another 2-3 inches of soil on top of the seed potatoes, gently firming it down to prevent any air pockets from forming. As the plants grow, you can continue to add more soil, leaving only a few inches of the leaves exposed to the sunlight. By planting the potatoes at the right depth, you'll be well on your way to growing a healthy and productive crop.
Providing Adequate Water and Sunlight
Providing adequate water and sunlight is crucial for the healthy growth of potatoes in a bucket. Potatoes need consistent moisture, especially when they're producing tubers. It's essential to water them deeply once or twice a week, depending on the weather conditions. The soil should be kept moist but not waterlogged, as this can lead to rot and other diseases. On the other hand, potatoes need full sun to partial shade, with at least six hours of direct sunlight per day. If you're growing them in a shaded area, consider moving the bucket to a sunnier spot or using grow lights to supplement the natural light. Additionally, make sure the bucket has good drainage holes to prevent water from accumulating and causing root rot. By providing the right amount of water and sunlight, you'll be able to promote healthy growth, prevent disease, and ultimately harvest a bountiful crop of delicious potatoes.
Adding Mulch and Fertilizer for Healthy Growth
Adding mulch and fertilizer is a crucial step in promoting healthy growth for your potatoes in a bucket. Mulch helps to retain moisture in the soil, suppress weeds, and regulate soil temperature, all of which are essential for optimal potato growth. Organic mulch options like straw, grass clippings, or wood chips work well, and should be applied in a 2-3 inch layer around the base of the plants. As for fertilizer, a balanced, water-soluble fertilizer with a ratio of 10-10-10 (nitrogen-phosphorus-potassium) is suitable for potatoes. You can also use a high-phosphorus fertilizer to promote tuber formation. Apply the fertilizer according to the manufacturer's instructions, taking care not to over-fertilize, which can damage the plants. Additionally, you can also use compost tea or fish emulsion as a natural alternative to synthetic fertilizers. By adding mulch and fertilizer, you'll be providing your potatoes with the necessary nutrients and conditions to thrive, resulting in a bountiful harvest.