How To Draw A Polar Bear
Mastering the Art: Simple Steps to Draw a Polar Bear
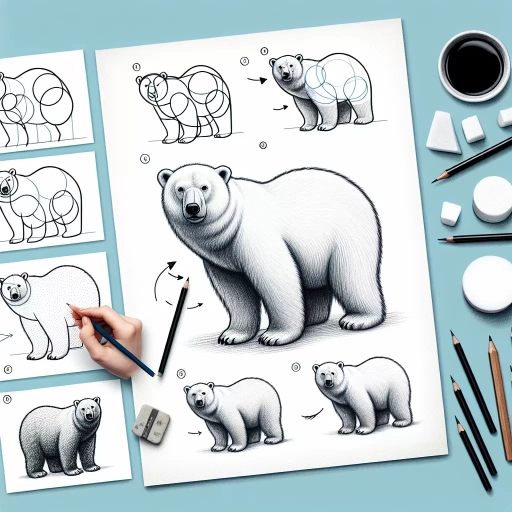
The Importance of Basic Shapes in Drawing
Before we dive into the nuances of how to draw a polar bear, it's crucial to understand the importance of using basic shapes in drawing. This technique is beneficial for beginners as well as experienced artists. Basic shapes like circles, triangles, rectangles, and ovals can help you lay out the skeleton of any drawing, including a polar bear. This is where your journey begins while drawing a polar bear. You should focus on creating a structure or blueprint for your drawing. The more accurately you can build up your basic shapes, the more accurate the final drawing will be. This technique reduces the complexity of any drawing by breaking it down into manageable, easy-to-understand components.
- Understand and identify the basic shapes that contribute to the form of a polar bear.
- Strategically map the position of these shapes on your canvas to mimic the bear's pose.
- Use these shapes as a guide to form the basic structure or blueprint for the final illustration.
Adding Details: Capturing the Character of a Polar Bear
The next step is to dive deeper and add details to your preliminary sketch. A polar bear is not just an imitation of simple shapes but is a living creature with specific attributes unique to its species. These intricacies range from its long neck, stocky body structure, fur, claws, and the characteristic bear-like facial features. Observational skills play an essential part in this process as you must pay close attention to how each component behaves in different poses. This phase is where your polar bear starts gaining its identity. Hence, it is best to spend time refining and fine-tuning the details. This stage can be challenging but is rewarding as it separates an ordinary drawing from a remarkable one.
- Develop the ability to observe, synthesize and translate the polar bear's unique features onto your drawing.
- Expand upon your basic shapes to include the distinctive body characteristics of a polar bear.
- Pay attention to the detail of the fur, which is vital for giving the bear a three-dimensional, realistic appearance.
Refining the Sketch: The Role of Shading and Texture
After sketching the polar bear with accuracy and incorporating intricate details, the final step is to solidify the drawing with shading and texture. Shading breathes life into your drawing. It can transform an otherwise flat image into a three-dimensional illustration that pops off the page. Polar bears, being mostly white, offer an exciting challenge when it comes to shading. Their fur is not pure white but reflects the colors around them. Their bodies are not uniformly white, either. There are variations in the color, and shadows often appear blue or grey. Therefore, when shading your polar bear, consider the light source and how it interacts with the bear's form.
- Understand the theory behind light and shadow, including the concepts of highlight, mid-tone, and shadow.
- Use shading techniques to give your polar bear form and depth to create a three-dimensional effect.
- Practice creating different texture effects with your chosen material to accurately represent the polar bear's fur and other physical characteristics.