How To Draw A Flame
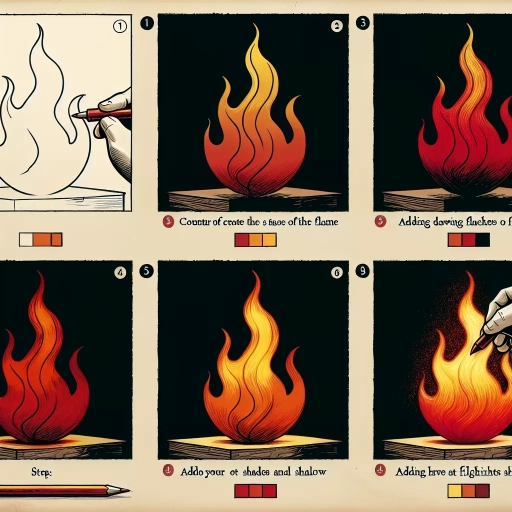
Drawing a flame can be a challenging yet rewarding task, requiring a combination of artistic skill and attention to detail. To create a realistic and captivating flame, it's essential to understand the basics of drawing a flame, including its shape, size, and movement. A well-drawn flame can add depth and energy to any artwork, from illustrations to paintings. To get started, it's crucial to create a solid foundation for the flame, which involves defining its shape and proportions. Once the foundation is established, you can add details and texture to the flame, such as wisps of smoke and flickering tongues of fire. Additionally, incorporating movement and flicker into the flame can create a sense of dynamism and energy. By mastering these techniques, you can create a flame that seems to dance across the page. In this article, we'll explore the basics of drawing a flame, starting with understanding the fundamentals of flame structure and movement, and then diving into the specifics of creating a realistic and captivating flame. Understanding the Basics of Drawing a Flame is the first step in creating a stunning and realistic flame, and it's where we'll begin our journey.
Understanding the Basics of Drawing a Flame
Drawing a flame can be a challenging task, but with a solid understanding of its basics, you can create realistic and captivating artwork. To get started, it's essential to recognize the shape and structure of a flame, which is typically teardrop-shaped with a rounded base and a pointed tip. However, before diving into the specifics of flame anatomy, it's crucial to identify the key elements that make up a flame, including the core, the mantle, and the outer flame. Additionally, choosing the right tools and materials is vital to achieve the desired texture and effect. By mastering these fundamental aspects, you'll be well on your way to creating stunning flame artwork. In this article, we'll explore the basics of drawing a flame, starting with recognizing the shape and structure of a flame.
Recognizing the Shape and Structure of a Flame
Recognizing the shape and structure of a flame is crucial in drawing a realistic and captivating flame. A flame typically consists of three main parts: the innermost yellow core, the middle orange section, and the outermost blue or purple edge. The yellow core is the hottest part of the flame, where the fuel is being consumed, and it is usually the brightest and most vibrant part of the flame. The middle orange section is where the fuel is being broken down and is typically less bright than the yellow core. The outermost blue or purple edge is the coolest part of the flame and is often the most delicate and wispy. In addition to these three main parts, a flame also has a distinctive shape, with a rounded base and a tapered top. The shape of the flame can vary depending on the type of fuel being burned and the airflow around the flame. For example, a flame in a windy environment may be more elongated and irregular, while a flame in a calm environment may be more rounded and symmetrical. By understanding the shape and structure of a flame, artists can create more realistic and dynamic drawings of flames that capture the viewer's attention.
Identifying the Key Elements of a Flame
When drawing a flame, it's essential to identify the key elements that make up its structure. A flame typically consists of three main parts: the innermost core, the middle section, and the outermost edge. The innermost core is the hottest part of the flame, where the fuel is being consumed, and is usually depicted as a bright, yellow or orange color. The middle section is where the heat and light are being produced, and is often shown as a swirling, orange or yellow-orange color. The outermost edge is the coolest part of the flame, where the heat and light are dissipating, and is typically drawn as a soft, blue or purple color. Additionally, flames often have a teardrop or tongue-like shape, with the innermost core being the narrowest part and the outermost edge being the widest. By understanding and incorporating these key elements, you can create a realistic and visually appealing flame in your drawing.
Choosing the Right Tools and Materials
When it comes to drawing a flame, having the right tools and materials can make all the difference in achieving a realistic and captivating piece of art. To start, choose a pencil that is soft enough to create smooth, flowing lines, but not so soft that it becomes difficult to control. A 2B or 4B pencil is a good starting point, as it allows for a range of tonal values and textures. For added depth and dimension, consider using a range of pencils, from 6B to 9H, to create a full spectrum of values. In addition to pencils, a blending stump or tortillon can be used to smooth out transitions and create subtle gradations of tone. For a more vibrant and dynamic flame, consider using colored pencils or markers, such as Prismacolor or Copic, which offer a wide range of colors and blending capabilities. When it comes to paper, look for a high-quality, smooth surface that can handle a range of media, such as Bristol board or hot press watercolor paper. Avoid using paper that is too rough or textured, as it can create unwanted texture and make it difficult to achieve smooth lines. Finally, consider using a reference image or still life setup to help guide your drawing and ensure that your flame is accurately proportioned and detailed. By choosing the right tools and materials, you'll be well on your way to creating a stunning and realistic flame that captures the imagination and inspires the viewer.
Creating the Foundation of the Flame
Creating the foundation of the flame is a crucial step in drawing realistic fire. To achieve this, artists must understand the fundamental structure of the flame, which consists of three key elements: the basic shape, the core and center, and the edges and contours. By mastering these components, artists can create a convincing and captivating flame that draws the viewer's eye. In this article, we will explore the process of creating the foundation of the flame, starting with the basic shape, which provides the overall form and structure of the flame. We will then delve into adding the core and center, which gives the flame its intensity and depth, and finally, defining the edges and contours, which adds texture and dimension to the flame. By following these steps, artists can create a solid foundation for their flame, setting the stage for a realistic and engaging piece of art. Let's begin by sketching the basic shape of the flame.
Sketching the Basic Shape of the Flame
Sketching the basic shape of the flame is a crucial step in creating a realistic and captivating drawing. To start, envision the flame as a teardrop or a pear shape, with the rounded end facing upwards and the pointed end facing downwards. This shape serves as the foundation of the flame, and it's essential to capture its proportions accurately. The teardrop shape should be slightly asymmetrical, with the left and right sides not being perfectly even. This subtle irregularity will add a sense of movement and dynamism to the flame. When sketching the shape, use gentle, flowing lines to convey the soft, fluid motion of the flame. Avoid using sharp or angular lines, as they can make the flame appear stiff and unnatural. Instead, focus on creating smooth, curved lines that evoke a sense of warmth and energy. As you refine the shape, pay attention to the proportions of the flame, ensuring that the rounded end is slightly larger than the pointed end. This will help create a sense of balance and harmony in the drawing. By carefully sketching the basic shape of the flame, you'll establish a solid foundation for adding details and textures, ultimately bringing your drawing to life.
Adding the Core and Center of the Flame
The core and center of the flame are the most crucial elements in creating a realistic and captivating flame drawing. To add the core, start by drawing a small, rounded shape at the base of the flame, making sure it is centered and symmetrical. This shape should be slightly smaller than the overall flame shape. The core represents the hottest part of the flame, where the fuel is being consumed, and it should be the brightest and most vibrant part of the drawing. Use a range of yellow and orange hues to color the core, gradating the colors from light to dark to create a sense of depth and dimension. The center of the flame, on the other hand, is the area surrounding the core, and it should be slightly cooler and less vibrant. Use a range of orange and red hues to color the center, blending the colors softly to create a smooth transition from the core to the outer edges of the flame. To add texture and movement to the core and center, use short, curved lines that radiate from the center of the flame, giving the impression of heat and energy emanating from the core. By carefully balancing the colors and textures of the core and center, you can create a flame that appears to pulse with life and energy.
Defining the Edges and Contours of the Flame
Defining the Edges and Contours of the Flame is a crucial step in creating a realistic and captivating flame drawing. To achieve this, start by identifying the overall shape of the flame, taking into account its size, proportions, and orientation. Next, focus on the edges and contours, using gentle, flowing lines to suggest the soft, wispy texture of the flame. Pay attention to the way the edges of the flame interact with the surrounding air, creating subtle curves and bends that convey a sense of movement and energy. As you refine the edges and contours, consider the flame's temperature and intensity, using thicker, more defined lines to indicate areas of higher heat and thinner, more delicate lines to suggest cooler regions. By carefully defining the edges and contours of the flame, you can create a sense of depth, dimension, and visual interest, drawing the viewer's eye into the heart of the flame.
Adding Details and Texture to the Flame
Creating Movement and Flicker in the Flame
Adding Shading and Dimension to the Flame
Incorporating Texture and Patterns to the Flame
Here is the introduction paragraph: When it comes to drawing a realistic flame, there are several key elements to consider. One of the most important aspects is adding details and texture to the flame, which can make it look more lifelike and engaging. To achieve this, artists can use a variety of techniques, including creating movement and flicker in the flame, adding shading and dimension to the flame, and incorporating texture and patterns to the flame. By mastering these techniques, artists can create a flame that looks like it's dancing on the page. In this article, we'll explore how to add details and texture to a flame, starting with creating movement and flicker. Here are the three supporting paragraphs: **Creating Movement and Flicker in the Flame** To create movement and flicker in a flame, artists can use a range of techniques, including hatching and cross-hatching. By applying gentle, curved lines that follow the shape of the flame, artists can create a sense of movement and energy. To add flicker, artists can use short, broken lines that suggest the flame's erratic movement. This technique can be used to create a sense of dynamism and energy in the flame, making it look like it's alive. **Adding Shading and Dimension to the Flame** Adding shading and dimension to a flame can help to create a sense of depth and volume. Artists can use a range of shading techniques, including hatching and stippling, to create a sense of texture and dimension. By applying shading to the flame, artists can create a sense of curvature and shape, making it look more three-dimensional. This technique can be used to create a sense of realism and authenticity in the flame, making it look like it's really burning. **Incorporating Texture and Patterns to the Flame** Incorporating texture and patterns to a flame can help to create a sense of interest and visual appeal. Artists can use a range of techniques, including stippling and pointillism, to create a sense of texture and pattern. By applying texture and pattern to the flame, artists can create a sense of complexity and detail, making it look more realistic and engaging. This technique can be used to create a sense of uniqueness and individuality in the flame, making it stand out from other drawings.
Creating Movement and Flicker in the Flame
Adding Shading and Dimension to the Flame
Incorporating Texture and Patterns to the Flame
Creating Movement and Flicker in the Flame
Creating movement and flicker in the flame is a crucial step in adding realism and energy to your drawing. To achieve this, you can use a variety of techniques, such as hatching and cross-hatching, to create a sense of movement and texture. Start by adding gentle, curved lines to the edges of the flame, suggesting the soft, flowing motion of the fire. You can also add short, sharp lines to the center of the flame, indicating the intense heat and energy emanating from it. To create a sense of flicker, you can add small, irregular shapes to the edges of the flame, giving the impression of the fire dancing and moving. Additionally, you can use different line weights and textures to create a sense of depth and dimension, making the flame appear more dynamic and engaging. By incorporating these techniques, you can create a flame that seems to pulse with energy and life, drawing the viewer's eye and captivating their attention.
Adding Shading and Dimension to the Flame
Adding shading and dimension to the flame can elevate its visual appeal and create a more realistic representation. To achieve this, start by identifying the light source and the areas of the flame that would be most affected by it. Typically, the light source is above the flame, so the top and outer edges of the flame will be the brightest. Use a range of shading techniques, such as hatching and cross-hatching, to create depth and dimension. Apply gentle, soft strokes to the inner areas of the flame, gradually increasing the pressure and darkness of the strokes as you move towards the outer edges. This will create a sense of volume and texture. To add more dimension, use a white or light-colored pencil to create highlights on the raised areas of the flame, such as the tips of the tongues or the edges of the wisps. This will help to create a sense of shine and luminosity. By carefully balancing shading and highlights, you can create a flame that appears to dance and flicker on the page.