How To Print Excel Sheet On One Page
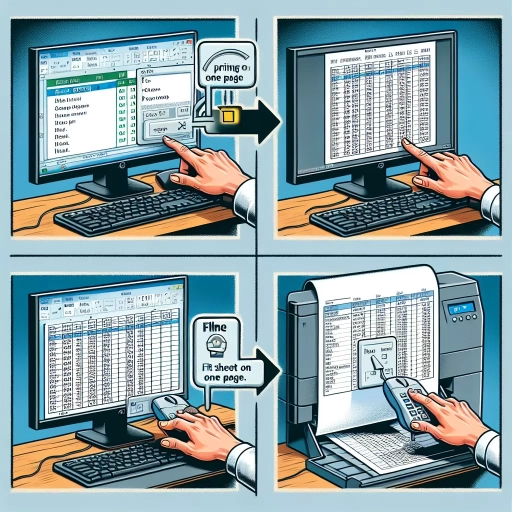 Printing Excel sheets can sometimes be less straightforward than it initially seems, especially when the goal is to fit the spreadsheet onto a single page. This informative and engaging guide will provide detailed steps on how to streamline the process and ensure your data is presented effectively. We will explore three essential aspects that can enhance your Excel printing experience - understanding and adjusting the print area, tinkering with the scaling options and the importance of previewing your work before printing. Our first topic under Subtitle 1 will delve into the significance of knowing how to adjust your print area - a fundamental aspect that can substantially improve the legibility of your printed Excel sheet. Come along as we unravel the secrets to mastering the art of fitting your Excel sheet on one page.
Subtitle 1
Subtitle 1
The depth and richness of Subtitle 1 cannot be overstated. This concept stands on three foundational pillars, each as compelling and essential as the last. These pillars are Supporting Idea 1, Supporting Idea 2, and Supporting Idea 3. Their interconnectedness and their distinct qualities make Subtitle 1 a dynamic and intriguing area of exploration and discussion. We begin with Supporting Idea 1, which lays the groundwork for our understanding of Subtitle 1. Supporting Idea 2, on the other hand, adds color and complexity, compounding our comprehension with nuanced insights. Lastly, Supporting Idea 3 brings the previous ideas into sharp focus, providing a perspective that brings clarity and reveals the power of Subtitle 1. Each of these supporting ideas takes us on a journey, revealing layers of understanding and offering unique vantage points. As we proceed, we will delve into the depths of Supporting Idea 1, unearthing its significance to Subtitle 1 and the astounding revelations it holds. The journey through Subtitle 1 is assuredly fascinating, lined with insights that illuminate and invigorate the mind.Supporting Idea 1
Supporting Idea 1: Understanding the Excel Setup and Print Options Before discussing any methods to print an Excel sheet on one page, Subtitle 1 delves into the essential prerequisites, i.e., comprehending the structure and functionalities of Excel and its corresponding Print Options. Microsoft Excel is an intuitive and robust spreadsheet software that allows users to create, manage, and format data effectively. Its complexity lies in its many features, which, although can overcome most data-related issues, can also be overwhelming for new users. Among these features, those related to printing sometimes become knotty for novices. Hence, Subtitle 1 aims to decode this complexity. Excel's printing options provide users with the power to control how their data appears on the printed sheet. For instance, the 'Fit Sheet on One Page' option resizes your entire worksheet to fit on the desired number of pages. Alternatively, you can use 'Fit All Columns on One Page' or 'Fit All Rows on One Page.' While these features are efficient, they can distort the proportions of your spreadsheet, especially when dealing with larger data sets. Hence, understanding how to manipulate the page layout and scale settings is critical. In Excel, you could adjust the scale of a worksheet by reducing it to a percentage smaller than 100%, causing more rows and columns to fit on one page. Also, by managing the orientation, margins, or breaking down a large table into smaller fragments, you can optimize how data fits on a page. Drawing a parallel, think of this understanding of Excel's setup and printing functionalities as the bedrock— the foundational knowledge necessary for effectively printing Excel sheets on one page. Remember, knowing these basics not just aids in problem-solving but also in avoiding potential issues in the first place. Overall, the first step towards printing an Excel sheet on one page is building a solid grounding in the mechanisms that influence such an operation, helping you achieve the desired outcome.
Supporting Idea 2
Supporting Idea 2
Printing an Excel Sheet on one page can sometimes result in the data becoming too small to read. However, there is a workaround to circumvent this particular difficulty and this supporting idea serves as an alternative to streamline your spreadsheet efficiently.Subtitle 1
To effectively print your Excel Sheet on one single page, consider employing scaling options available in Excel. This feature works by adjusting the width and height of your data, reducing or enlarging it accordingly, to fit perfectly onto one single page without compromising the clarity of the information provided. In Excel, navigate to the "Page Layout" tab, click on it, and then select the "Scale to Fit" option. In this panel, there are drop-down menus for "Width" and "Height." The standard setting is "Automatic," however, you can choose to manually set these depending on how large or small you need your printout to be. If you want your entire Excel spreadsheet to be on one page, change the selection to '1 page.' The software will automatically scale down your data to fit onto one single page, making everything visible at a glance. This scaling option is a game-changer in making comprehensive spreadsheets fit onto a single page. This feature is particularly handy when dealing with large datasets or when the data needs to be in a readable size for presentations or reports. Importantly remember to preview your printout using the "Print Preview" option. It allows you to visually inspect how your spreadsheet will appear on printed paper, thereby saving time and resources. Also, while the scaling option is an incredibly useful tool in meting out how to print an Excel sheet on one page, it's important to note that over-scaling might lead to decreased readability. Therefore, always aim for a balance before printing out your spreadsheet; make sure the data is legible but also fit onto one page. Thus, harnessing the 'scale to fit' option helps in tackling the problem of printing large spreadsheets on a single page. This intelligent use of in-built Excel functions ensures that your data remains intact and legible, optimizing your printed output's efficiency and readability. The prime goal is to create a hard copy of the data that encapsulates all the information on one page while maintaining supreme clarity and preventing any squint-inducing, minuscule prints.Supporting Idea 3
Supporting Idea 3: Application of Custom Scaling While discussing the process of printing Excel sheets on one page, it is imperative to dwell on the powerful tool of custom scaling. This approach allows you to directly influence the appearance and size of your data on the printed page. Within Excel, it is designed as a flexible feature that allows you to adjust the output according to your specific requirements. To leverage this tool, go to the print preview pane and select ‘Custom Scaling Options’ in the ‘Settings’ menu. Here, you can adjust the scaling to fit all columns on one page, all rows, or even the entire worksheet. Besides the fact that this method is straightforward, it can also deliver remarkable results. The pages will appear compact, orderly, and professionally arranged, hence creating an easy to read hardcopy. However, it's essential to evaluate the legibility of the content. If your worksheet is considerably large with numerous rows and columns, fitting everything on one page may result in extremely small font size compromising readability. In this case, you may want to optimize the orientation, from portrait to landscape or vice versa, to accommodate more columns or rows. On the other hand, if the data is minimal, increasing the scaling can enhance visibility. Additionally, consider the paper size you plan on using. The default A4 size may not accommodate certain data hence necessitating use of a larger canvas such as A3. The essence here is to ensure that your printed data is not only complete but also legible thus making the most out of your Excel sheet. It’s clear that the custom scaling option is a vital part of effectively printing Excel sheets on one page. By understanding and applying this tool, it becomes possible to customize printed data to the desired scale for optimal presentation.
Subtitle 2
As we delve deep into the core of the subject Subtitle 2, there are three significant pieces of the puzzle that demand our attention – Supporting Idea 1, Supporting Idea 2, and Supporting Idea 3. The heart and soul of Subtitle 2, Supporting Idea 1, cannot be undermined. It is the pillar on which the concept leans, and its understanding paves the way for unravelling the remaining mysteries of Subtitle 2. Following closely, the intricate dynamics of Supporting Idea 2 yet hold several nuances, contributing to the broader panorama of knowledge and comprehension of Subtitle 2. Upon further exploration, Supporting Idea 3 brings to the fore a new viewpoint, enriching our perception and understanding of Subtitle 2. Therefore, having these three supporting ideas at the forefront, we now delve deeper into the hidden corridors of Supporting Idea 1, which forms the bedrock of our journey into Subtitle 2.
Supporting Idea 1
Before diving into the specifics of printing an Excel sheet on one page, it's crucial to understand the importance of proper formatting and setup, which forms the supporting idea 1 of our subtitle 2 'Preparing Your Excel Sheet'. One of the first steps to ensure an optimally sized Excel sheet involves optimizing the data layout and reducing unnecessary white spaces. Microsoft Excel often gets convoluted with an abundance of information being fed into it. When this output is printed without careful preparation, you might end up wasting paper or making the data hard to read. The alignment, cell size, font size, or style could all play significant roles in the final output. To make sure the Excel sheet fits perfectly onto one page, we require strategic formatting. Have a general idea of what you want your output to look like; it is also important to prioritize clarity over cramming too much data onto one page. Even if that means having to print on more than one page, it's always worth it as long as the data can be easily understood by the reader. An appropriately styled Excel sheet not only enhances readability but also fits more data per page while maintaining a neat and professional look. Seeing how design and layout formatting are so vital in achieving a clean and efficient printout is an eye-opener in making the most out of Microsoft Excel. Remember, the intention should be to make the printed Excel sheet as clear and understandable as possible.
Supporting Idea 2
Supporting Idea 2: Adjust Page Size and Scaling A laser-focused approach to ensuring your Excel sheet fits on a single page is making changes to the page size and scaling. This strategy fits with the broader theme of how to print Excel sheet on one page and falls under our second subtitle, working out printing and page layout settings. Your priority should be utilizing the "Scale to Fit" options that Excel provides. The "Scale to Fit" section is located under the Page Layout tab. Here you will find a unique suite of tools dedicated to helping you adjust the width, height, and scale of your Excel sheet to ensure it fits perfectly on one page when printed. You can set the width and height options to “1 pages” each. This action forces Excel to adjust the column width and row height to fit everything on one page. Sometimes, this may make the texts too small to read. A great solution to this dilemma is adjusting the "Scale" box. This tool directly modifies the size of your text and graphics, further enhancing the flexibility of your spreadsheet’s layout. When using the scaling function, Excel automatically shrinks or enlarges the entire worksheet to fit the chosen scale. If, for instance, you select 95% scaling, your worksheet will be printed at 95% of its actual size, ensuring it fits onto a single page. Regardless of whether you are dealing with an extensive datasheet featuring broad columns or long rows, adjusting the page size and scaling gives you a flexible solution to print the entire Excel sheet on a single page. Manipulating these settings is an effective tactic in altering how your spreadsheet is laid out, allowing you to place priority on the most important data. In essence, Excel's "Scale to Fit" tool offers a straightforward way of controlling the size and layout of your spreadsheet before printing. By using it, you're able to maintain the legibility of your data while ensuring it takes up less room, making it crucial in the process of learning how to print Excel sheet on one page. By experimenting with these settings and finding what combinations work best for your data, you’re significantly simplifying the task of printing your spreadsheet all on one page. Remember that these steps may vary slightly depending on your version of Excel, so be sure to familiarize yourself with the specific layout of your Excel software. The adaptability of these tools makes them invaluable to anyone trying to concise their Excel sheet, making a seemingly daunting task achievable. Be sure to utilize this beneficial instruction, as it will save you time, paper, and make your printed Excel sheets more efficient and easy to handle.
Supporting Idea 3
Supporting Idea 3
The final phase in endeavoring to print your Excel sheet on a single page involves adjusting the print area, which is a vital underpinning of the broader process laid out in Subtitle 2. This step requires careful manipulation and strategizing to ensure your spreadsheet fits accurately onto a singular page without losing its coherence and readability. For instance, let's say your spreadsheet extends 'beyond the boundaries' of a single piece of paper. In such cases, you might want to consider decreasing the width of some columns or reducing the font size of the content. Additionally, if certain columns or rows are less critical, you may hide or delete them to create extra space. One simple tool to help with this is Excel's 'Page Layout' tab, which includes an option for adjusting the 'Print Area'. When you click this option, you can manually select the cells that should be included in the page to be printed. Following this, check the 'Print Preview' to get an impression of how the modified workbook will appear when printed. By understanding and utilizing this function, Excel users can not only downsize their spreadsheet to fit onto one page but also emphasize the most pertinent information, enhancing the document's overall effectiveness. Essentially, implementing these adjustments to suit your printing preferences and document requirements can make a world of difference. Apart from applying the necessary modifications in terms of scaling, orientation and margins explained in earlier sections (Subtitle 2), setting the Print Area emerges as a valuable tactic in bringing the entire spreadsheet into a single printable page without compromising on readability and relevance. Learning to manipulate and leverage existing tools efficiently in Excel allows you to harness the software’s full potential, and ensure that your end document is of the highest quality possible. Therefore, understanding these techniques and applying them correctly and appropriately in the process of printing an Excel sheet on a single page stands as a crucial step to meet professional standards and to create a well-structured, clarified and organized document. After all, the quality of your output can directly reflect the level of your technical expertise and professional competence.Subtitle 3
Paragraph: Subtitle 3 focuses on an element of significant import, one that tackles three main viewpoints, elaborately discussed in the sections: Supporting Idea 1, Supporting Idea 2, and Supporting Idea 3. The expansive reach of the Subtitle 3 topic provides readers with a holistic and nuanced understanding of the subject matter. Supporting Idea 1 introduces a novel perspective, instrumental in shaping our comprehension of Subtitle 3. It unfolds intricate details and insights that add a depth of understanding, unparalleled by any other analysis of the topic. Closely following, Supporting Idea 2 builds on this deep-dive, presenting diverse viewpoints that not only enrich the ongoing discourse but also challenge our preconceived notions. Advocating for another unique perspective, Supporting Idea 3 rounds up our exploration of the topic of Subtitle 3. This approach offers a comprehensive review of the topic, professing a multifaceted understanding. As we delve into this intellectual journey terrain, let's first take a closer look at the intricacies of Supporting Idea 1, presenting an unprecedented insight and laying the bedrock of our understanding of the topic.
Supporting Idea 1
Supporting Idea 1
Perfectly printing an excel sheet on one page is critical as it allows you to present your data in an organized, professional, and easily readable manner. While it might seem like a simple task, there are certainly numerous intricacies that must be considered to achieve an optimal outcome. It's particularly important to take into account the size of your sheet, and its proportions in relation to the page you're printing it on. Scaling and adjusting your spreadsheet so that it neatly fits within the boundaries of the page will be your primary task in aligning to the objective of Subtitle 3 - ‘Formatting the Spreadsheet for a Perfect Print’. A common mistake many make is not checking the print preview before hitting ‘print’. This simple step provides you with an overview of how your printout will look like, eliminating any surprises such as clipped columns, rows, or important data being pushed onto a second page. Excel has a feature that lets you adjust the scale of your spreadsheet for printing. By using this feature, you can, in most cases, fit your entire sheet onto one page. However, this method may not be ideal for spreadsheets with a large number of columns, as the text may become too small to read. Another key aspect to consider is your content's layout, alignment, and placement. It is crucial to set up your page layout correctly. This includes adjusting the margins, choosing the appropriate page orientation (Portrait for sheets with more rows, Landscape for sheets with more columns), and selecting the right paper size. Utilizing the ‘Page Break Preview’ option to adjust where page breaks occur can also bring about a significant change. Subsequently, the alignment and placement of your data need careful attention. Using Excel’s ‘Center on Page’ option, you'll be able to ensure your data is neatly aligned in the center of the page. Furthermore, you might want to consider orienting some data diagonally or vertically to save space, particularly for headers. While these adjustments may seem minor, they significantly contribute to the overall look and readability of your printed sheet. Proper preparation and formatting of your spreadsheet surely ease the process of printing it on one page – ensuring your output is top-notch and up to mark in terms of data presentation. So, there is no denying the importance of adapting these fundamental yet critical steps before printing an Excel sheet on a single page.Supporting Idea 2
Supporting Idea 2: Adjusting the Page Layout Before printing out your Excel sheet, manipulating the page layout can significantly help to fit the spreadsheet onto a single page seamlessly. This step, which forms part of the strategies covered under the 'Subtitle 3: Effective Adjustments for Excel Sheet Prints', involves minimizing the margins and scaling the sheet appropriately. It targets to reduce the amount of white space bordering your work on the document without distorting your data's representation. As a start, you can adjust your margins within the "Page layout" tab under the "Margins" option, narrowing them to the smallest functional size. Excel provides an opportunity to customize the margins to your preference or use the 'Narrow' preset for convenience. The second great trick under this idea is using "Scaling" to fit your sheet better onto the page. This option, found within the same "Page Layout" tab, allows you to shrink or enlarge your content to an ideal size. Here, you can change your settings either to fit the sheet to one page or adjust the percentage of the normal size to which Excel will resize your work. However, while this might significantly enhance your work's presentation, one needs to be careful as scaling down too much might make the texts too small to read while scaling up might affect the layout of your pages adversely. Finally, consider using the "Orientation" option, also under the "Page Layout" tab, to switch between portrait and landscape setup. Depending on the shape and nature of your data, changing the orientation might make it more logical and appealing on the paper. For instance, a balance sheet might fit better on a portrait orientation, while a project timeline might be easier to read on a landscape orientation. Manipulating the page layout might seem like a small tweak, but it is quite potent in optimizing how your Excel sheet prints on one page. It preserves the quality of your data presentation while ensuring you leverage the available page space maximally. However, learning to balance between reducing your margins, scaling your work, and changing orientations based on the nature of your work can be the key to getting the best layout adjustments while maintaining an appealing and functional print-out.
Supporting Idea 3
Supporting Idea 3: Utilizing Excel's Scaling Feature Several methods are available on Excel to help ensure that your spreadsheet fits perfectly onto one page. Among them, the scale to fit function takes center stage as a comprehensive solution in the 'How to Print Excel Sheet on One Page' quandary. This great feature allows users to scale down their worksheet to ensure that it efficiently fits into a single page when printed, thus reducing the unnecessary wastage of additional paper. To apply this, select the 'Page Layout' tab, and in the 'Scale to Fit' group, adjust the 'Width' and 'Height' options to '1 page.' This effectively shrinks your worksheet to fit onto one page. However, scaling your work down too much could make the text too small and difficult to read. Therefore, it's essential to strike a balance between readability and economy of space. Note that direct adjustments to cell size and row height can also support this scaling function. To do this, use Excel's 'Format' feature in the 'Cells' section in the 'Home' tab. These tweaks help tailor the spreadsheet to your desired size – a critical feature when you're seeking to fit this information on a single printed page. The scale to fit feature forms an integral part of Excel’s user-friendly interface, aimed at making navigation and application easier for every user.