How To Draw A Dragon Easy
Understanding the Basics of Dragon Drawing
The Importance of Start with Simple Shapes
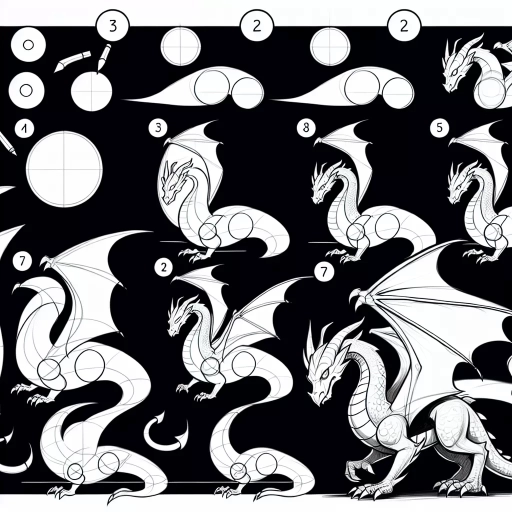
The fundamental principle of any art form, including drawing a dragon, begins with understanding simple shapes. In drawing, everything can be broken down into basic shapes like circles, squares, triangles, and so on. A dragon, despite its complex appearance, can be simplified into a series of these shapes. The head might be a hexagon, the body a series of linked ovals, and the wings a blend of triangles. Drawing a dragon becomes significantly less intimidating when simplified to its base shapes. The ability to see and draw these shapes aids in the construction of a more intricate subject matter like a dragon.
How to Draw a Dragon’s Head Easily
While the dragon's body can be complicated, mastering the dragon's head is crucial as the head is the first thing most people will notice. We will look at how to draw a dragon’s head easily by starting with simple shapes and adding details slowly. You can start with a circle or oval shape for the base of the head. Then add triangular shapes for the jaws and horns. For the eyes, a pair of small circles or semi-circles can be used. From there, you can start fleshing out the details like nostrils, scales, and sharp teeth. This step-by-step process will prevent any confusion and will make the drawing session more enjoyable.
Addition of Details to the Dragon Anatomy
The anatomy of a dragon includes several intricate details like scales, claws, wings, and tail, which may make the drawing seem daunting at first. However, by observing references and breaking down these details into simpler forms, it becomes easier. A dragon's scales, for example, can be drawn as a series of intersecting lines that create a fishnet pattern on the body. Wings can be depicted as larger versions of bat wings, with long, skeletal fingers covered by a thin membrane. Observing and understanding a dragon’s anatomy helps in making the dragon drawing more convincing and appealing.
A Step-by-Step Guide on Drawing a Dragon
How to Sketch the Body Outline
An effective technique is to sketch the dragon body's structure in a step-by-step manner. Begin with the dragon’s spine or central axis, which can be a simple, curved line that defines the dragon's pose. Based on this central line, you can draw ovals representing the main body parts like the head, body, and tail. After this, you can connect these ovals with smooth lines to create the body outline. This step plays a significant role in ensuring the correctness of the dragon’s proportions and the fluidity of its pose.
How to Draw Dragon Wings and Tail
The dragon's wings and tail are prominent features that require careful drawing. The wings begin by sketching a framework of bones extending from the dragon's body. The individual sections of the wings can be drawn as smaller, elongated ovals linked together by these "bones." The tail can be drawn as a continuation of the spine line, gradually getting thinner and ending in a pointed tip. By simplifying complex parts to basic shapes, you can create a believable and robust portrayal of a dragon.
Addition of Scale and Texture
Adding scale and texture in your dragon drawing will make it more lifelike and eye-catching. Scales can be drawn using small, curved lines to depict their round shape and irregular arrangement. The texture can vary based on the dragon’s parts like the wings can have a relatively smooth texture while the body can be rough. Remember, randomness in the scale patterns and texture variations will give the dragon drawing a more natural and convincing appearance.
Final Drawing and Shading Techniques
Delineating the Features of Your Dragon
After drawing the basic outline, it's time to delineate the dragon's features such as eyes, horns, and other details. The dragon's eyes can be the most expressive part of the drawing. For a menacing look, the upper eyelid can be drawn heavier and the pupils slits. The horns and scales can be drawn using angular lines to mimic their sharpness and hardness.
How to Shade Your Dragon
Shading is an important step in your dragon drawing because it adds depth and dimension. Begin with simple shadow shapes, keeping in mind that the lightest areas are the highest points on the dragon's body, and the shaded areas are the recesses. Smudging and blending tools can be used to smooth out the shadows for a more realistic effect. Remember that the smoother and more varied your shading techniques are, the more depth and dimension your drawing will have.
Final Touches and Highlights
After shading, adding final touches and highlights to your dragon drawing can make it stand out. Highlights can be added to the areas where light hits directly. Further, small details like smoke from nostrils, a shiny gleam in the eye or maybe a rugged environment can add more interest to the whole image. These final touches depend on the individual’s style and creativity, and experimenting is key to finding your unique approach in dragon drawing.