How To Draw A Fist
Here is the introduction paragraph: Drawing a fist can be a challenging task, especially for beginners. However, with the right techniques and practice, anyone can master the art of drawing a realistic fist. To get started, it's essential to understand the basics of drawing a fist, including the overall shape and proportions. Once you have a solid foundation, you can break down the structure of a fist into its individual components, such as the fingers, wrist, and forearm. Finally, adding details and refining your drawing can help bring your fist to life. In this article, we'll explore these three key aspects of drawing a fist, starting with the basics. By understanding the fundamentals of drawing a fist, you'll be well on your way to creating a realistic and convincing representation of this complex subject. So, let's begin by understanding the basics of drawing a fist.
Understanding the Basics of Drawing a Fist
Here is the introduction paragraph: Drawing a fist may seem like a simple task, but it requires a good understanding of its overall shape, proportions, and the movement or gesture that it conveys. To accurately capture the essence of a fist, one must first familiarize themselves with its overall shape, taking note of the way the fingers curl in and the thumb overlaps them. Additionally, learning the basic proportions of a fist is crucial in achieving a realistic representation, as it is essential to understand the relationship between the length and width of the fist. Furthermore, gesture drawing plays a significant role in capturing the dynamic movement and tension of a fist, allowing the artist to convey the emotions and intentions behind the clenched hand. By mastering these fundamental aspects, artists can develop a deeper understanding of the basics of drawing a fist, enabling them to create more realistic and engaging artwork. Understanding the Basics of Drawing a Fist is a crucial skill for any artist looking to improve their drawing skills and create more convincing and dynamic artwork.
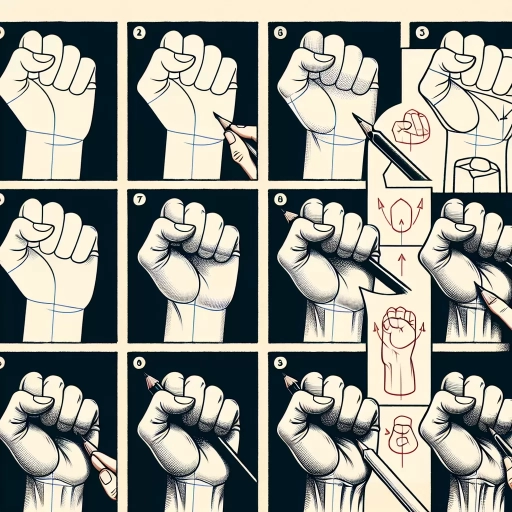
1. Familiarize yourself with the overall shape of a fist
. When it comes to drawing a fist, it's essential to start by familiarizing yourself with the overall shape. A fist is essentially a compact, rounded form that tapers slightly towards the wrist. Imagine a rough oval or egg shape, with the fingers curled in towards the palm. The key is to capture the sense of tension and solidity in the fist, conveying the idea that the fingers are tightly clenched. To achieve this, pay attention to the subtle curves and contours of the fist, particularly around the knuckles and the base of the fingers. Notice how the skin tends to bunch up and crease in these areas, creating a series of gentle folds and ridges. By accurately capturing these details, you can create a convincing and dynamic representation of a fist. As you practice drawing fists, experiment with different angles and perspectives to get a sense of how the shape changes and adapts. This will help you develop a deeper understanding of the underlying structure and anatomy of the fist, allowing you to draw it with confidence and precision.
2. Learn the basic proportions of a fist
. To accurately draw a fist, it's essential to understand its basic proportions. A fist is roughly cylindrical in shape, with the fingers curled in towards the palm. The length of a fist is typically about 1.5 to 2 times the width. The fingers, when curled, should be roughly the same length as the palm. The thumb, when clenched, should be about half the length of the fingers. When drawing a fist, start by sketching a rough cylinder shape to represent the overall form. Then, divide the cylinder into three sections: the palm, the fingers, and the wrist. The palm should be the largest section, taking up about half of the cylinder's length. The fingers should be slightly shorter, and the wrist should be the smallest section. By breaking down the fist into these basic proportions, you'll be able to create a more accurate and realistic drawing. Additionally, pay attention to the subtle curves and contours of the fist, such as the rounded shape of the knuckles and the slight indentation of the palm. By capturing these details, you'll be able to add depth and dimension to your drawing.
3. Understand the importance of gesture drawing in capturing the essence of a fist
. Gesture drawing is a fundamental technique in capturing the essence of a fist, as it allows artists to convey the dynamic movement and energy of the hand. By quickly sketching the overall pose and movement of the fist, artists can capture the subtleties of the hand's anatomy and the way it interacts with the surrounding environment. Gesture drawing helps to loosen up the artist's hand and get them in tune with the subject, allowing for a more expressive and spontaneous representation of the fist. When drawing a fist, it's essential to focus on the overall gesture and movement of the hand, rather than getting bogged down in details. By doing so, artists can create a more dynamic and engaging drawing that captures the essence of the fist. Additionally, gesture drawing can help artists to develop their observation skills, allowing them to better understand the underlying structure and anatomy of the hand. By practicing gesture drawing, artists can improve their ability to draw a fist that is not only anatomically correct but also full of life and energy. Overall, gesture drawing is a crucial step in capturing the essence of a fist, and it's an essential technique for any artist looking to improve their drawing skills.
Breaking Down the Structure of a Fist
Here is the introduction paragraph: When it comes to drawing the human body, one of the most complex and nuanced features to capture is the fist. A fist is more than just a clenched hand - it's a intricate structure made up of fingers, thumb, and wrist, all working together to form a tight, compact unit. To accurately draw a fist, it's essential to understand the key components that make it up, including the fingers, thumb, and wrist. You'll also need to know how the fingers and thumb interact to form a fist, and how to capture the subtle creases and folds that give a fist its distinctive shape. By breaking down the structure of a fist into its individual parts and understanding how they work together, you'll be well on your way to mastering the basics of drawing a fist. In this article, we'll explore the key components of a fist, how the fingers and thumb interact, and how to draw the creases and folds of a fist, giving you a solid foundation for Understanding the Basics of Drawing a Fist.
1. Identify the key components of a fist, including the fingers, thumb, and wrist
. Here is the paragraphy: When it comes to drawing a fist, it's essential to understand the key components that make up this complex structure. The fingers, thumb, and wrist all play a crucial role in forming a fist, and each part has its unique characteristics. The fingers, typically curled inward, provide the foundation of the fist, with the fingertips tucked into the palm. The thumb, often overlooked, is a vital component, as it wraps around the fingers, securing them in place and adding depth to the fist. The wrist, although not directly visible, provides the base of the fist, connecting the forearm to the hand. When drawing a fist, it's crucial to capture the subtle relationships between these components, ensuring that the fingers, thumb, and wrist work together harmoniously to create a believable and anatomically correct representation. By understanding the intricacies of each part, artists can create a more realistic and detailed fist, adding depth and dimension to their artwork.
2. Understand how the fingers and thumb interact to form a fist
. Here is the paragraphy: When drawing a fist, it's essential to understand how the fingers and thumb interact to form a cohesive unit. The fingers, specifically the index, middle, and ring fingers, curl inward toward the palm, with the fingertips meeting at the center of the hand. The pinky finger, being the smallest, tends to tuck in closer to the ring finger, often disappearing from view. The thumb, on the other hand, wraps around the fingers, with the tip of the thumb meeting the first knuckle of the index finger. This interaction creates a compact, rounded shape that is characteristic of a clenched fist. As the fingers and thumb come together, the skin on the back of the hand tightens, forming a series of creases and folds that add depth and texture to the drawing. By accurately depicting the relationship between the fingers and thumb, you can create a convincing and dynamic fist that conveys tension and energy.
3. Learn how to draw the creases and folds of a fist
. When it comes to drawing a fist, one of the most important aspects to capture is the creases and folds of the skin. A clenched fist is not a smooth, uniform shape, but rather a complex arrangement of wrinkles and folds that give it a sense of tension and energy. To draw these creases and folds convincingly, start by observing the way the skin bunches up around the knuckles and the base of the fingers. Notice how the skin is stretched taut over the bones, creating a series of deep creases and folds that radiate out from the center of the fist. To capture these creases and folds in your drawing, use a range of lines and hatching techniques to suggest the texture and tension of the skin. Start with a series of gentle, curved lines to indicate the overall shape of the fist, and then add deeper, more angular lines to suggest the creases and folds. Use hatching and cross-hatching techniques to add depth and texture to the drawing, and pay particular attention to the areas around the knuckles and the base of the fingers, where the skin is most tightly stretched. By carefully observing and rendering the creases and folds of a fist, you can create a drawing that is both anatomically accurate and visually compelling.
Adding Details and Refining Your Fist Drawing
Here is the introduction paragraph: When it comes to drawing a fist, it's easy to get caught up in the basics of shape and proportion. However, to truly bring your fist drawing to life, it's essential to add details and refine your work. By incorporating texture and shading, you can give your fist drawing depth and dimension, making it more visually appealing. Additionally, refining the shape and proportions of your fist drawing can help create a more realistic and accurate representation. Furthermore, paying attention to the subtleties of finger placement and tension can add a level of nuance and emotion to your drawing. By mastering these techniques, you can take your fist drawing to the next level and create a truly impressive piece of art. Understanding the basics of drawing a fist is just the starting point - with practice and attention to detail, you can create a drawing that truly packs a punch.
1. Add texture and shading to give your fist drawing depth and dimension
. Here is the paragraphy:
Adding texture and shading to your fist drawing can elevate it from a flat, two-dimensional representation to a more lifelike and engaging image. To add texture, consider the rough, uneven surface of the skin on your fist. You can suggest this texture by adding short, curved lines that follow the contours of the fist, giving the impression of wrinkles and creases. Pay particular attention to the areas around the knuckles, where the skin tends to be thicker and more rugged. For shading, think about the areas of the fist that would naturally be in shadow. The creases between the fingers, the underside of the wrist, and the areas around the knuckles are all good candidates for shading. Use a range of values, from light to dark, to create a sense of depth and dimension. You can also use shading to suggest the rounded, three-dimensional shape of the fist. By adding texture and shading to your drawing, you can create a more nuanced and realistic representation of a fist.
2. Refine the shape and proportions of your fist drawing
. Here is the paragraphy: Refining the shape and proportions of your fist drawing is a crucial step in creating a realistic and detailed illustration. To start, take a closer look at the overall shape of your fist. A fist is typically a compact, rounded shape with a slight curvature to it. Make sure the shape of your fist is not too angular or boxy, as this can give it a stiff and unnatural appearance. Instead, focus on creating smooth, flowing lines that capture the gentle curves of the fist. Pay attention to the proportions of your fist as well. A typical fist is about one and a half to two times the size of the palm, so make sure your drawing is in proportion. You can also use reference images to get a better sense of the shape and proportions of a fist. Once you have the overall shape and proportions of your fist drawing refined, you can start adding more details such as the creases and folds of the skin, the shape of the knuckles, and the texture of the fingers. By taking the time to refine the shape and proportions of your fist drawing, you can create a more realistic and detailed illustration that captures the nuances of the human hand.
3. Pay attention to the subtleties of finger placement and tension in a fist
. When it comes to drawing a fist, one of the most crucial aspects to focus on is the subtleties of finger placement and tension. A well-drawn fist is not just about clenching the fingers together, but also about conveying the underlying tension and structure of the hand. To achieve this, pay close attention to how the fingers are positioned and how they interact with each other. Notice how the fingers tend to curl inwards, with the fingertips tucked into the palm, and the knuckles protruding outwards. The thumb, in particular, plays a key role in forming the fist, as it wraps around the fingers to create a tight, compact shape. As you draw the fist, be mindful of the tension in the fingers, with the muscles in the forearm and hand tensed to create a sense of solidity and power. By capturing these subtleties, you can create a fist that looks not just clenched, but also dynamic and full of energy. Additionally, consider the context in which the fist is being drawn - is it a relaxed fist, or a tense one? Is it being used in a gesture of aggression, or as a symbol of determination? By taking these factors into account, you can add depth and nuance to your drawing, and create a fist that is not just a simple shape, but a powerful and expressive gesture.