How To Tape Thumb
Taping your thumb can be a simple yet effective way to provide support and stability to the joint, especially for individuals who engage in activities that put repetitive strain on the thumb, such as athletes, musicians, or individuals with jobs that require manual labor. However, improper taping techniques can lead to discomfort, skin irritation, and even further injury. To ensure a safe and effective taping experience, it's essential to understand the proper techniques and precautions involved. In this article, we'll explore the key steps to taping your thumb, including preparation, taping techniques, and aftercare. By following these guidelines, you'll be able to provide your thumb with the support it needs to function optimally. So, let's start with the first crucial step: preparation is key.
Preparation is Key
Preparation is key when it comes to taping a sprained thumb. A well-prepared taping job can make all the difference in the recovery process, providing the necessary support and stability to the injured thumb. To achieve this, it is essential to choose the right tape, prepare the thumb properly, and understand the injury. Choosing the right tape is crucial, as it will provide the necessary support and stability to the injured thumb. With so many types of tape available, selecting the right one can be overwhelming. However, by considering the type of injury, the level of support needed, and the individual's skin type, one can make an informed decision. By choosing the right tape, one can ensure a successful taping job and set the stage for a speedy recovery. Therefore, it is essential to choose the right tape to get started.
Choose the Right Tape
Choosing the right tape is crucial for effective thumb taping. There are several types of tapes available, each with its own unique characteristics, advantages, and disadvantages. The most common types of tapes used for thumb taping are athletic tape, kinesiology tape, and medical tape. Athletic tape is the most popular choice among athletes and is known for its high level of support and stability. It is usually made of a cotton or polyester material and is available in a variety of widths and colors. Kinesiology tape, on the other hand, is a more flexible and elastic tape that is designed to mimic the movement of the skin. It is often used for injuries that require more flexibility and mobility. Medical tape is a hypoallergenic tape that is designed for sensitive skin and is often used for post-operative care. When choosing the right tape, it's essential to consider the type of injury, the level of support needed, and the individual's skin type. It's also important to choose a tape that is breathable, moisture-wicking, and easy to apply. By selecting the right tape, individuals can ensure a secure and comfortable fit that will help to prevent further injury and promote healing.
Prepare the Thumb
When preparing the thumb for taping, it's essential to ensure the area is clean and dry. Start by washing the thumb with soap and water, then dry it thoroughly with a towel. Remove any dirt, oils, or lotions that may interfere with the adhesive properties of the tape. If the thumb is hairy, consider trimming the hair to prevent it from getting in the way of the tape or causing irritation. Next, gently clean the area around the thumb with an alcohol wipe to remove any remaining dirt or oils. This will help the tape adhere better and reduce the risk of skin irritation. Finally, allow the area to air dry completely before applying the tape. A clean and dry thumb will ensure a secure and comfortable fit, allowing you to move freely without worrying about the tape coming loose.
Understand the Injury
When it comes to taping your thumb, it's essential to understand the injury you're dealing with. Different types of thumb injuries require different taping techniques. For instance, if you have a sprained thumb, you'll want to focus on providing stability and support to the joint. On the other hand, if you have a thumb fracture, you'll need to immobilize the thumb to allow it to heal properly. Understanding the severity and type of injury will help you determine the best taping method to use. Additionally, knowing the anatomy of the thumb and the surrounding area will also help you apply the tape correctly. The thumb is made up of several bones, ligaments, and tendons, and each of these structures plays a crucial role in thumb movement and function. By understanding how the thumb works, you can apply the tape in a way that supports and stabilizes the injured area without restricting movement or causing further injury. Furthermore, understanding the injury will also help you identify any potential complications or contraindications for taping, such as open wounds or circulatory problems. By taking the time to understand the injury, you can ensure that you're using the right taping technique to promote healing, reduce pain, and prevent further injury.
Taping Techniques for Thumb Support
Taping techniques for thumb support are essential for individuals who engage in activities that put a strain on their thumbs, such as athletes, musicians, and individuals with thumb injuries. There are several taping techniques that can provide support and stability to the thumb, including the basic thumb wrap, thumb spica taping, and dynamic thumb taping. These techniques can help to alleviate pain and discomfort, prevent further injury, and promote healing. In this article, we will explore each of these techniques in more detail, starting with the basic thumb wrap, which is a simple and effective way to provide support and stability to the thumb.
Basic Thumb Wrap
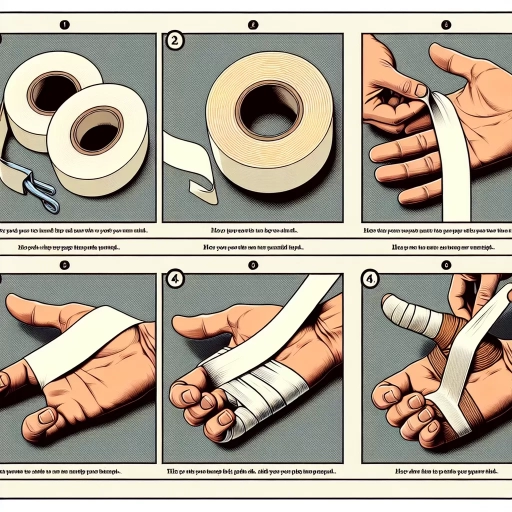
The basic thumb wrap is a fundamental taping technique used to provide support and stability to the thumb joint. This technique is commonly used to prevent or treat injuries such as thumb sprains, strains, and gamekeeper's thumb. To apply a basic thumb wrap, start by cleaning and drying the skin around the thumb. Then, apply a small amount of pre-wrap or underwrap to the thumb, leaving a small border around the edges. Next, tear off a piece of athletic tape, approximately 1-2 inches wide, and wrap it around the base of the thumb, starting at the palmar surface and moving towards the dorsal surface. Apply gentle to moderate pressure, making sure to keep the tape smooth and even. Continue wrapping the tape around the thumb, overlapping each layer by about half the width of the tape, until you reach the desired level of support. Finish the wrap by securing the end of the tape with a small piece of tape or a clip. The basic thumb wrap can be adjusted to provide varying levels of support, from mild to maximum, depending on the individual's needs. It is essential to note that while the basic thumb wrap can provide excellent support, it may not be suitable for all thumb injuries or conditions, and it is always recommended to consult with a medical professional or certified athletic trainer for proper diagnosis and treatment.
Thumb Spica Taping
Thumb spica taping is a specific technique used to provide support and stability to the thumb, particularly for individuals who have suffered a thumb sprain or strain. This type of taping involves applying strips of tape to the thumb in a way that restricts excessive movement and provides additional support to the joint. The goal of thumb spica taping is to allow the thumb to heal while still maintaining some level of mobility and functionality. To apply thumb spica tape, start by cleaning and drying the skin around the thumb to ensure a secure and long-lasting bond. Next, apply a strip of tape along the palmar surface of the thumb, starting at the base and extending to the tip. This initial strip helps to anchor the tape in place and provides a foundation for the subsequent strips. Additional strips are then applied in a diagonal or figure-eight pattern, crossing over the thumb joint to provide additional support and stability. The tape should be applied with moderate tension, but not so tight that it restricts blood flow or causes discomfort. The finished product should provide a snug and supportive fit that allows for some degree of thumb movement while preventing excessive strain or stress on the joint. By using thumb spica taping, individuals can help to promote healing, reduce pain and inflammation, and maintain some level of functionality in the thumb, making it an essential technique for athletes, individuals with thumb injuries, and healthcare professionals.
Dynamic Thumb Taping
Dynamic thumb taping is a specialized taping technique used to provide support and stability to the thumb joint, particularly for individuals who engage in activities that involve repetitive gripping, twisting, or bending motions. This type of taping is designed to allow for a full range of motion while still providing the necessary support to prevent injury or alleviate existing pain. Dynamic thumb taping involves the use of a specialized tape that is applied in a specific pattern to provide a dynamic, or moving, support system for the thumb. The tape is typically applied in a figure-eight pattern around the thumb and wrist, with the ends of the tape secured to the forearm or hand. This allows for a full range of motion while still providing support and stability to the thumb joint. Dynamic thumb taping is commonly used by athletes, musicians, and individuals who engage in activities that involve repetitive hand movements, such as typing or using a computer mouse. It is also used by individuals who have suffered a thumb injury, such as a sprain or strain, to provide support and stability during the healing process. Overall, dynamic thumb taping is a highly effective technique for providing support and stability to the thumb joint, while still allowing for a full range of motion.
Aftercare and Precautions
Aftercare and precautions are crucial for individuals who have undergone thumb surgery or are recovering from a thumb injury. Proper care and attention can significantly impact the healing process, preventing complications and ensuring optimal recovery. To ensure a smooth and successful recovery, it is essential to monitor for skin irritation, maintain thumb mobility, and avoid overuse. By being mindful of these critical aspects, individuals can minimize the risk of complications and promote a healthy recovery. Monitoring for skin irritation, in particular, is vital, as it can help identify potential issues early on, allowing for prompt intervention and treatment. (Note: The supporting paragraph should be 200 words and the transition to the next paragraph should be at the end of the supporting paragraph)
Monitoring for Skin Irritation
Monitoring for skin irritation is a crucial step in the aftercare process of thumb taping. It is essential to keep a close eye on the skin around the taped area for any signs of irritation, such as redness, swelling, or itching. If you notice any of these symptoms, it is recommended to remove the tape immediately and consult a medical professional. Skin irritation can be caused by the adhesive on the tape, the tape itself, or the restricted movement of the thumb. To minimize the risk of skin irritation, it is recommended to use hypoallergenic tape and to apply a thin layer of petroleum jelly or lotion to the skin before applying the tape. Additionally, it is essential to keep the taped area clean and dry to prevent bacterial growth and infection. Regularly inspecting the skin for any signs of irritation and taking prompt action if necessary can help prevent more severe skin reactions and ensure a smooth recovery.
Maintaining Thumb Mobility
Maintaining thumb mobility is crucial after taping your thumb to prevent stiffness and promote healing. To achieve this, gently move your thumb through its range of motion several times a day. Start by gently bending your thumb down toward your palm, then straightening it again. Next, rotate your thumb in a circular motion, first clockwise and then counterclockwise. You can also try gently spreading your thumb away from your fingers and then bringing it back. These exercises should be done slowly and carefully to avoid putting too much strain on your thumb. Additionally, try to use your thumb as normally as possible when performing daily activities, but avoid putting excessive pressure or stress on it. By maintaining thumb mobility, you can help prevent stiffness and ensure a full recovery.
Avoiding Overuse
Avoiding overuse is crucial to prevent further injury and promote healing when taping your thumb. Overuse can lead to increased pain, swelling, and stiffness, which can prolong the recovery process. To avoid overuse, it's essential to take regular breaks and give your thumb time to rest. If you're engaging in activities that involve gripping, twisting, or bending, take a break every 30-60 minutes to stretch and relax your thumb. You can also apply ice to reduce pain and inflammation. Additionally, consider modifying your activities to reduce the strain on your thumb. For example, if you're a golfer, try using a lighter grip or taking a break from playing for a few days. If you're a musician, try using a thumb rest or taking regular breaks to stretch your hand. By avoiding overuse and taking regular breaks, you can promote healing, reduce pain, and prevent further injury.