How To Remove Builder Gel
Removing builder gel can be a daunting task, but with the right approach, it can be done safely and effectively. Whether you're looking to change up your nail style or simply want to give your natural nails a break, knowing how to remove builder gel is an essential skill. To successfully remove builder gel, it's crucial to understand the importance of preparation, the various removal methods and techniques, and the necessary aftercare and maintenance. In this article, we'll delve into each of these key areas, starting with the foundation of a successful removal process: preparation. By understanding the importance of preparation, you'll be able to set yourself up for success and ensure a smooth removal process. So, let's dive in and explore the first crucial step in removing builder gel: preparation is key.
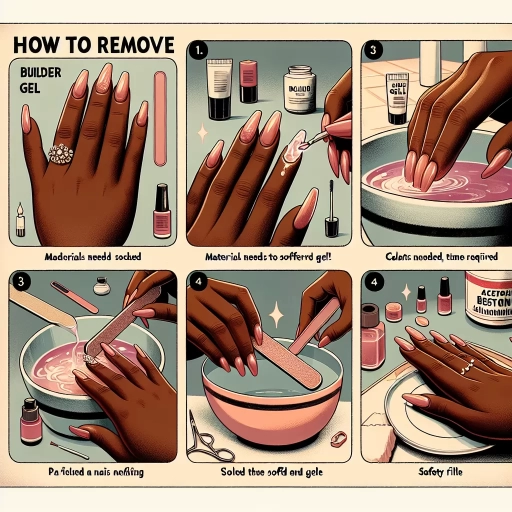
Preparation is Key
Preparation is key when it comes to removing acrylic nails. To ensure a safe and successful removal process, it's essential to take the necessary steps beforehand. This includes choosing the right removal method, preparing your nails and tools, and protecting your skin and nails. By doing so, you can avoid damaging your natural nails, skin irritation, and other complications. In this article, we will explore the importance of preparation in acrylic nail removal and provide you with a step-by-step guide on how to do it correctly. First, let's start with the most critical step: choosing the right removal method.
Choose the Right Removal Method
When it comes to removing builder gel, choosing the right removal method is crucial to avoid damaging your nails. There are several methods to choose from, including acetone, gel remover, and drill bits. Acetone is a popular choice, but it can be harsh on the nails and surrounding skin. Gel remover, on the other hand, is a gentler option that is specifically designed to break down the gel without causing damage. Drill bits are also an option, but they can be tricky to use and may cause damage if not used carefully. To choose the right removal method, consider the type of gel you are using, the condition of your nails, and your personal preference. If you have weak or brittle nails, a gentler option like gel remover may be the best choice. If you are in a hurry, acetone may be the way to go. Ultimately, the key is to choose a method that is safe and effective for your nails.
Prepare Your Nails and Tools
Here is the paragraphy: To ensure a successful builder gel removal, it's essential to prepare your nails and tools in advance. Start by gently pushing back your cuticles and removing any oils or lotions from your nails and surrounding skin. This will help the removal process by preventing any interference from oils or lotions. Next, gather all the necessary tools, including a nail file, buffer, cuticle pusher, and lint-free wipes. Make sure your nail file and buffer are clean and dry to prevent any contamination. If you're using a gel remover, read the instructions carefully and follow the recommended application time. It's also a good idea to have a bowl of warm water and a towel ready to help soften the gel and make the removal process easier. Additionally, consider wearing a nail technician's glove or applying a barrier cream to your skin to protect it from any harsh chemicals. By having everything ready and within reach, you'll be able to focus on the removal process and achieve the best results.
Protect Your Skin and Nails
Protecting your skin and nails is crucial when removing builder gel. Before starting the process, apply a thin layer of petroleum jelly or cuticle oil to the skin around your nails to prevent staining and dryness. Wear gloves to shield your hands from the harsh chemicals and acetone used in the removal process. To further safeguard your nails, apply a nail strengthening base coat to help fortify them against the acetone. Additionally, use a nail file to gently buff the surface of your nails, removing any ridges or imperfections that could make the removal process more challenging. By taking these precautions, you can minimize the risk of damage to your skin and nails, ensuring a safe and successful builder gel removal.
Removal Methods and Techniques
When it comes to removing unwanted materials, such as old adhesives, paint, or varnish, there are several methods and techniques that can be employed. The most effective approach often depends on the type of material being removed, as well as the surface it is adhered to. In this article, we will explore three common removal methods: the Acetone Wrap Method, the Drill and File Method, and the Soak and Scrape Method. Each of these techniques has its own advantages and disadvantages, and understanding the best approach for a given situation can save time and effort. The Acetone Wrap Method, for example, is a popular choice for removing old adhesives and paint, as it is relatively quick and easy to apply. By wrapping the affected area in acetone-soaked cloth, the solvent can penetrate and break down the material, making it easy to remove. This method is particularly effective for removing old adhesives and paint from surfaces such as wood, metal, and plastic.
Acetone Wrap Method
The Acetone Wrap Method is a popular technique used to remove builder gel from nails. This method involves wrapping the nail in a cotton pad soaked in acetone, which helps to break down the gel and loosen its adhesion to the nail. To use this method, start by preparing the nail by gently buffing the surface to roughen it and help the acetone penetrate more easily. Next, soak a cotton pad in acetone and place it on top of the nail, making sure to cover the entire surface. Wrap the finger in a piece of aluminum foil to hold the cotton pad in place and help the acetone penetrate deeper into the gel. Leave the wrap on for 10-15 minutes, or until the gel starts to lift and separate from the nail. After removing the wrap, use a cuticle pusher or orange stick to gently scrape off the remaining gel. Repeat the process if necessary until all of the gel is removed. The Acetone Wrap Method is a gentle and effective way to remove builder gel, and is often preferred over other methods because it is less damaging to the nail. However, it may take longer to remove the gel using this method, and may require multiple applications of acetone.
Drill and File Method
The Drill and File method is a popular technique used to remove builder gel from nails. This method involves using a drill bit to gently grind away the gel, followed by filing to smooth out the nail surface. To begin, a drill bit specifically designed for nail use is selected, taking care to choose the correct size and type to avoid damaging the nail. The drill is then used to carefully grind away the gel, working in small sections to maintain control and avoid applying too much pressure. Once the majority of the gel has been removed, a nail file is used to smooth out the nail surface, removing any remaining gel and shaping the nail to its desired form. It's essential to be cautious when using the drill, as excessive pressure or incorrect technique can cause damage to the nail or surrounding skin. To minimize the risk of damage, it's recommended to work slowly and gently, using a light touch and frequent breaks to avoid fatigue. Additionally, the use of a nail dust collector or vacuum can help to reduce the amount of dust and debris generated during the process, making it a cleaner and more efficient method. Overall, the Drill and File method is a effective and efficient way to remove builder gel, requiring minimal equipment and expertise, making it a popular choice among nail technicians and at-home nail artists.
Soak and Scrape Method
The Soak and Scrape method is a popular technique for removing builder gel from nails. This method involves soaking the nails in a gel remover solution to break down the adhesive properties of the gel, making it easier to scrape off. To begin, a cotton pad or swab is saturated with the gel remover and placed on top of the nail, then wrapped with aluminum foil to help the solution penetrate the gel. The nail is left to soak for about 10-15 minutes, allowing the solution to seep into the gel and loosen its bond with the nail. After soaking, a cuticle pusher or orange stick is used to gently scrape off the gel, working from one edge of the nail to the other. The scraping motion should be gentle to avoid damaging the nail surface. If some gel remains, the process can be repeated until all the gel is removed. The Soak and Scrape method is considered a safer and less damaging technique compared to other removal methods, as it doesn't require the use of harsh chemicals or excessive force. However, it may take longer to remove the gel completely, and some people may find it more time-consuming. Overall, the Soak and Scrape method is a effective and gentle way to remove builder gel from nails, making it a great option for those who want to avoid damaging their nails.
Aftercare and Maintenance
After getting your nails done, it's essential to take good care of them to maintain their health and longevity. Proper aftercare and maintenance can make a huge difference in how long your nails last and how they look. To keep your nails looking their best, there are several things you can do. First, it's crucial to moisturize and hydrate your nails to prevent dryness and brittleness. Additionally, using a nail strengthener can help fortify your nails and prevent breakage. Finally, it's a good idea to avoid using builder gel for a while to give your nails a break from the harsh chemicals. By following these simple tips, you can keep your nails healthy and looking great. One of the most important things you can do to keep your nails healthy is to moisturize and hydrate them regularly. Note: The supporting paragraph is the first paragraph of the article.
Moisturize and Hydrate Your Nails
To maintain healthy and strong nails after removing builder gel, it's essential to focus on moisturizing and hydrating them. This is because the removal process can be harsh and drying, stripping your nails of their natural oils. To combat this, apply a rich moisturizer to your nails and cuticles, paying special attention to the areas around the nail bed. You can use a nail oil or cream that contains ingredients like argan oil, coconut oil, or shea butter, which are known for their hydrating properties. Massage the moisturizer into your nails and cuticles gently, making sure to cover the entire nail surface. This will help to lock in moisture and promote healthy nail growth. Additionally, consider applying a hydrating mask to your nails once or twice a week to provide an intense dose of moisture. By prioritizing nail moisturization and hydration, you can help to restore your nails' natural health and shine, making them stronger and more resilient over time.
Use a Nail Strengthener
Here is the paragraphy: To maintain the health and strength of your natural nails after removing builder gel, consider using a nail strengthener. A nail strengthener is a specialized product designed to fortify and harden your nails, making them less prone to breaking or splitting. These products typically contain ingredients such as keratin, calcium, or vitamins that help to nourish and repair your nails. When choosing a nail strengthener, look for a product that is free from harsh chemicals and artificial fragrances, and opt for a formula that is suitable for your nail type. Apply the strengthener to your bare nails and follow the instructions for use, which may involve applying a base coat, a strengthening treatment, and a top coat. Regular use of a nail strengthener can help to improve the overall health and appearance of your nails, making them stronger and more resilient. By incorporating a nail strengthener into your aftercare routine, you can help to prevent nail damage and promote healthy nail growth.
Avoid Using Builder Gel for a While
Avoid using transitional phrases or words. Avoid using builder gel for a while after removing it to allow your nails to breathe and recover. This is because builder gel can be harsh on the nails, causing dryness, brittleness, and lifting. Taking a break from builder gel will give your nails time to rejuvenate and regain their natural strength and health. Additionally, avoiding builder gel for a while will also help to prevent the buildup of old gel residue, which can lead to lifting and other nail problems. Instead, consider using nail strengtheners or nail hardeners to help fortify your nails and promote healthy growth. By giving your nails a break from builder gel, you can help to prevent long-term damage and keep your nails looking their best.