How To Draw A Hat
 Welcome to this comprehensive and interactive guide, where we explore the enchanting art of how to draw a hat, shedding light on every minute detail that adds up to create a compelling piece of work. Mastering this seemingly simple yet intricate representation is often elusive for many art enthusiasts. This article aims to demystify the process with three essential steps. Firstly, we immerse ourselves in the fundamental understanding of drawing a hat, cutting to the heart of its basic components. Progressing from there, we delve into sketching the basic shape - the foundation stone of our hat. And lastly, the art comes alive as we impart the final touch by employing ingenious techniques to add realistic details and texture to the hat. Let's begin our artistic journey by understanding the basics of drawing a hat, the stepping stone to your master creation. By following these carefully structured steps, you will transform a simple drawing of a hat into a lifelike representation that springs forth from the canvas.
Understanding the Basics of Drawing a Hat
Drawing a hat can seem like an unmanageable task for many, but it doesn't have to be. With key concepts mastered, anyone can create an engaging, detailed hand-drawn hat. There's never been a better time to start understanding the basics! In this article, we will guide you through three essential steps to get you sketching hats like a pro. Initially, we will explore the primary step, which is 'Defining the Type of Hat.' This crucial step helps in capturing the distinguishing traits that make a hat unique. Next, we will step into 'Identifying the Key Features of a Hat.' This is where we'll learn about the different elements of a hat and their interplay in achieving a true-to-life representation. Lastly, we will delve into 'Choosing the Right Drawing Tools,' an imperative facet of your drawing journey. This step can transform your drawing experience and enhance your artwork's overall quality. After understanding these vital aspects, drawing a hat will no longer be an intimidating task. So, let's grab our sketchbooks and start by defining the type of hat we want to draw.
Defining the Type of Hat
Defining the type of the hat is an essential step when you're learning how to draw a hat. The hat type determines the overall shape and features of the hat, and directly influences the drawing process. Hats come in numerous types, including bowler hats, fedoras, baseball caps, beanies, cowboy hats, and top hats, among others. Each type is distinct and has unique characteristics that an artist needs to capture accurately. Bowler hats, also known as derby hats, have a distinct round and hard top with a small brim, creating a dome-like silhouette. Fedoras, on the other hand, have a wider brim and a pinch in the crown that creates a more dramatic look. Baseball caps are more modern and are often characterized by their stiff, projecting visor and the hard dome of the cap which is composed of 5 or 6 panels. Beanies are typically simplistic, soft, and snug, fitting close to the head with a rounded shape. Cowboy hats are known for their high crown and wide, curved brim, offering a slightly western appeal, while top hats bring back a sense of classic, traditional style with a tall, cylindrical crown and a narrow brim. Drawing each one of this hat types requires understanding their key structural and stylistic elements. Each hat type will need different techniques to accurately represent the texture, depth, and shading involved. For instance, the brim of a cowboy hat will require careful shading to show its curve, while a beanie may need horizontal or vertical lines to depict the texture of knitted or woven fabric. Study the particularities of different types of hats and practice drawing their specific characteristics. Like many aspects of art and design, drawing a hat relies heavily on observation, understanding, and accuracy. So, before you put pencil to paper, take your time to define your hat type and understand its unique features, as this will pave the way for a successful drawing of a hat. No matter what type of hat you intend to draw, proper definition and understanding of the hat type is the foundation to achieving an accurate and visually interesting representation. This reflects the fundamental role of accurate definition and understanding in the art of drawing.
Identifying the Key Features of a Hat
Understanding the key features of a hat is critically essential for any artist looking to depict it accurately. A hat isn't merely a head accessory; it's a complex structure with several interconnecting elements, each playing a distinct role. Identifying these features simplifies the drawing process, guiding you in sketching the accurate basic forms and dimensions of a hat, and providing you a comprehensive idea of various hat styles. Firstly, the crown is the topmost part of the hat. It could vary drastically in shape, depending on the fashion or function of the hat. For instance, a beret's crown will be flat and round, while a top hat would possess a tall, cylindrical crown. This variation in crowns contributes to the hat's overall silhouette and its spatial impact in your drawing. The second key feature is the brim, extending outward from the base of the crown. The variations in its thickness, shape, and how it flares can significantly influence the hat's character and visual weight in your artwork. A sombrero, for instance, has a broad, flat brim, while a fedora's brim is narrower and slightly upturned. Thirdly, observe the hatband, typically found where the crown and brim meet. While often overlooked, this detail can add an extra layer of believability to your hat drawings, reflecting the hat's construction and adding a touch of embellishment. Some hats also have decorative elements called trims. These could range from ribbons and feathers to buttons and badges. Trims offer an opportunity to inject personality to a hat, portraying the wearer's style or the hat's purpose. Lastly, pay attention to material texture. The character of a straw sun hat significantly differs from that of a felted wool fedora or a leather baseball cap. Capturing these material nuances can bring your hat drawings to life, making them look not just believable but also tactile. Understanding these key hat features gives you a fundamental artistic vocabulary to start with. It aids in breaking down a complex form like a hat into approachable, sketchable components. Additionally, it can support in expanding your hat repertoire, letting you draw hats from imagination instead of references, and adding variety to your characters' wardrobes. Remember, like any other form of art, practice is paramount to honing your hat-drawing skills.
Choosing the Right Drawing Tools
of any form of visual art lies in the tools that are utilized to express creativity. So, in drawing a hat or indeed any object, the choice of drawing tools can nudge the beauty, precision, and overall appeal of one's art. Quality is preeminent, this could be the difference between an ordinary sketch and an extraordinarily impressive work of art. In choosing the right drawing tools, several factors need to be taken into consideration. Pencil grades, for instance, matter greatly. They range from Hard H pencils which produce light lines, suitable for initial outlines or subtle shades, to the softer B pencils that give bolder and darker lines, great for emphasis and deeper shadows. The correct choice can significantly enhance your depiction of a hat, using the different grades to highlight the texture and form of the hat. Have a variety of both H and B pencils at your disposal so you can switch accordingly to deliver the desired effect. For colored illustrations, consider using colored pencils, pastels, or watercolor. Colored pencils can give vibrant or subtle colors depending on the pressure applied and can be blended smoothly. Pastels, on the other hand, are best for soft colorations and a puffier look, giving a unique texture, perfect for fuzzy or woolly hats. Watercolor allows for gradients and can be used to express a more fluid and dynamic representation of a hat, bringing out the richness of color values and contrasts. Ink pens may also be helpful in accenting and finalizing your drawing. Fine-tips are great for detailed works and precision, while thicker ones are suitable for bold lines and emphasizing major outlines. They can also create a diverse range of textures and patterns. Paper quality also plays a prominent role. A thick paper will withstand erasures and various medium applied without smudging or tearing, enhancing the overall look and longevity of your hat drawing. Those with a slight texture to the surface can give a lovely depth to pencil and pastel works. Don't overlook the importance of good erasers - kneaded erasers are softer and less intrusive, while rubber or vinyl erasers can completely remove pencil lines without leaving marks behind. Additionally, investing in a good quality sharpener will ensure your pencils don’t break or split, which in turn will improve the quality of your lines and shading. Remember, the most expensive tool is not necessarily the best one. Strike a balance between quality and cost. Experimenting with a variety of tools can help you discover which ones are most comfortable for you to use and offer the best results for your hat drawings. Practice and learn how to use each one effectively, maximizing their potential to create a wonderfully stunning piece of art. In summary, the choice of drawing tools can significantly impact your ability to accurately represent and artistically express the subject of your art. Whether you're drawing a casual baseball cap or a sophisticated fedora, the right tools can accurately capture not just the shape and form of the hat, but also convey its texture, material, and even the mood it exudes. It's amazing how something as simple as a hat can be brought to life with the right drawing tools!
Sketching the Basic Shape of the Hat
Coming up with a compelling portrait involves paying keen attention to each element, including something as seemingly innocuous as a hat. Mastering the art of sketching the basic shape of a hat does not only enhance the realism of your portrait, but it also provides depth and dynamism to your artwork. This article will guide you expertly through three significant steps. We'll first explore how to simplify the task by breaking down the hat's form into manageable elementary shapes. Then, we'll delve into techniques of adding depth and dimension, lending the hat a three-dimensional quality that makes it 'pop' off the page. Finally, we’ll learn how to refine the hat's shape and proportions, adding intricacies that make it unique and realistic. Without skipping over any details, our first step works on a crucial tool every artist must familiarize themselves with - Using Simple Shapes to Create the Hat's Form. This approach will not only streamline the process but will also ensure your depiction of a hat is accurate and proportionally pleasing. Let's delve in, shall we?
Using Simple Shapes to Create the Hat's Form
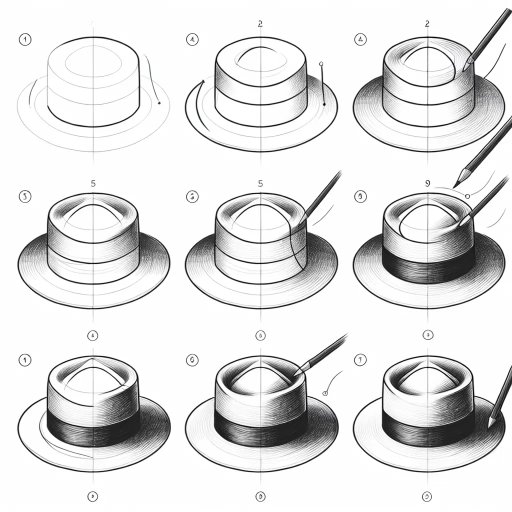
Creating a hat's form through the usage of simple shapes provides an accessible avenue for budding artists to develop their sketching skills. The overall process is simple, versatile, and rewarding, as it aids in improving your understanding and control over proportions and perspectives. Establishing the basic shape of the hat is the initial and pivotal step in this process. For instance, in sketching a cowboy hat, you begin by drawing an oval for the crown and a larger irregular oval shape for the brim. It's like creating a top-down blueprint of the hat where inefficiencies such as disproportionate sizes or misalignment can be identified and corrected early. The idea is to not be hyper-detailed at this stage but to lay a solid foundation on which further complexities can be built. Knowing the type of hat you are sketching is essential, as each hat has a unique form. This knowledge will influence the form and complexity of the shapes you'll draw. For instance, a fedora would require more angular shapes unlike a beanie that more closely represents a semi-circle. Once you've sketched the basic shape, refine it further by sketching in the hat band as an additional, thinner oval. For the dents on the top, you can use two crescent shapes. One captivating aspect of using simple shapes to create a hat's form is how it simplifies the drawing process. By fragmenting the subject into manageable parts, you can concentrate on a single part at a time. Consequently, this technique reduces complexity and overwhelming feelings, especially for beginners. Over time, it enhances your dexterity in sketching not just hats but virtually any subject. This method also aids in familiarizing oneself with the basics of shading and highlighting. You can practice casting shadows and providing depth to make the hat more realistic. This gradually polishes your skill in perceiving shadows and highlights, which are vital for creating depth and perception in your drawings. Lastly, using simple shapes to create a hat's form is not limited to sketching alone. It extends to painting, doodling, and all other forms of visual arts. It's a universal technique that is accessible to all, which endorses creativity, builds confidence, and fuels passion in the arts. Whether you are sketching a Top Hat, a Derby Hat, or a Baseball Cap, the principle remains the same: start with establishing the basic shape, gradually adding layers of complexities, and adjusting the proportions to create a realistic and visually aesthetic image.
Adding Depth and Dimension to the Hat
In learning how to draw a hat, after outlining the basic shape, the next crucial step is to add depth and dimension. This is an essential part of portraying not only the true reflection of a hat but also the form and overall perception of a three-dimensional object on a two-dimensional platform. Drawing depth and dimension entails considering the light source, gradient and shadow. Depth can be accomplished by adding elements such as lines, shapes, values, hues, contrast and texture. While creating the depth, you would need to visualize the hat as a three-dimensional object. Start by varying the thickness and continuity of the lines. Thicker and continuous lines on the contour of the hat can denote closeness while slimmer and broken lines create an effect of distance. This fluctuation of lines gives the hat an appearance of depth making it seem as though it exists in a three-dimensional space on a flat surface. Further, by creating smaller shapes on areas hidden from the light and larger shapes on areas in direct light, the hat will appear more dimensional. Contrasting values can also help imply depth. By using a range of shades from light to dark, you create an impression of a light source emanating from a specific direction, thereby depicting a sense of depth. Using shading styles like cross-hatching or stippling can also significantly enhance the depth and dimension of your hat drawing. The use of different hues can also be quite instrumental in creating depth by using warmer colors for closer areas and cooler colors for distant parts. No less important is the aspect of texture. For instance, if drawing a woolen beanie, light, feathery strokes can mimic its soft, fuzzy texture quite accurately. In contrast, a leather hat may require smoother, more continuous strokes to capture its sleek surface. This aids the observer's subconscious perception of the material, adding another layer of depth and realism to the artwork. When skillfully done, the addition of texture creates a sensory experience, convincing the viewer of the illusion of fabric resting three-dimensionally on the head of the wearer. As a caveat, it’s essential to note that caution should be exercised in maintaining the balance between these elements in adding depth and dimension. Overdoing any of them can make your drawing appear overly dramatic and perhaps a little intimidating. Minimal, yet effective application gained through practice, will render your hat drawing not only convincing but also aesthetically pleasing. In summary, adding depth and dimension is an essential step in the process of drawing a hat or any object. It involves the use of lines, shading techniques, colors and textures to give the impression of a three-dimensional object on a two-dimensional surface. Only through balancing these elements in the right proportions can the drawing take a realistic, tangible shape in the mind's eye of the observer.
Refining the Hat's Shape and Proportions
of any inspiring artwork is its attention to detail. Refining the hat's shape and proportions is a critical phase when you're sketching the basic shape of the hat. It's during this stage when an artist brings out their inner perfectionist to ensure the hat isn’t just a mass of line and colours but accurately represents the contours and unique attributes of the hat design they’re capturing. Establishing a balanced proportion is no cakewalk, it requires an additional layer of attention to detail. Think about the hat from multiple perspectives. Assess its breadth, gauge its height, understand its symmetry, and observe the depth of its crown - the topmost shaping part of a hat. Whether it's a beret, a baseball cap, or a trilby, each design has different proportions and angles to consider. For instance, a cowboy hat has a brim that's generally wider than its crown, with the brim typically angling downward. Thus, when you sketch and refine, you have to translate these distinct variations of shape and proportion accurately. Adjusting the hat's shape goes hand in hand with balancing its proportions. It involves creating a dynamic visual appeal by incorporating the elegance of curves, the crispness of lines, and the boldness of angles. Refining the shape could mean smoothing out the contours of a beanie or defining the sharp looking brim of a fedora. This stage opens up a world of opportunities to express one's artistic alexandrite through personalizing these nuances. In order to capture the realistic representation of a hat, it is crucial to understand the importance of light and shadow. They provide a sense of dimension, texture and depth to the hat, giving it a certain level of realistic look. Whether the hat is placed in direct sunlight or under diffused indoor light, the appearance of shadow will change. Consequently, refining the hat's shape and dimension to correlate with the light source is a skill an artist needs to imbibe. The phase of refining the hat's shape and proportions is a detailed and precise task that can test the consideration of an artist. But it is this phase that breathes life into the sketch, making it a masterful work of art. Whether you are novice or an experienced artist, learning to capture the unique character and idiosyncrasy of any hat in the sketch will elevate your artistic abilities to new heights. Embrace the challenge, immerse yourself in the refinement process - you'll be amazed at how your sketches intricately capture the hat's spirit and charisma when these factors are diligently considered.
Adding Details and Texture to the Hat
Designing hats that not only complement an outfit perfectly but also reflect one's unique personality is a delightful endeavor. To achieve this, it's crucial to focus on adding intricate details and texturing on the hat for a more realistic and appealing look. Essentially, we will concentrate on three different aspects; creating a realistic hat texture, adding embellishments and decorations, and mastering the art of shading and highlighting the hat. It all starts with creating a realistic hat texture, a technique that gives the hat a more authentic, tangible feel. This process involves careful material selection and thoughtful incorporation of stitches and weaves to replicate a true-to-life fabric finish. After this, we delve into the task of adding embellishments and decorations. Embellishments, whether big or small, can make a significant difference. They add character and can transform a seemingly basic hat into an attention-grabbing accessory. Lastly, the article will tackle shading and highlighting techniques. Correct use of these gives depth and volume to the hat, making it appear three-dimensional. Now let's begin our deep dive into creating a realistic hat texture, the bedrock of exquisite hat design.
Creating a Realistic Hat Texture
When creating a realistic hat texture, understanding the material and the way it interacts with light is crucial for capturing its essence. Different materials possess distinct characteristics that reflect or absorb light differently, and these attributes need to be diligently reproduced in drawings to achieve a lifelike texture. One effective method to create a realistic hat texture is by mastering the art of cross-hatching. Cross-hatching is a drawing technique where parallel lines are drawn in close proximity to depict varying degrees of light and shade which, in turn, helps create an illusion of texture. When creating the hat texture, consider the primary light source, and start cross-hatching in the areas away from it. Here, the lines would be closely packed, and as you gradually move towards the light source, create a gradient effect by slowly increasing the space between the lines. This technique effectively brings out the three-dimensionality and texture of the hat. In a textured fabric, such as wool, detailing could be emphasized by adding more lines and dots to create a coarse expression. On the contrary, for a smooth fabric such as silk or satin, fewer lines, and more blending can result in the desired soft and lustrous effect. In terms of auxiliary tools, don't underestimate the power of a good stumping tool or a tortillon. These are cylindrical drawing tools used for smudging and blending, especially helpful when creating textures. If you desire to make the texture a little rougher such as straw or felt hats, an eraser can also come handy. By lightly brushing the eraser across the hat, you can lift the graphite or charcoal in some places to give the appearance of coarser texture. In digital art, using texture brushes that mimic the look and feel of various material surfaces is beneficial. Photoshop, Procreate, and other similar digital software offer a wide selection of brushes to create realistic textures. The details you add to your drawing are essential to give it depth, life, and character. But remember, the goal is not to drown the viewer in details, rather to create a harmonious balance. And most importantly, do not be afraid to experiment. Trial and error is a vital part of art and one of the most effective ways to refine your skills. Creating a realistic hat texture involves such meticulous attention to detail and dedication to replicating the exact material's nature. There's a balance between knowing and understating the material you are working with and implementing the correct technique to bring it to life on paper or a digital canvas. Above all, patience is critical in mastering textures. So, explore, experiment, and enjoy the process of creating.
Adding Embellishments and Decorations
of successful hat drawings relies on the accurate addition of embellishments and decorations. They amplify the hat's character, offer a realistic impression, and provide the depth and texture an artist aims for. Whether it's a classically detailed fedora or a whimsically decorated party hat, understanding how crucial these details are is fundamental. Textures and decorations make a hat stand out, and this is why they need careful attention during the drawing process. An artist's ability to convey the material, whether it is suede, leather, straw, or fabric, lies in the careful rendering of textures. Individual threads can be suggested in a fabric hat using quick, but carefully drawn lines, while subtle shading can create the illusion of the warm roughness of a suede. Observable texture difference helps the viewer understand the drawing better and makes the picture strikingly vivid. Embellishments such as ribbons, feathers, flowers, or charms add personality to the hat. These elements define the hat's style, its purpose, or the era it belongs to. A ribbon tied around a hat may suggest a softer, vintage charm, while feathers might indicate a flamboyant style or a ceremonial purpose. Dashed lines or dots can successfully render the delicate details of embroidery or beadwork. Such nuances can result in a more intriguing and appealing artwork. To execute such detail, it's vital to practice patience and keen observation. Studying the object closely aids in capturing the decorating elements. It's not always about full-on realism, but significant attention to detail can also provide a stylised interpretation. Employing techniques such as cross-hatching, stippling, and smudging, can assist in achieving the desired nuanced effect and textural variety. Remember, decorations and embellishments on the hat shouldn’t steal the limelight and supersede the hat's form. Hence, striking the right balance is key. By applying these principles thoughtfully, an artist can enhance the detailed portrayal of the hat, resulting in a drawing that is not just visually pleasing but also reflective of their artistic skill and interpretation. In conclusion, while hats may seem simple to draw at first glance, they possess an inherent complexity that requires skill to capture effectively. Detailed embellishments and intricate decorations play a vital role in making the artwork appear more realistic and appealing. Hence, taking the time to master these factors can significantly improve an artist's ability to correctly and impressively depict a hat in their drawing.
Shading and Highlighting the Hat
Adding shades and highlights is a significant part of rendering a realistic hat. If done accurately, shading and highlighting can add depth, texture, and context to the hat, making it come alive on the canvas. It's a critical step that directly follows the detailing and texturing process, adding the finishing touches that turn a flat sketch into an intricate design. To begin, it's essential to identify your light source. This will determine where your highlights (the areas hit directly by light) and shadows (parts hidden from the light) will fall. Light sections of the hat would be the highlights, heavily illuminated due to the direct light. Opposite these, you'll have your shadows or darker sections that rest beneath or behind raised sections of the hat. Once you've figured the light source, choose a base color, ensuring a tone that mirrors your subject's actual color. Following this, choose a lighter and darker shade of your base color for highlighting and shading, respectively. Starting with your base color, you'll gradually build up towards the darker shades for areas in shadow, ensuring a smooth blend that gives a rounded impression to the object. Subsequently, for areas catching light, the highlights, you start blending with the base color and extend towards the lighter shade slowly, lending a natural graduation. Toward the very end of this process, you can add a touch of white to depict a brilliant shine on the hat if the material is reflective. Adding texture while shading and highlighting is also crucial in making the hat look realistic. If the hat has a soft, fuzzy texture, maintain a soft blend, while for a straw hat, your shading could have a rougher, cross-hatched approach. The chosen technique of shading would further enhance the existing texture you've drawn during the detailing process. Remember, shading and highlighting goes beyond just adding light and dark portions to an illustration. They represent the artist's intuitive understanding of light interaction with different forms and materials. By mastering shading and highlighting, you can transform a simple hat sketch into a detailed and textured piece that leaves a lasting impression on viewers.