How To Use Transfer Tape Cricut
Here is the introduction paragraph: Using transfer tape with a Cricut machine can be a game-changer for crafters and DIY enthusiasts. This versatile tool allows for easy and precise application of vinyl, iron-on, and other materials to various surfaces. To get the most out of transfer tape, it's essential to understand its uses, prepare your design and tape correctly, and apply it with precision. In this article, we'll delve into the world of transfer tape and explore its benefits, as well as provide a step-by-step guide on how to use it effectively. First, let's start by understanding what transfer tape is and its various uses, which will set the foundation for the rest of our discussion.
Understanding Transfer Tape and Its Uses
Transfer tape is a versatile tool that has revolutionized the way we work with vinyl, iron-on, and other materials. It is an essential accessory for crafters, DIY enthusiasts, and small business owners who use cutting machines like Cricut. But what exactly is transfer tape, and how does it work? In this article, we will delve into the world of transfer tape, exploring its uses, benefits, and types available for Cricut users. We will discuss the different types of transfer tape available, including their unique features and applications. Additionally, we will examine the benefits of using transfer tape with Cricut, including its ability to simplify the weeding process and prevent mistakes. By the end of this article, you will have a comprehensive understanding of transfer tape and its uses, starting with the basics of what transfer tape is and how it works.
What is Transfer Tape and How Does it Work?
Transfer tape, also known as application tape or transfer film, is a type of adhesive tape specifically designed to help transfer vinyl letters, numbers, and designs onto various surfaces. It works by applying a thin, adhesive layer to the top of the vinyl, allowing it to be lifted and transferred to the desired surface without stretching or distorting the vinyl. The tape is usually made of a thin, flexible material, such as paper or plastic, coated with a gentle adhesive that is strong enough to hold the vinyl in place but not so strong that it leaves residue on the surface. To use transfer tape, simply cut a piece to the desired size, place it over the vinyl, and smooth out any air bubbles or wrinkles. Then, lift the tape and vinyl together, and apply it to the surface, smoothing out any air bubbles or wrinkles as you go. The transfer tape can then be removed, leaving the vinyl in place. Transfer tape is an essential tool for anyone working with vinyl, as it makes it easy to achieve professional-looking results without the hassle of trying to apply individual letters or designs by hand.
Types of Transfer Tape Available for Cricut
There are several types of transfer tape available for Cricut, each with its own unique characteristics and uses. The most common types of transfer tape include paper transfer tape, vinyl transfer tape, and clear transfer tape. Paper transfer tape is a cost-effective option that is suitable for most Cricut projects, including paper crafts, iron-on designs, and vinyl decals. Vinyl transfer tape, on the other hand, is specifically designed for use with vinyl and is ideal for creating intricate designs and patterns. Clear transfer tape is a versatile option that can be used with a variety of materials, including vinyl, iron-on, and paper, and is great for creating custom designs and logos. Additionally, there are also specialized transfer tapes available, such as transfer tape for glitter vinyl, holographic vinyl, and other specialty materials. It's essential to choose the right type of transfer tape for your specific project to ensure the best results and to prevent damage to your materials.
Benefits of Using Transfer Tape with Cricut
Using transfer tape with Cricut can greatly enhance the overall cutting and application process. One of the primary benefits is that it allows for precise placement and alignment of intricate designs and small details. The tape helps to keep the cut vinyl or iron-on in place, ensuring that it is applied smoothly and evenly, without wrinkles or air bubbles. This is particularly useful when working with delicate or complex designs, as it eliminates the risk of misalignment or damage during the application process. Additionally, transfer tape can help to prevent the vinyl or iron-on from stretching or distorting, which can occur when it is applied by hand. This results in a more professional-looking finish and a longer-lasting design. Furthermore, using transfer tape can save time and reduce frustration, as it eliminates the need for manual placement and adjustment of individual pieces. Overall, incorporating transfer tape into your Cricut workflow can significantly improve the quality and efficiency of your projects.
Preparing Your Design and Transfer Tape
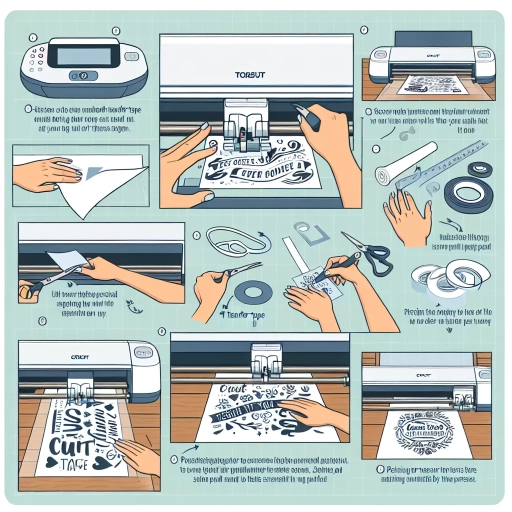
When it comes to preparing your design and transfer tape for a successful project, there are several key steps to follow. To ensure a professional-looking finish, it's essential to start with a well-designed project, which can be achieved by utilizing Cricut Design Space. This powerful tool allows you to create custom designs, edit images, and arrange elements with precision. Once your design is complete, you'll need to cut it out using your Cricut machine, which requires careful preparation to ensure accurate cuts. Finally, preparing your transfer tape for application is crucial to ensure a smooth and bubble-free finish. By following these steps, you'll be able to achieve a high-quality finish that showcases your creativity. In this article, we'll explore each of these steps in more detail, starting with designing your project with Cricut Design Space.
Designing Your Project with Cricut Design Space
Designing your project with Cricut Design Space is an exciting step in bringing your creative vision to life. To start, open Cricut Design Space on your computer or mobile device and sign in to your account. If you're new to Cricut, you can create a free account and access a wide range of features and tools. Once you're logged in, click on the "Create a New Project" button to begin designing your project. Choose the type of project you want to make, such as a vinyl decal, iron-on design, or paper craft, and select the machine you'll be using. Next, choose the material you'll be working with and the size of your project. You can also select from a variety of pre-made templates and shapes to get started. As you design your project, you can use the toolbar to add text, shapes, and images, and adjust the size, color, and layout of your design. You can also use the "Undo" and "Redo" buttons to experiment with different design options. Once you're happy with your design, click on the "Make It" button to send your project to your Cricut machine for cutting. Before you start cutting, make sure to prepare your transfer tape, which will help you apply your design to your desired surface. In the next step, we'll cover the process of preparing your design and transfer tape for a successful application.
Cutting Your Design with Cricut Machine
Cutting your design with a Cricut machine is a crucial step in the transfer tape process. To ensure a precise cut, start by loading your cutting mat into the machine and selecting the correct settings for your material. Next, send your design to the Cricut machine via Bluetooth or USB, and let the machine do the work. The Cricut's advanced cutting technology will carefully cut out your design, following the lines and curves with precision. As the machine cuts, make sure to keep an eye on it to ensure that the cut is accurate and complete. Once the cut is finished, carefully remove the excess material from the mat, taking care not to touch the cut design. Your design is now ready to be weeded and prepared for transfer tape application.
Preparing Transfer Tape for Application
Preparing transfer tape for application is a crucial step in ensuring a smooth and successful transfer process. To start, make sure to choose the right type of transfer tape for your project, taking into account the size, shape, and material of your design. Next, cut a piece of transfer tape slightly larger than your design, leaving a small margin around the edges. This will provide enough room for the tape to adhere to the design without overlapping or creasing. Before applying the transfer tape, ensure that your design is free of dust, dirt, and oils, as these can interfere with the adhesive properties of the tape. Gently place the transfer tape over the design, starting from the center and working your way outwards, smoothing out any air bubbles or wrinkles as you go. Use a credit card or similar tool to apply even pressure, ensuring the tape adheres firmly to the design. Finally, inspect the transfer tape for any air bubbles or imperfections, and make any necessary adjustments before proceeding with the transfer process. By following these simple steps, you can ensure that your transfer tape is properly prepared for application, setting you up for a successful and stress-free transfer.
Applying Transfer Tape to Your Design
Applying transfer tape to your design is a crucial step in the vinyl cutting process. It allows you to transfer your design from the vinyl sheet to your desired surface, such as a sign, sticker, or decal. To ensure a successful transfer, it's essential to follow the correct steps. First, you need to align the transfer tape with your design, making sure it's centered and even. This step is critical, as it sets the stage for the rest of the process. Once the tape is aligned, you can apply it to your design, smoothing out any air bubbles or wrinkles. Finally, you'll need to remove any excess transfer tape, leaving only the tape that's covering your design. By following these steps, you can achieve a professional-looking finish and ensure your design looks its best. In this article, we'll dive deeper into the process, starting with the first step: aligning transfer tape with your design.
Aligning Transfer Tape with Your Design
Here is the paragraphy: When applying transfer tape to your design, it's crucial to align it properly to ensure a smooth and even application. To do this, start by placing the transfer tape over your design, making sure to cover the entire area. Next, use a credit card or similar tool to smooth out any air bubbles or wrinkles. Begin at the center of the design and work your way outwards, applying even pressure to ensure the tape adheres evenly. If necessary, use a ruler or other straightedge to help guide the tape and ensure it's aligned with the edges of your design. For intricate designs or those with many small details, consider using a smaller piece of transfer tape and applying it in sections, rather than trying to cover the entire design at once. This will help prevent air bubbles and ensure a more precise application. By taking the time to properly align your transfer tape, you'll be able to achieve a professional-looking finish and ensure your design looks its best.
Applying Transfer Tape to Your Design
Applying transfer tape to your design is a crucial step in the vinyl cutting process. To do this, start by cutting a piece of transfer tape that is slightly larger than your design. Peel the backing off the transfer tape and place it over your design, making sure to cover the entire surface. Use a credit card or similar tool to smooth out any air bubbles or wrinkles in the tape. Apply even pressure to ensure the tape adheres well to the vinyl. If necessary, use a scraper or other tool to remove any excess tape from around the edges of your design. Once the tape is applied, use it to lift the vinyl off the backing paper and transfer it to your desired surface. Make sure the surface is clean and dry before applying the vinyl to ensure a strong bond. By following these steps, you can successfully apply transfer tape to your design and achieve a professional-looking finish.
Removing Excess Transfer Tape
When applying transfer tape to your design, it's essential to remove any excess tape to ensure a smooth and bubble-free application. To do this, start by gently peeling the transfer tape away from the design, working from one edge to the other. As you peel, use a credit card or similar tool to smooth out any air bubbles that may form. If you notice any excess tape, use scissors or a craft knife to carefully trim it away, taking care not to cut too close to the design. For intricate designs or small details, use a weeding tool or a pair of tweezers to remove excess tape, working slowly and carefully to avoid damaging the design. Once you've removed the excess tape, use a lint roller or a piece of tape to pick up any remaining debris or dust particles. Finally, inspect the design to ensure that all excess tape has been removed and the design is ready for application.