How To Season Stainless Steel Pan
Here is the introduction paragraph: Seasoning a stainless steel pan is a simple yet effective way to create a non-stick surface, prevent rust, and enhance the overall cooking experience. While stainless steel pans are known for their durability and resistance to scratches, they can be prone to sticking and require regular maintenance to maintain their performance. To achieve optimal results, it's essential to understand the process of seasoning a stainless steel pan, which involves three key steps: pre-seasoning preparation, the seasoning process itself, and maintenance and re-seasoning. In this article, we'll delve into each of these steps, starting with the crucial pre-seasoning preparation phase, where we'll explore the importance of cleaning and degreasing the pan to create a smooth surface for seasoning.
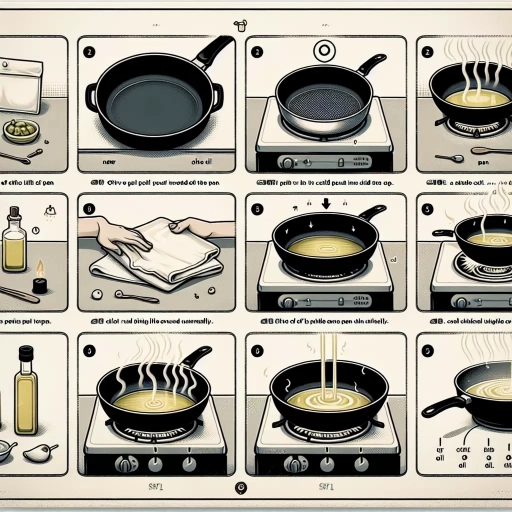
Pre-Seasoning Preparation
Pre-seasoning is a crucial step in maintaining and enhancing the performance of your cookware, particularly cast iron and carbon steel pans. To achieve a non-stick surface and prevent rust, it's essential to prepare your pan properly before applying the seasoning. This process involves three key steps: choosing the right oil, cleaning the pan thoroughly, and heating the pan to the optimal temperature. By following these steps, you'll be able to create a durable and even seasoning that will improve your cooking experience. Let's start with the first step: choosing the right oil.
Choose the Right Oil
When it comes to seasoning a stainless steel pan, choosing the right oil is crucial. Not all oils are created equal, and some are better suited for high-heat cooking and seasoning than others. Look for oils with a high smoke point, which is the temperature at which the oil begins to break down and smoke. Some good options include avocado oil, grapeseed oil, and peanut oil, which have smoke points of around 520°F (271°C), 420°F (220°C), and 450°F (232°C), respectively. These oils are also relatively neutral in flavor, which won't affect the taste of your food. On the other hand, oils like olive oil and coconut oil have lower smoke points and can become damaged or even toxic when heated to high temperatures, making them less ideal for seasoning. Additionally, some oils, such as flaxseed oil and linseed oil, are high in polyunsaturated fats, which can become rancid when exposed to heat, light, or oxygen, affecting the seasoning process. By selecting the right oil, you'll be able to create a durable, non-stick seasoning that will enhance the performance of your stainless steel pan.
Clean the Pan Thoroughly
Cleaning the pan thoroughly is a crucial step in pre-seasoning preparation. Before applying any seasoning, it's essential to remove any debris, residue, or manufacturing impurities that may be present on the surface of the pan. Start by washing the pan with mild soap and warm water to remove any loose particles. Use a soft sponge or cloth to scrub the pan, paying particular attention to any areas with visible stains or residue. Rinse the pan thoroughly with clean water to remove any soap residue. Next, mix equal parts water and white vinegar in the pan and bring it to a boil. Reduce the heat and let it simmer for 10-15 minutes to help loosen any tough residue. After simmering, use a soft-bristled brush or non-abrasive scrubber to gently scrub away any remaining residue. Rinse the pan again with clean water and dry it thoroughly with a towel. For tougher residue or stains, you can also use a gentle cleanser like Bar Keepers Friend or a mixture of baking soda and water to create a paste. Apply the paste to the affected area and let it sit for 30 minutes before rinsing and drying the pan. Once the pan is clean and dry, it's ready for the seasoning process. A clean pan ensures that the seasoning adheres evenly and prevents any unwanted flavors or residue from affecting the cooking performance of the pan.
Heat the Pan
To heat the pan, place it over medium-high heat on your stovetop. Allow the pan to heat up for 2-3 minutes, or until it reaches the desired temperature. You can test the heat by flicking a few drops of water onto the pan - if they sizzle and evaporate quickly, the pan is ready. Alternatively, you can use a thermometer to check the temperature, aiming for around 400°F (200°C). Once the pan is hot, reduce the heat to medium-low and proceed with adding a small amount of oil to the pan. This will help to evenly coat the surface and prevent the seasoning from pooling in one area. As the oil heats up, it will start to shimmer and slightly smoke - this is a sign that the pan is ready for the seasoning process to begin. Be careful not to let the oil smoke excessively, as this can damage the pan's surface. By heating the pan correctly, you'll create a strong foundation for a durable and non-stick seasoning.
The Seasoning Process
The seasoning process is a crucial step in maintaining and enhancing the performance of cookware, particularly cast iron and carbon steel pans. It involves creating a non-stick surface by building up a layer of polymerized oil on the metal. This process not only prevents rust but also improves the cooking experience by reducing the risk of food sticking to the pan. To achieve a well-seasoned pan, it is essential to follow a series of steps. First, a thin layer of oil must be applied to the entire surface of the pan, ensuring that every area is coated. Next, the oil must be heated to a high temperature to polymerize, or harden, the oil molecules. Finally, the pan must be allowed to cool before wiping off any excess oil that has not been absorbed into the metal. By following these steps, a durable and non-stick seasoning can be achieved. To begin the seasoning process, the first step is to apply a thin layer of oil.
Apply a Thin Layer of Oil
Applying a thin layer of oil is a crucial step in the seasoning process of a stainless steel pan. This step helps to create a non-stick surface and prevents rust from forming on the pan. To apply a thin layer of oil, start by selecting a high-quality cooking oil with a high smoke point, such as peanut or avocado oil. Using a paper towel, apply a thin, even layer of oil to the entire surface of the pan, making sure to cover every area, including the handle and underside. Be careful not to apply too much oil, as this can lead to a sticky surface. Instead, aim for a thin, almost imperceptible layer that will help to protect the pan and create a non-stick surface. Once the oil is applied, use a clean paper towel to wipe off any excess oil, leaving a thin, even layer behind. This thin layer of oil will help to season the pan and create a durable, non-stick surface that will last for many uses.
Heat the Oil to Polymerize
When it comes to seasoning a stainless steel pan, one of the most crucial steps is to heat the oil to polymerize. This process involves heating the oil to a high temperature, typically between 350°F to 400°F (175°C to 200°C), to break down the molecular structure of the oil and create a hard, non-stick surface. The heat causes the oil molecules to react with each other, forming a complex network of polymer chains that bond to the metal surface. This polymerized layer is what provides the non-stick properties and prevents food from sticking to the pan. To achieve this, it's essential to use a high-smoke-point oil, such as avocado oil or grapeseed oil, which can withstand the high temperatures without breaking down or smoking. Once the oil is heated to the correct temperature, it's essential to let it cool slowly and naturally, allowing the polymerized layer to form and harden. This process can take anywhere from 30 minutes to an hour, depending on the thickness of the oil layer and the temperature. By heating the oil to polymerize, you'll create a durable and non-stick surface that will make cooking and cleaning a breeze.
Let it Cool and Wipe Off Excess
After seasoning your stainless steel pan, it's essential to let it cool completely before wiping off any excess oil. This step is crucial in allowing the seasoning to set and bond with the metal. If you wipe off the excess oil too soon, you risk removing the seasoning along with it, which can lead to a poor non-stick surface. By letting the pan cool, you enable the oil to polymerize and form a hard, non-stick layer that will provide excellent cooking performance. Once the pan has cooled, use a paper towel to gently wipe off any excess oil, being careful not to scrub or rub too hard, as this can damage the seasoning. A clean, dry cloth can also be used to wipe down the pan, removing any remaining excess oil. It's also important to note that you should not wash the pan with soap or water after seasoning, as this can strip away the seasoning. Instead, simply wipe off any excess oil and store the pan in a dry place, ready for its next use. By following these steps, you'll be able to achieve a well-seasoned stainless steel pan that will provide you with years of excellent cooking performance.
Maintenance and Re-Seasoning
To maintain a high-quality cast iron pan, it's essential to follow a few simple steps. One of the most critical aspects of cast iron maintenance is avoiding the use of harsh chemicals, which can strip the pan of its seasoning and damage the metal. In addition to avoiding harsh chemicals, it's also important to re-season the pan periodically to maintain its non-stick properties. Finally, storing the pan properly is crucial to prevent rust and maintain its overall condition. By following these simple steps, you can keep your cast iron pan in great condition and ensure it continues to perform well for years to come. In this article, we'll take a closer look at each of these steps, starting with the importance of avoiding harsh chemicals.
Avoid Using Harsh Chemicals
When it comes to maintaining and re-seasoning your stainless steel pan, it's essential to avoid using harsh chemicals that can strip away the seasoning and damage the metal. Instead of reaching for abrasive cleaners or scouring pads, opt for gentle cleaning methods that won't compromise the integrity of your pan. For tough stains or grime buildup, mix equal parts water and white vinegar in the pan and bring it to a boil. Reduce the heat and let it simmer for a few minutes before wiping it clean with a soft cloth. For more stubborn stains, you can also use a gentle cleanser like Bar Keepers Friend, which is specifically designed for cleaning stainless steel without damaging the seasoning. Avoid using bleach, ammonia, or other harsh chemicals, as they can react with the metal and cause damage. By sticking to gentle cleaning methods and avoiding harsh chemicals, you can keep your stainless steel pan in great condition and ensure it continues to perform well over time.
Re-Season the Pan Periodically
Re-seasoning a stainless steel pan periodically is essential to maintain its non-stick properties and prevent rust. Over time, the seasoning on your pan can wear off due to regular use, cleaning, and storage. Re-seasoning the pan helps to replenish the seasoning layer, ensuring that your pan continues to perform optimally. To re-season your stainless steel pan, start by cleaning it thoroughly with soap and water to remove any food residue and debris. Next, apply a thin, even layer of cooking oil to the pan, making sure to cover the entire surface. Place the pan in the oven at 350°F (175°C) for an hour to allow the oil to polymerize and form a new seasoning layer. After the hour is up, turn off the oven and let the pan cool before wiping off any excess oil with a paper towel. Repeat this process 2-3 times to build up a robust seasoning layer. It's recommended to re-season your stainless steel pan every 1-3 months, depending on how frequently you use it. By re-seasoning your pan periodically, you'll be able to maintain its non-stick properties, prevent rust, and ensure that your pan continues to cook your food evenly and efficiently.
Store the Pan Properly
Store the Pan Properly To maintain the seasoning and overall quality of your stainless steel pan, it's essential to store it properly. After cleaning and drying the pan, apply a thin layer of cooking oil to the surface. This will help prevent rust and maintain the seasoning. Next, place the pan in a dry location, such as a hook or hanging rack. Do not store the pan in a humid environment or cover it with a lid, as this can encourage rust and bacterial growth. If you must store the pan in a cabinet or drawer, place a paper towel or cloth between the pan and any other cookware to prevent scratching. Additionally, avoid stacking the pan on top of other cookware, as this can cause damage to the seasoning and the pan's surface. By storing your stainless steel pan properly, you can help extend its lifespan and maintain its non-stick properties. Regularly inspect the pan for any signs of rust or damage, and re-season as needed to maintain its performance. Proper storage is a crucial step in maintaining the quality and longevity of your stainless steel pan, and with a little care and attention, it can continue to perform well for years to come.