How To Draw A Parrot
 Let's embark on an artistic journey as we explore the fascinating world of sketching a vibrant and lifelike parrot. Drawing a parrot is more than just graphite on paper; it is a harmonious blend of observation, understanding, and the mastery of techniques, beautifully encompassed into an artistic rendition. This intriguing article unfolds in three essential phases– Understanding the Anatomy of a Parrot, where we delve deep into witnessing the intricate details of a parrot’s physique; Mastering the Basic Techniques of Drawing a Parrot, where we fine-tune our artistic skills aligning with the form, structure, and essence of the parrot; and concluding on a vivid note with Finishing the Parrot Drawing with Color and Details, breathing life into our creation. Immerse yourself in this intricate process as we first set off to comprehend the basic anatomy of a parrot as a crucial cornerstone to representing their unique charm accurately.
Understanding the Anatomy of a Parrot
Understanding the unique anatomy of a parrot can be akin to exploring a living, colorful masterpiece crafted by nature. This article will walk you through the process of identifying the intricate structural design of parrots, enriching your knowledge and sharpening your keen eye for details. As you delve further into this captivating topic, you will come across three significant components. Firstly, 'Recognizing the Major Body Parts of a Parrot' will acquaint you with the basic physical architecture of these vibrant birds, elucidating their characteristic features and functionality. Next, the segment 'Studying the Peculiarities of a Parrot's Beak and Feathers' will unveil the interesting specifics about their hardy beak and magnificent plumage that aid in their survival and behavior in their environment. Lastly, 'Familiarizing Yourself with a Parrot's Color Patterns' will reveal the extraordinary array of hues a parrot can exhibit and the communicating role these patterns play. With this framework in mind, let us now embark on this journey, beginning with recognizing the major body parts of a parrot, an essential step towards appreciating their distinctive appeal and intricate anatomy.
1. Recognizing the Major Body Parts of a Parrot
Parrots, known as 'psittacines,' are admired for their vibrant colors, striking appearances, and distinctive communication abilities. Understanding the major body parts of a parrot is not just important for artists aiming to capture their likeness, but also for anyone who wants to engage more deeply with these magnificent creatures. Let's begin with the head. Parrots have a large, curved beak that serves a multitude of purposes. This powerful tool allows them to crack open hard nuts, preen their feathers, and communicate through distinctive head movements. Topping the beak are their keen eyes, known for their incredible vision, ringed by a soft patch of skin called the 'eyering'. Parrots also have specialized feathers on their head, which they can move and manipulate to signal mood and intentions. Moving onto the upper body, the neck is often covered with short, fluffy feathers extending to what is referred to as the 'mantle' - the area across the back and wings. Each wing presents a stunning display of primary and secondary flight feathers, meticulously arranged for optimal flight and colored for dazzling visual displays. Also, underneath the wing, you'll find the 'flanks,' which extend down the sides of the bird to the belly. The lower body is comprised of the tail, the 'vent' (the exit for a parrot's digestive, urinary, and reproductive systems), and the legs. The tail, made of balanced tail feathers called 'rectrices,' assists in steering during flight. Parrots' legs are generally short but sturdy, ending in zygodactyl toes – two pointing forward and two backward - perfect for gripping branches or climbing. Quality artistry goes beyond the mere physical aspects of the parrot. An artist must also capture their temperament - their inquisitive eyes, the playful tilt of their head, or the fluffed feathers signaling contentment. Once you comprehend a parrot's anatomy, drawing them becomes more than just a replication process—it turns into a session of appreciation for their unique design and spirit.
2. Studying the Peculiarities of a Parrot's Beak and Feathers
Delving deeper into the understanding of a parrot's anatomy, we are now going to study the peculiarities of a parrot's beak and feathers, two crucial components that uniquely characterize these vibrant avians. Parrot's beak is an astounding apparatus of nature that is designed not just for feeding, but also for climbing, foraging, and an array of other activities. Composed primarily of keratin, the beak of a parrot shares similarities with our fingernails. The upper beak, known as the maxilla, arches over the lower beak or the mandible, forming a powerful nutcracker-like apparatus. The pointed hook at the tip is used for tearing and breaking food apart, while the broad surface can crush seeds or take on the precision work of manipulating small objects. An interesting characteristic of a parrot's beak is that it continually grows throughout its life. Thus, regular chewing and grinding are required to keep it in shape and prevent overgrowth. Exploring the structure of a parrot's feathers, we unearth an ingenious composition that can vibrant colors and facilitate different forms of activities. Each wing feather consists of a stiff central shaft from which soft barbs radiate. These barbs intertwine with each other through a series of natural hooks, giving the feather its smooth, flat surface. This feather architecture provides the necessary strength and flexibility for flight while keeping the bird’s body lightweight. A parrot's stunning colors originate not from pigments but from microscopic structures within these feathers that interact with light, resulting in their captivating brilliance. Understanding the evolution and complexities of a parrot's beak and feathers unveils more than we realize. From their functionality and durability to their aesthetic appeal and adaptation to environmental needs, these two aspects provide a deep insight into how beautifully parrots are engineered by nature. As you strive to draw a parrot, appreciating the nuances of their beak and feathers can elevate your portrayal and imbue your work with a more lifelike and convincing quality.
3. Familiarizing Yourself with a Parrot's Color Patterns
When engaging in the artistic adventure of drawing a parrot, a deep understanding of their distinct color patterns gives you an edge and aids in an effective final representation. Parrots, by nature, are an embodiment of vivid color palettes, and their flamboyance encapsulates nature's artistic prowess. Each species boasts unique color patterns that differentiate one variety from another. Starting with the Scarlet Macaw, one of the largest parrots, it flaunts a fiery red plumage that gradually transitions into yellow and striking blue at the wing tips. On the other hand, an Amazon parrot predominantly sports green feathers mixed with splashes of yellow, blue, or red. You can't also overlook the distinct face color of the Indian Ringneck parrot, which comes in either yellow, blue, green, or white, characterized by powerful contrasts against their more uniform body colors. Differential color patterns can also be seen in the Eclectus parrot, where sexual dimorphism is apparent. These parrots make it easy to distinguish between males and females - the males are predominantly vibrant green, while females are radiant hues of red and purple. More interesting is the African Grey parrot known for its neutral yet elegant grey color complemented by a stunningly red tail. Exploring these color patterns gleans insight into the diversity and intricate beauty inherent in parrots and aids in establishing foundational knowledge necessary for creating a visually compelling and accurate drawing. Furthermore, understanding these distinct colour schemes will play a pivotal role in effectively capturing the attention of your audience, leaving them visually stimulated and potentially intrigued to learn more about these winged wonders. When drawing, one must remember that the art lies in the details. Each strand of feather color, patterning, shading, and alignment contributes to the overall authenticity of the image. Striking a balance between meticulously replicating each impressive color detail and adding one's personal flair and creativity can result in a stunningly captivating parrot drawing. That's the beauty of understanding a parrot's color pattern; it allows you not only to illustrate but to narrate a story through your strokes on paper. By displaying a deep understanding and respect for this aspect of a parrot's anatomy, your artwork can gain life, vibrancy, and a resonance that echoes through the eyes of your audience.
Mastering the Basic Techniques of Drawing a Parrot
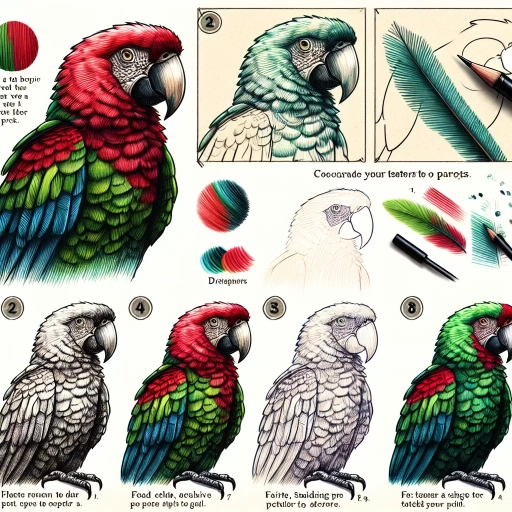
Mastering the art of drawing a parrot can be an exciting challenge for both beginners and advance artists. By implementing a measured and meticulous approach, anyone can bring this vibrant, tropical bird to life on a canvas. The key to creating a high-quality, realistic parrot sketch is following three critical steps, each serving as a cornerstone to the overall drawing. To begin, an artist must first sketch out the basic outline of the parrot, where the foundation for the entire sketch is laid out. Following this, the focus shifts to developing substantive detail on the parrot's body, which imbues the sketch with depth and lucidity. Finally, the paradoxical stroke of brilliance comes from playing with shadows and highlights to create a three-dimensional effect. As we delve deeper into the technique, let's start by exploring the first stage - sketching the basic outline of a parrot; the stage where your interaction with your canvas begins, and the parrot shape takes its nascent form. The journey to creating that vibrant, lively parrot you envisage begins here.
1. Sketching the Basic Outline of a Parrot
Sketching the basic outline of a parrot is an integral aspect under the broad umbrella of mastering the fundamental techniques of drawing a parrot. Before you even consider color, proportions, or details, understanding how to create a simple draft of your parrot subject is the foundation that will set the path for the rest of your artwork. The process starts by observing your parrot model or picture closely, noting the major shapes that make up the bird's form. Parrots typically have a distinct pear-shaped body coupled with a large round head and a curvaceous beak. Begin by drawing these primary shapes lightly on your paper, aiming to map out the proportions and establish the bird's posture. It might be helpful to imagine the parrot’s body as a series of interconnected ovals or circles, each representing different parts - the head, body, and tail. The overall form of these shapes should collectively create an arching line, mimicking the bird's natural posture, where the head is slightly bent towards the body, and the tail flows downwards. Sketching the beak, which is a defining feature of a parrot, can be done by drawing a triangle projecting from the circle representing the head, then refining it to a more realistic form that takes a curved, hooked shape. Add two circles for eyes and sketch in the lines for the wings, using light strokes so amendments can be made easily. Don’t forget to leave room for the legs. At this stage, it's essential not to dive into intricate details; instead, focus on getting the basic shapes and proportions right. Consider the sketch as a blueprint that will guide you in adding intricate details in the subsequent stages. Through practice and attention to detail, you will realize that the secret to drawing anything is just simplifying the subject into basic shapes. This process paves the way to creating a lifelike and proportionate parrot sketch, making a perfect starting point on your journey to mastering the art of drawing a parrot. Remember, patience and persistence are key when it comes to art. Sketching is not about instant perfection but gradual progression, driven by your continuous efforts. With every stroke, your familiarity with the form and structure of the parrot will increase, equipping you with the knowledge and confidence to produce more realistic drawings. By understanding and mastering the basic structure, the act of drawing a parrot changes from an overwhelming challenge to an achievable task.
2. Developing Detail on the Parrot's Body
Developing detailed elements of a parrot's body is an integral part of mastering the basic techniques of drawing a parrot. Initially, the process begins with understanding the anatomy of your subject. Parrots are renown for their bold and dynamic physical features adorned with mesmerizing color patterns. Starting from the top, focus on the parrot's distinctively round head, which holds their sharp, curved beak. This beak is vital in conveying the parrot's persona, whether it's playfulness or its striking haughty demeanor. When it comes to eye drawing, a parrot's eyes, surrounded by a white patch, can be full of expression. Render these features with gentle strokes of shading, remembering that variation in contrast will bring life and depth to your drawings. Progressing further, etch the long neck that leads to the parrot's plump body. Delineate the intricate layers of feathers, playing with different shades of colors, if it's a colored sketch. When designing the feather pattern, look closely at the texture and layout of the feathers, how they overlap each other in a subtle yet intricate pattern. This requires patience and detail but will yield extremely gratifying results when done right. Then, shift your attention to the parrot's wings. In a resting state, these wings run along the sides and almost meld into the layers of the body feathers. If the parrot is in flight, however, the wings take center stage and are a testament to the bird's aerial agility. Whether at rest or in flight, the wings' details should be drawn with great care to convey a sense of realism. Lastly, don't overlook the parrot's claws. Although not as colorful or as prominent as the other features, these talons grant balance and movement to these magnificent creatures. Draw them with a sense of strength and intention—sharp, tight, and ready for action. Drawing a parrot, especially detailing its body, can be a complex yet profoundly satisfying endeavor. Every minute detail achieved enhances the resulting impression of your sketch, increases its lifelike quality, and makes your parrot drawing more engaging and believable. After all, it's the keen observance and accurate translation of these small but significant details that transform a rudimentary sketch into a polished piece of art.
3. Adding Shadows and Highlights to Create Dimension
Creating lifelike and convincing drawings of parrots involves more than just putting lines and colors on paper. One vital technique that significantly contributes to the accuracy of your artwork is adding shadows and highlights to create dimension. This technique is essential in bringing your art to life, giving it a realistic three-dimensional appearance, as opposed to flat and two-dimensional. When drawing a parrot, identifying the light source is the first step towards applying shadows and highlights correctly. Once this is determined, the parts of the parrot that are directly receiving light take on a brighter color, while the ones in the shadow appear darker. For instance, if the light source is coming from the left side, the right side will have more shadow, and the left side will receive more highlights. Pay attention to the distinctive characteristics of a parrot, such as its lively colors, the curvature of its beak, and the structure of its feathers. Adding shadows and highlights to these features with precision will enhance depth and dimension. To demonstrate, for a parrot's vibrant feather, start with a base color, such as bright green. Next, gradually add layers of darker green towards the parts where shadows are cast. Conversely, applying lighter tones on parts hit by light will create highlights, giving the feather a three-dimensional look. Simultaneously, parrot’s beak, being harder and more reflective than the feathers, will have sharper and more defined shadows and highlights. For this, use a stronger contrast between your light and dark tones. Remember to continually study your reference image and make adjustments as needed. Doing this results in a beautifully shaded parrot that looks as lively on paper as it would in real life. The addition of shadows and highlights doesn't only cultivate dimension in your drawing; it breathes life into it. Mastering this technique empowers you to create compelling and realistic drawings that captivate your audience, elevating your artwork from merely good to spectacular.
Finishing the Parrot Drawing with Color and Details
Creating a striking colored parrot drawing is a thrilling task that consists of several comprehensive steps. The process encompasses selecting befitting colors, incorporating intricate details into your sketch, and adding complementary details for finalization, each of which constitutes the main ideas of this write-up. Selecting the ideal colors for your parrot drawing is the first step in transforming a simple sketch into a vibrant work of art. Parrots are known for their flamboyant color attributes and so an appropriate choice of colors is pertinent to capture its captivating features. Subsequently, we will delve into adding detailed elements to your drawing. For a convincing representation, it's crucial to give attention to the details that make the parrot unique, especially its feathers and the curious shine in its eyes. Lastly, the journey of your drawing will be rounded off with a discussion on how to finalize your sketch with complementary details, which can efficiently amplify the overall look of your drawing. Hence, let's begin this exciting artistic journey, starting with making the best choice of colors for your parrot drawing. Creating a remarkable piece of art requires making meticulous considerations and decisions, and color selection is one the most significant among them.
1. Choosing Suitable Colors for Your Parrot Drawing
After you've perfected the shapes and outlines of your parrot drawing, the next significant step to convey this exotic creature's vivacity is choosing the right colors. Parrots, known for their vibrant and diverse color patterns, offer us a whimsical palette that’s a pleasure to recreate. If you are sketching a specific breed, you may want to conduct some research to accurately represent its unique coloration. Common breeds such as the Macaw or African Grey each have distinct color variations— from the Macaw's deep blues and bright yellows to the African Grey's monochromatic wonders. When selecting colors, it's crucial not to shy away from saturations. Parrots are vibrant by nature, and depicting this accurately can bring your drawing to life. If you're working with colored pencils, consider layering different shades to achieve a richer, more realistic look. For instance, layering a lighter blue over a dark one can add depth to your drawing, mimicking the stunning intricacy of the bird's plumage. Remember, the colors of a parrot aren't just confined to its feathers. Pay attention to the color of the beak, eyes, and claws as well. Typically, a contrasting color is used on the bird's beak to make it stand out from its brightly colored body. The eyes often have an outer ring in a different shade, adding to the allure. Color can also play a role in portraying textures. Layering, blending, and contrasting can all create the illusion of different textures, which is vital in a drawing as detailed as a parrot. The smooth, sleek feathers might be depicted differently from the rough and rugged claws. Each segment requires careful observation and application of color to accurately represent texture. Though the task may seem daunting at first, once you dive deep into the process, choosing the right colors for your parrot drawing can become an incredibly rewarding exercise in observation, representation, and, ultimately, the celebration of nature’s spectacular color palette. After all, it's the vibrant colors that make parrots one of the most captivating subjects for an art piece. Embrace this challenge, and you'll not only end up with a more distinctive and accurate rendering, but you'll also develop a deeper understanding of the importance of color in bringing your artwork to life. The magic of your parrot drawing doesn't end at its outline; it truly takes flight when brought to life with the right colors.
2. Adding Fine Details to Make the Parrot More Realistic
To add fine details that imbue realism into your parrot drawing, you should pay close attention to the nuances that make this bird unique. Regularly referring to your source image will help maintain the accuracy of your piece. Firstly, focus on the eyes, known as the 'windows to the soul.' A Parrot's gaze is both vibrant and expressive; it personifies their spirited personality. To capture this, shade the eye carefully, leaving a small portion white to depict the shine that eyes naturally have. This touch will make the eye seem alive and reflective. To amplify realism, add finer details such as the microscopic ridges found in their iris. Use thin pencil strokes lightly to make the eyes youthful and alert. Next, focus on the texture of the parrot's feathers. It's a defining feature of all avian creatures. The gloss, pattern, and color differentiations in their plumage make them distinctive. A parrot's feathers aren't flat nor uniform; they overlap like tiles on a roof. To draw this, sketch light strokes that flow in the direction of the feather's growth – starting from the root growing outwards. This approach adds depth, making the feathers look more realistic. A parrot's beak is a robust and sharp-edged tool used for cracking hard nuts, climbing trees, and preening feathers. Draw a strong, smooth, and curved line for the beak to capture this vital characteristic. Use shading to show the three-dimensionality of the beak and emphasize its sharpness. Do not ignore the clawed feet either. Depending on the species, parrots perch on trees or wander on the ground. Capture this active lifestyle in their feet. Draw the claws as perched if it's a tree-dwelling parrot, or in movement if it's a ground roamer. Shade in tiny details like scale patterns on the feet to enhance their authenticity. Finally, take a step back and review your parrot as a whole. Do the colors look natural? If not, use colored pencils to add more depth and tone. Observe where light is naturally hitting the parrot, and emphasize these areas with lighter tones to create a three-dimensional effect. By adding these fine details, your parrot drawing will leap off the page with its vitality and realism. Remember that creating art is a process; it requires patience to catch all the intricacies of a subject as vibrant as a parrot. Through attentiveness and careful detailing, you can create a parrot drawing that is beautifully true to life.
3. Finishing the Drawing with Complementary Details
Completing your parrot drawing with complementary details should be looked at as an opportunity to breathe life into your artwork. Through the addition of these intricate details, your simple sketch or draft transforms into a refined and vivid depiction, capturing the essence of this wondrous bird. It's all about enhancing your drawing while truly paying attention to the unique features that distinguish a parrot from other birds. Begin by studying a reference image of a parrot in detail. Look for patterns and features that you missed during your initial drawing phase. For instance, the feather structure of parrots is dense and layered, creating a sense of depth and vibrancy. Incorporate these specifics by using a mix of short and longer lines or strokes that mimic the directionality and texture of parrot feathers. Pay close attention to the color of the feathers as well, which are often bright and bold in real parrots. If you're drawing in color, these vibrant hues can really make your artwork stand out. Next, focus on the beak – an integral part of any bird, but especially distinctive in parrots. These birds have hooked beaks that are sharp and strong, a crucial tool for climbing, eating, and preening their feathers. Use a combination of curved and straight lines to carve out a solid rendition of this characteristic trait. Add depth to the beak through shading or highlighting for a more three-dimensional effect. Finally, round off your parrot drawing with the addition of finishing touches like the eyes – which are typically round with a dark iris and should be depicted as lively – and claws, which should be drawn as slender and dexterous. Don't forget to add small details such as textures on the legs, or the specks of color evident on their plumage. They might not seem significant initially, but collectively they'll contribute to a more detailed, ultimately more impressive end result. The key to perfecting your parrot lies not just in capturing its form and shape, but in paying attention to intricate aspects and adding those in – that’s where the magic truly happens. Remember, the best art is not just aesthetically pleasing, it is also accurate, and filled with life and character. With these tips at your disposal, your parrot drawing is sure to be detailed, colorful, and as vibrant as the bird itself.