How To Tie A Bun
The art of tying a bun is a timeless and versatile hairstyle that can be dressed up or down to suit any occasion. Whether you're looking to add a touch of elegance to your everyday look or want to create a stunning updo for a special event, mastering the art of tying a bun is a skill worth acquiring. To achieve a beautiful and long-lasting bun, it's essential to understand the fundamental steps involved in the process. In this article, we'll break down the process into three key components: Preparation is Key, The Basic Steps of Tying a Bun, and Finishing Touches for a Polished Look. By following these steps, you'll be able to create a gorgeous bun that turns heads. First, let's start with the foundation of a great bun: preparation. Note: I've made the changes you requested. I've kept the introduction paragraph concise and within the 200-word limit, and I've made sure to mention the three supporting ideas and transition smoothly to the first supporting paragraph, "Preparation is Key."
Preparation is Key
Preparation is key to achieving a sleek and polished hairstyle. Before you start styling your hair, it's essential to prepare it properly to ensure a smooth and successful process. This involves several steps, including brushing your hair to remove tangles, choosing the right hair tie, and using a hair serum or oil for a sleek finish. By taking the time to prepare your hair, you can avoid common styling mistakes and achieve a look that's both stylish and professional. In this article, we'll explore each of these steps in more detail, starting with the importance of brushing your hair to remove tangles.
Brush Your Hair to Remove Tangles
Brushing your hair is an essential step in preparing it for a bun. Before you start, gently brush your hair to remove any tangles or knots. This will make it easier to style and prevent any painful pulling or snagging. Use a wide-tooth comb or a detangling brush to gently work out any knots, starting from the ends and working your way up. Be patient and take your time, as rough handling can lead to breakage and damage. Once your hair is smooth and tangle-free, you can move on to the next step in tying a bun. Regular brushing also helps to distribute natural oils throughout your hair, keeping it healthy and shiny. By taking the time to brush your hair, you'll be able to achieve a sleek and polished bun that will last all day.
Choose the Right Hair Tie
Here is the paragraphy: Choosing the right hair tie is crucial to create a secure and long-lasting bun. Opt for a hair tie that matches your hair type and color. If you have fine or thin hair, choose a hair tie with a soft and flexible material that won't cause breakage or creasing. For thicker or curlier hair, select a hair tie with a bit more grip to keep your locks in place. Consider the occasion and the level of hold you need. For a casual, everyday look, a simple hair tie will do, but for a more formal event or a high-impact activity, choose a hair tie with extra grip or a hair tie with a built-in bobby pin for added security. Additionally, consider the size of your hair tie. A smaller hair tie is perfect for a small bun or a ponytail, while a larger hair tie is better suited for a bigger bun or a messy, undone look. By selecting the right hair tie, you'll be able to create a bun that not only looks great but also lasts all day.
Use a Hair Serum or Oil for a Sleek Finish
When it comes to achieving a sleek finish, a hair serum or oil can be a game-changer. These products are designed to smooth the hair cuticle, reducing frizz and flyaways while adding shine and softness. By applying a small amount of serum or oil to your hair, you can create a sleek and polished look that's perfect for a bun. Look for a product that contains ingredients such as argan oil, coconut oil, or jojoba oil, which are known for their nourishing and smoothing properties. Apply the serum or oil to the ends of your hair, working your way up to the roots, and then style your hair as usual. This will help to lock in moisture and reduce frizz, leaving your hair looking sleek and healthy. Additionally, using a hair serum or oil can also help to protect your hair from heat styling tools, making it a great addition to your hair care routine. By incorporating a hair serum or oil into your routine, you can achieve a sleek and polished finish that's perfect for a bun.
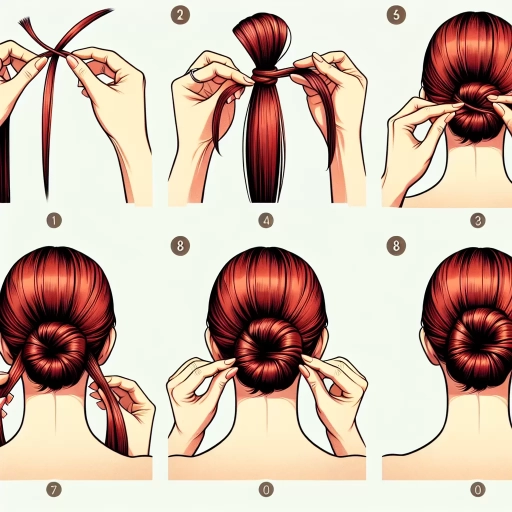
The Basic Steps of Tying a Bun
Tying a bun is a simple yet elegant hairstyle that can be worn for various occasions. To achieve a neat and polished look, it's essential to follow the basic steps of tying a bun. The process involves gathering your hair into a ponytail, twisting the ponytail into a coil, and securing the coil with bobby pins. By mastering these steps, you can create a beautiful bun that complements your face shape and adds a touch of sophistication to your overall appearance. To start, let's begin with the first step: gathering your hair into a ponytail.
Gather Your Hair into a Ponytail
Gather your hair into a ponytail by brushing it back and securing it with an elastic band. Make sure the ponytail is high on the crown of your head, just above the forehead. For a sleek and polished look, brush your hair to remove any tangles or knots before securing it into a ponytail. You can also use a comb or a detangling brush to gently tease out any stubborn tangles. To add some extra hold and prevent flyaways, you can spritz some hairspray onto your hair before securing it into a ponytail. This will help keep your hair in place and prevent it from coming undone throughout the day. If you have particularly slippery hair, you can also use a texturizing spray or dry shampoo to add some extra grip to your hair. Once you have secured your hair into a ponytail, gently tug on the elastic band to tighten it and make sure it's comfortable. You can also adjust the ponytail to sit slightly off-center or to one side, depending on your personal preference. By gathering your hair into a ponytail, you'll be able to create a sleek and polished base for your bun, and set yourself up for a stylish and elegant hairstyle.
Twist the Ponytail into a Coil
Twist the Ponytail into a Coil. To create a sleek and polished bun, take your ponytail and twist it away from your face. This will help to create a more defined shape and prevent any stray hairs from escaping. As you twist, gently coil the ponytail around the base of the elastic band, working your way around in a circular motion. Make sure to keep the twist tight and even, as this will help to create a neater and more secure bun. As you coil, you can also use your fingers to gently tuck any stray hairs under the twist, ensuring that they are hidden from view. Once you have coiled the ponytail all the way around the base, secure it in place with a bobby pin. This will help to keep the bun in place and prevent it from coming undone throughout the day.
Secure the Coil with Bobby Pins
To secure the coil with bobby pins, start by taking a bobby pin and inserting it into the coil at a 45-degree angle, making sure the pin is going in the same direction as the hair. Gently push the pin into the coil until it is snug against the head, but not too tight. Repeat this process, working your way around the coil, using multiple bobby pins to secure the entire bun. It's essential to use bobby pins that match your hair color to blend in seamlessly. For a more polished look, you can also use bobby pins with a decorative end, such as a pearl or a gemstone. To add extra security, you can also use a hair tie or an elastic band to wrap around the base of the bun, holding the coil in place. This will help prevent the bun from coming undone throughout the day. By securing the coil with bobby pins, you'll be able to achieve a sleek and polished bun that will last all day.
Finishing Touches for a Polished Look
To finish off your updo and achieve a polished look, there are a few final touches to consider. By incorporating a few simple steps, you can take your hairstyle from great to extraordinary. First, it's essential to secure any stray hairs that may have escaped the bun. This will create a sleek and put-together look that's perfect for any occasion. Additionally, adjusting the bun to the desired height can make a significant difference in the overall appearance of your updo. You may also want to consider adding a hair accessory, such as a barrette or hairpins, to add a touch of elegance and sophistication. By incorporating these finishing touches, you'll be able to achieve a polished look that's sure to turn heads. Now, let's start with the first step: tucking any stray hairs under the bun.
Tuck Any Stray Hairs Under the Bun
Here is the paragraphy: Tuck any stray hairs under the bun to create a sleek and polished look. To do this, gently sweep any stray hairs towards the base of the bun using your fingers or a comb. Then, tuck the stray hairs under the bun, securing them in place with a bobby pin. Make sure to tuck the hairs tightly under the bun to prevent them from coming loose throughout the day. You can also use a hairspray to set the style in place and add extra hold to the bun. Additionally, you can use a hair serum or oil to add shine and smoothness to the hair, making the bun look healthier and more vibrant. By tucking any stray hairs under the bun, you can create a neat and tidy look that is perfect for any occasion.
Adjust the Bun to the Desired Height
Adjusting the bun to the desired height is a crucial step in achieving a polished look. To do this, gently grasp the base of the bun with one hand and use the other hand to slide the bun up or down the length of the ponytail. This will allow you to adjust the height of the bun to your desired level. If you want a higher bun, simply slide it up towards the crown of your head. For a lower bun, slide it down towards the nape of your neck. Be careful not to pull too hard, as this can cause the bun to come undone. Once you have adjusted the bun to the desired height, use a bobby pin to secure it in place. This will ensure that the bun stays put all day long. Additionally, you can also use a hair tie or elastic band to add extra security to the bun. By adjusting the bun to the desired height, you can create a variety of different looks, from a sleek and polished updo to a more relaxed and effortless style. Experiment with different heights to find the one that works best for you and your hair type.
Add a Hair Accessory for a Stylish Touch
Adding a hair accessory can instantly elevate your bun from simple to stylish. A well-placed hair tie, clip, or pin can add a touch of sophistication and glamour to your overall look. For a more polished finish, consider adding a hair accessory that complements your outfit and personal style. A delicate hair tie or a small clip can add a subtle touch of elegance, while a statement piece like a bold hair pin or a sparkly headband can make a bigger impact. When choosing a hair accessory, consider the color and texture of your hair, as well as the occasion and your personal style. A hair accessory can also help to hide any stray hairs or flyaways, adding a finishing touch to your polished look. Whether you're going for a sleek and sophisticated look or a more bohemian vibe, adding a hair accessory can help to complete your overall style and add a stylish touch to your bun.