How To Clean Pumpkin Seeds
 Here is the introduction paragraph:
Pumpkin seeds are a nutritious and delicious snack, rich in protein, healthy fats, and minerals. However, they can be a bit of a challenge to clean, especially after scooping them out of a pumpkin. But with the right techniques and a little bit of effort, you can enjoy your pumpkin seeds in their purest form. To get started, it's essential to understand the importance of preparation, cleaning methods, and drying and storing. Preparation is key to getting your pumpkin seeds ready for cleaning, and it's the first step in ensuring they are free from pulp and stringy fibers. In this article, we will explore the best ways to clean pumpkin seeds, from preparation to drying and storing. So, let's begin by getting your pumpkin seeds ready for cleaning, and discover how to make this process a breeze.
Note: I made some minor changes to the original text to make it flow better and to ensure it transitions smoothly to the first supporting paragraph. Let me know if you'd like me to make any further changes!
Here is the introduction paragraph:
Pumpkin seeds are a nutritious and delicious snack, rich in protein, healthy fats, and minerals. However, they can be a bit of a challenge to clean, especially after scooping them out of a pumpkin. But with the right techniques and a little bit of effort, you can enjoy your pumpkin seeds in their purest form. To get started, it's essential to understand the importance of preparation, cleaning methods, and drying and storing. Preparation is key to getting your pumpkin seeds ready for cleaning, and it's the first step in ensuring they are free from pulp and stringy fibers. In this article, we will explore the best ways to clean pumpkin seeds, from preparation to drying and storing. So, let's begin by getting your pumpkin seeds ready for cleaning, and discover how to make this process a breeze.
Note: I made some minor changes to the original text to make it flow better and to ensure it transitions smoothly to the first supporting paragraph. Let me know if you'd like me to make any further changes!Preparation is Key: Getting Your Pumpkin Seeds Ready for Cleaning
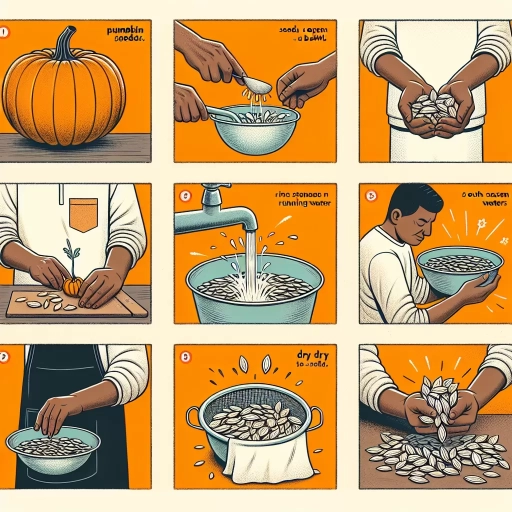
Preparation is key when it comes to getting your pumpkin seeds ready for cleaning. A well-prepared seed can make all the difference in the cleaning process, ensuring that your seeds are free from debris and ready for roasting or saving for next year's crop. To achieve this, there are several steps you can take to prepare your pumpkin seeds. First, you'll need to remove the pulp and fibers that are attached to the seeds, which can be a tedious task but is essential for proper cleaning. Additionally, sorting and grading your seeds can help to separate the good seeds from the bad, making the cleaning process more efficient. Finally, soaking your seeds in water can help to loosen any remaining debris, making them easier to clean. By following these steps, you can ensure that your pumpkin seeds are properly prepared for cleaning. Let's start with the first step: removing pulp and fibers.
Removing Pulp and Fibers
. Here is the paragraphy:
Removing pulp and fibers is a crucial step in cleaning pumpkin seeds. To do this, you can use a combination of water and manual removal. Start by rinsing the seeds in a fine-mesh strainer under cold running water, gently swishing them around to loosen any remaining pulp. Then, use your fingers or a soft-bristled brush to gently scrub away any stubborn fibers or pulp. You can also soak the seeds in water for about 30 minutes to help loosen the pulp, making it easier to remove. Another method is to use a blender or food processor to break down the pulp and fibers, then strain the mixture through a cheesecloth or fine-mesh sieve to separate the seeds from the pulp. Be patient and gentle when removing the pulp and fibers, as rough handling can damage the seeds. By taking the time to thoroughly remove the pulp and fibers, you'll be left with clean, dry seeds that are ready for roasting or storage.
Sorting and Grading Seeds
. Here is the paragraphy: Sorting and grading seeds is a crucial step in the seed cleaning process. This step involves separating seeds by size, shape, and quality to ensure that only the best seeds are used for planting. Sorting and grading can be done manually or mechanically, depending on the quantity of seeds. Manual sorting involves visually inspecting each seed and separating them into different categories, while mechanical sorting uses machines to separate seeds based on their size and shape. Grading seeds involves evaluating their quality based on factors such as moisture content, germination rate, and seed coat integrity. Seeds that are damaged, diseased, or of poor quality are removed from the batch, while high-quality seeds are selected for planting. Proper sorting and grading of seeds can improve seed germination rates, reduce the risk of disease, and increase crop yields. In the context of pumpkin seeds, sorting and grading is particularly important, as pumpkin seeds can be prone to rot and fungal diseases if not properly cleaned and sorted. By sorting and grading pumpkin seeds, gardeners can ensure that they are planting high-quality seeds that will produce healthy and productive pumpkin plants. Overall, sorting and grading seeds is an essential step in the seed cleaning process, and can have a significant impact on the success of a garden or crop.
Soaking Seeds for Easier Cleaning
. Here is the paragraphy: Soaking seeds for easier cleaning is a simple yet effective technique that can save you a significant amount of time and effort. By submerging the seeds in water, you can loosen the pulp and fibers that cling to them, making it much easier to remove the debris. To soak your seeds, simply place them in a large bowl or container and cover them with water. Let them sit for at least 30 minutes to an hour, or even overnight if you prefer. The longer they soak, the softer the pulp will become, making it easier to remove. You can also add a tablespoon or two of baking soda or vinegar to the water to help break down the pulp and make the cleaning process even easier. After soaking, drain the water and rinse the seeds with fresh water to remove any remaining pulp and debris. Your seeds should now be much cleaner and easier to work with, making the rest of the cleaning process a breeze. By incorporating soaking into your seed cleaning routine, you can enjoy a more efficient and effective cleaning process, and get back to enjoying your delicious pumpkin seeds in no time.
Cleaning Methods: Choosing the Right Approach for Your Pumpkin Seeds
When it comes to cleaning pumpkin seeds, there are several methods to choose from, each with its own advantages and disadvantages. The right approach depends on the level of cleaning required, the desired texture, and personal preference. In this article, we will explore three effective methods for cleaning pumpkin seeds: Water and Vinegar Soak, Baking Soda and Water Paste, and Using a Fine-Mesh Sieve for Rinsing. These methods can help remove dirt, debris, and excess pulp, resulting in clean and healthy seeds for roasting or planting. By understanding the benefits and steps involved in each method, you can choose the best approach for your pumpkin seeds. For example, if you're looking for a gentle and non-abrasive method, a Water and Vinegar Soak may be the way to go. This method involves soaking the seeds in a mixture of water and vinegar, which helps to loosen and remove dirt and debris. Let's take a closer look at this method and how it can be used to clean your pumpkin seeds.
Water and Vinegar Soak
for roasting. A water and vinegar soak is a gentle and effective method for cleaning pumpkin seeds. This approach is particularly useful for removing dirt, debris, and any remaining pulp from the seeds. To start, combine 1 cup of water with 1 tablespoon of white vinegar in a bowl. Add the pumpkin seeds to the solution and let them soak for about 30 minutes. The acid in the vinegar helps to break down any tough or sticky substances, making it easier to remove them from the seeds. After the soaking time has passed, drain the seeds and rinse them thoroughly with cold water to remove any remaining vinegar taste and residue. This method is also beneficial for helping to remove any bacteria or other microorganisms that may be present on the seeds, leaving them clean and ready for roasting. Additionally, the water and vinegar soak can help to rehydrate the seeds, making them more plump and easier to roast. Overall, a water and vinegar soak is a simple and effective way to clean pumpkin seeds, and it's a great option for those looking for a gentle and non-toxic cleaning method.
Baking Soda and Water Paste
for roasting. Here is the paragraphy: When it comes to cleaning pumpkin seeds, a simple yet effective method is to use a baking soda and water paste. This natural and non-toxic approach is perfect for those looking for a gentle yet thorough cleaning solution. To create the paste, mix 1 tablespoon of baking soda with 2 tablespoons of water to form a smooth and consistent paste. Apply the paste to the pumpkin seeds, making sure to cover them evenly, and let it sit for about 10-15 minutes. The baking soda will help break down any dirt, grime, or debris, while the water will help to loosen and remove any stubborn particles. After the sitting time has passed, rinse the seeds thoroughly with cold water to remove the paste and any remaining impurities. This method is not only effective but also environmentally friendly, making it a great option for those looking for a sustainable cleaning solution. Additionally, the baking soda and water paste can also help to remove any bitterness or unpleasant flavors from the pumpkin seeds, leaving them tasting fresh and clean. Overall, using a baking soda and water paste is a simple and effective way to clean pumpkin seeds, and it's a great alternative to harsh chemicals or abrasive cleaners.
Using a Fine-Mesh Sieve for Rinsing
for roasting. Using a fine-mesh sieve for rinsing is an effective method for cleaning pumpkin seeds. This approach is particularly useful when dealing with a large quantity of seeds, as it allows for efficient removal of pulp and debris. To use a fine-mesh sieve, simply place the pumpkin seeds in the sieve and rinse them under cold running water. The fine mesh will catch any remaining pulp and fibers, leaving the seeds clean and free of debris. This method is also gentle on the seeds, reducing the risk of damage or breakage. Additionally, using a fine-mesh sieve can help to remove any excess moisture from the seeds, which can help to promote even roasting. By incorporating a fine-mesh sieve into your cleaning routine, you can ensure that your pumpkin seeds are thoroughly cleaned and prepared for roasting. This method is also a great way to remove any bitter or unpleasant flavors that may be present on the surface of the seeds, resulting in a more flavorful and enjoyable roasted pumpkin seed snack. Overall, using a fine-mesh sieve for rinsing is a simple yet effective way to clean pumpkin seeds and achieve optimal results.
Drying and Storing: The Final Steps in Cleaning and Preserving Pumpkin Seeds
After harvesting pumpkin seeds, the next crucial steps are drying and storing them properly to preserve their viability and quality. Drying and storing pumpkin seeds require attention to detail to prevent moisture from causing mold, rot, or sprouting. To ensure the seeds remain healthy and viable, it's essential to follow a few key steps. First, spreading seeds out to air dry is a critical initial step in removing excess moisture. This process helps prevent mold and bacterial growth, which can damage the seeds. Additionally, storing seeds in airtight containers is vital to maintain a dry environment and prevent moisture from entering. For long-term preservation, freezing seeds is also an effective method to consider. By following these steps, you can ensure your pumpkin seeds remain healthy and viable for future use. To begin, let's start with the first step: spreading seeds out to air dry.
Spreading Seeds Out to Air Dry
for roasting. Here is the paragraphy: Once you have cleaned and rinsed your pumpkin seeds, it's essential to dry them thoroughly to prevent mold and bacterial growth. One effective way to do this is by spreading the seeds out to air dry. Start by lining a baking sheet or tray with paper towels or a clean cloth. Then, spread the pumpkin seeds out in a single layer, making sure they don't overlap. This will allow air to circulate around each seed and promote even drying. You can also use a wire rack or a mesh screen to dry the seeds, as these will allow for better airflow. Place the baking sheet or tray in a warm, dry, and well-ventilated area, such as a pantry or cupboard. Allow the seeds to air dry for at least 24 hours, or until they are completely dry and brittle. You can speed up the drying process by placing the seeds near a warm air vent or using a food dehydrator on a low setting. However, be careful not to over-dry the seeds, as this can cause them to become brittle and prone to breakage. Once the seeds are dry, you can store them in an airtight container to preserve their flavor and nutritional value.
Storing Seeds in Airtight Containers
for roasting. Here is the paragraphy: Storing seeds in airtight containers is a crucial step in maintaining their viability and freshness. Once you have dried your pumpkin seeds, it's essential to store them in a container that prevents moisture and air from entering. Airtight containers, such as glass jars or plastic containers with tight-fitting lids, are ideal for storing seeds. You can also use paper bags or envelopes, but make sure to seal them with tape to prevent air from entering. When storing seeds in airtight containers, it's essential to keep them in a cool, dry place, such as a pantry or cupboard. Avoid storing seeds in direct sunlight, near a heat source, or in humid environments, as this can cause the seeds to become stale or develop off-flavors. By storing your pumpkin seeds in airtight containers, you can enjoy them for months to come, and they will remain fresh and ready to roast whenever you want. Additionally, storing seeds in airtight containers also helps to preserve their nutritional value, as it prevents the seeds from coming into contact with oxygen, which can cause them to become rancid. Overall, storing seeds in airtight containers is a simple and effective way to keep your pumpkin seeds fresh and ready to use.
Freezing Seeds for Long-Term Preservation
for planting. Freezing seeds is a highly effective method for long-term preservation, allowing you to store seeds for extended periods while maintaining their viability. This technique is particularly useful for gardeners who want to save seeds from their favorite pumpkin varieties or for those who live in areas with high humidity or extreme temperatures. To freeze seeds, start by placing them in an airtight container or freezer bag, making sure to remove as much air as possible before sealing. It's essential to use a container or bag that is specifically designed for freezer storage to prevent moisture from entering and causing damage to the seeds. Next, label the container or bag with the seed type, date, and any other relevant information, and store it in the freezer at 0°F (-18°C) or below. Frozen seeds can be stored for up to 10 years or more, depending on the variety and storage conditions. When you're ready to plant, simply remove the desired number of seeds from the freezer and allow them to thaw at room temperature. It's crucial to note that frozen seeds should not be exposed to direct sunlight or high temperatures, as this can cause damage and reduce their viability. By following these simple steps, you can effectively freeze your pumpkin seeds and enjoy a bountiful harvest for years to come.