How To Draw Lips
Understanding the Anatomy of Lips
The Importance of Knowing the Structure of the Lips
Before we journey into the world of pencil sketches, brushes, and color palettes, we need to understand the science behind the art - the fundamental structure and anatomy of lips. They're not just a simple curve but are composed of different parts, each requiring special attention. This knowledge helps in creating more realistic and accurate drawing of the lips. As an artist, your sharp observational skills combined with specific anatomical knowledge will contribute to the success of your depiction.
Key Elements in the Structure of Lips
There are three main elements to take note when sketching lips: the outer line that defines the shape, the separation between the upper and lower lip, and the philtrum or the indentation that connects the top lip to the nose. Paying extra attention to these key elements can dramatically improve the realism of your drawings. It is these subtle elements that make each pair of lips unique, giving you an exciting variety to draw and paint.
Analyzing Differences in Lip Shapes
Not all lips are created equal. Some are full, others thin. Some people have a clearly defined cupid's bow, while others' may be round and subtle. Understanding these differences and incorporating them into your sketches can help create a lifelike and individual depiction. Observing and studying different lip shapes improves your versatility as an artist and expands your repertoire.
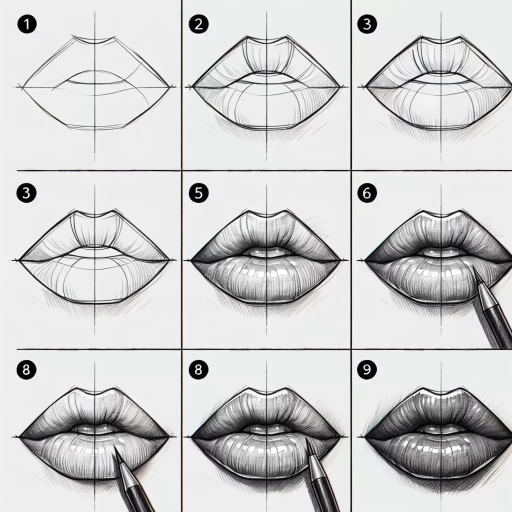
Step-by-Step Process of Drawing Lips
Drawing the Outline
Armed with the understanding of the lips' anatomy, we can now dive into the actual drawing. Start by outlining the shape of the lips. While sketching, maintain a gentle hand to produce soft lines that can be easily adjusted. Remember, perfection isn't your goal at the initial stage. The aim is to define the general structure around which you'll build the details. Use your observations and anatomical knowledge as a guide to create a well-defined and realistic lip outline.
Adding Details and Shadows
After successfully outlining the lips, the next step is to add detail and depth to your drawing using shadows. Look closely at your reference photo or subject - see where the light lands and where the shadows fall. The upper lip, for instance, generally appears darker as it tends to receive less light. The areas receiving less light would be darker and vice versa. Correctly capturing these highlights and shadows plays a crucial role in bringing your artwork to life.
Refining and Polishing Your Drawing
The final stages of your drawing should focus on refining and adding finishing touches. Polish the uneven lines, intensify the essential shadows, and soften the edges. At this point, it's all about fine-tuning your drawing until you're satisfied with the outcome. Remember, the key is perseverance and practice until you achieve the outcome you desire.
Common Mistakes to Avoid When Drawing Lips
Ignoring the Influence of Light Direction
One of the common mistakes made when drawing lips is disregarding the effect of light. Understanding the light direction dramatically impacts the realism and three-dimensional effect in your drawings. Incorrect lighting can result to unrealistic or distorted lips. Hence, it's crucial to consider the light source to determine where the highlights and shadows would be.
Overdoing Lip Lines and Contours
While definitions and lines are essential for realism, overdoing them can make your lips sketch look harsh and unnatural. It's best to apply lip lines and contours subtly and focus more on the play of light and shadows, which mimic the way we naturally perceive objects.
Disproportional Drawing
A common pitfall for beginners is making lips either too big or too small compared to the other facial features. To avoid disproportional drawings, it is necessary to understand the proper scale and placement of lips in relation to the whole face. Practice and keen observation will help achieve more proportional and natural-looking sketches.