How To Draw A Rabbit
Understanding the Basic Structure of a Rabbit
Anatomical Basics
Drawing a rabbit starts with understanding its basic anatomy. A rabbit's body is made up of a few key components that are generally the same across the species. They consist of the head, the body, the legs, and the tail. The head, which is usually round or oval-shaped, carries the ears and eyes, which have important distinctive features. The body is structured as three circles: one large for the chest and two smaller ones for the rump. The legs are quite short with distinctive joints and, often, the view of a rabbit will either hide the hind legs or only show them from a side view. Learning these fundamental anatomical features will set a foundation for drawing a rabbit.
Details on the Face and Ears
Adding details to the rabbit's face is important as it determines the expressiveness of the rabbit and sets the mood in the piece of art. The ears of a rabbit can vary widely in both size and shape depending on the breed. Yet, they typically sit high on the head and have a long, straight shape. The eye shape is generally an oval, a little slanted, and the placement slightly towards the sides. The nose is made up of a single line, curving inwards to create a small triangle with the line representing the mouth. Rabbits also have whiskers that are represented by very fine lines emerging from the nose area.
Developing Techniques and Sharpening Skills
Like any other form of art, drawing a rabbit requires the development of specific techniques and continual practice. Start with light pencil strokes to create a basic structure. As your confidence grows, you can move onto other mediums such as charcoal or paint. Additionally, take time to study and observe live animals or references from books and images. Also consider practicing shading and texture techniques which can bring your rabbit drawings to life. You may create fur texture by using short, rapid strokes addressing the direction in which the fur grows.
The Step-By-Step of Drawing a Rabbit
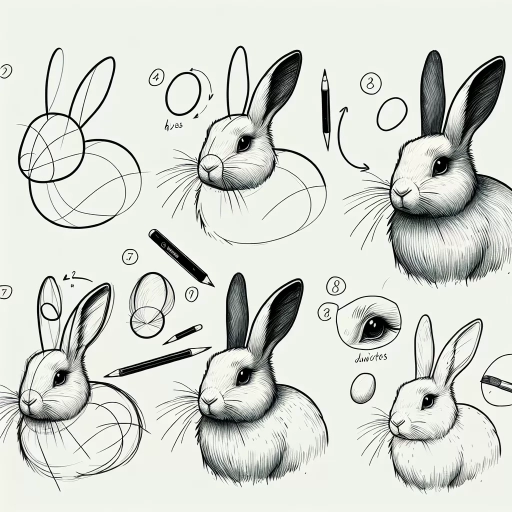
Design the Structure
The first step in drawing a rabbit is designing the basic structure. This involves sketching out the main parts of the rabbit such as the head, body, and legs using light pencil strokes. Remember, the head is usually round or slightly oval, the body consists of three circles differing in size, and the legs are short with distinct joints. Drawing lightly is a good practice, especially at the beginning because it allows for necessary adjustments as your drawing progresses.
Refining the Outline and Adding Details
After having the basic structure laid out, you can refine your sketch by adding details and depth. Include facial features and distinct characteristics using slightly darker lines. Make sure to reflect the long, straight shape of the ears, the oval-shaped eyes positioned towards the sides, a simple triangular nose, and very fine lines for the whiskers. Also, differentiate the front and hind legs using accurate proportions and joints. Then, you can start adding the tail to your rabbit using soft, fluffy strokes to reflect its texture.
Final Touches
Once you've achieved a satisfactory outline of your rabbit, it's time for the final touches. Add textures like fur using quick, short strokes responding to the direction in which the fur grows. Try to also include variations in fur length and volume as not all parts of a rabbit have equal amounts of fur. Finally, depending on your preference, you can choose to either shade your rabbit for a realistic touch or color it for a more vibrant look. Remember to use soft shades where the fur is light and darker shades where the fur appears thick or overlaps.
Common Mistakes and Tips for Improvement
Avoiding Proportionality Errors
One common mistake made when drawing a rabbit is getting the proportions incorrect. For example, drawing the head too large or the body too small can distort the overall appearance of the rabbit. Frequent practice, referring to real-life rabbits, or studying images can minimize this error. Also, start your sketched lines lightly, enabling you to correct these proportions easily early in the process.
Creating Realistic Textures
Another challenge many artists face is achieving a realistic fur texture. It's easy to fall into the trap of making fur look too smooth or too rough. To create an appealing, realistic texture, you should judge the length and density of the fur in different parts of the rabbit’s body. Using quick, short strokes can make the illusion of soft, fluffy fur. Also, remember that practice makes perfect. So, take time to practice creating fur textures specifically.
Mastering Light and Shade
Mastering the use of light and shade in your drawing can immensely increase the life-like quality of your rabbit. This involves using dark shades for areas where light doesn't reach and light shades for areas directly under light. Understanding the source of light and the shadow it casts can be complex, but it can bring a sense of depth and reality to your drawing. Don't shy away from experimenting with different shading techniques and watch the different effects they have on your piece.