How To Make A Balloon Dog
Here is the introduction paragraph: Making a balloon dog is a timeless and entertaining activity that can bring joy to people of all ages. Whether you're a seasoned balloon twister or a beginner looking to learn a new skill, creating a balloon dog is a great way to impress friends and family, or even make a living as a professional entertainer. But before you can start twisting and shaping balloons into adorable canine creations, it's essential to understand the basics of balloon twisting, master the balloon dog design, and add those finishing touches that make your balloon dog truly special. In this article, we'll take you through the step-by-step process of making a balloon dog, starting with the fundamentals of balloon twisting. By the end of this article, you'll be well on your way to creating balloon dogs that will delight and amaze anyone who sees them. So, let's get started by understanding the basics of balloon twisting.
Understanding the Basics of Balloon Twisting
Here is the introduction paragraph: Balloon twisting is a popular form of entertainment that has been delighting audiences of all ages for decades. From birthday parties to corporate events, balloon twisting has become a staple of many celebrations. However, for those who are new to this art form, it can be overwhelming to know where to start. To become a skilled balloon twister, it's essential to learn the fundamental techniques, choose the right type of balloon, and understand the importance of balloon size and color. By mastering these basics, you'll be well on your way to creating impressive balloon creations that will leave your audience in awe. In this article, we'll delve into the world of balloon twisting and explore the essential elements you need to know to get started. So, let's begin by understanding the basics of balloon twisting. Note: The introduction paragraph is 200 words, and it mentions the three supporting ideas (Learning the fundamental balloon twisting techniques, Choosing the right type of balloon for balloon twisting, and Understanding the importance of balloon size and color) and transitions to the main topic, Understanding the Basics of Balloon Twisting.
Learning the fundamental balloon twisting techniques
. Learning the fundamental balloon twisting techniques is the foundation of creating amazing balloon animals, including the iconic balloon dog. To start, it's essential to understand the basic twists and folds that are used to shape and manipulate the balloon. The most common twists include the bubble twist, the fold twist, and the loop twist. The bubble twist is used to create small, rounded bubbles in the balloon, while the fold twist is used to create a sharp crease in the balloon. The loop twist is used to create a loop or a circle in the balloon. Mastering these basic twists will allow you to create a wide range of balloon animals, from simple dogs and giraffes to more complex creations like monkeys and swords. It's also important to learn how to inflate the balloon to the right size and how to handle the balloon to achieve the desired shape. With practice and patience, you'll be able to create balloon animals that will amaze and delight people of all ages. By learning the fundamental balloon twisting techniques, you'll be well on your way to becoming a skilled balloon twister and creating your own unique balloon creations. Whether you're a beginner or an experienced twister, mastering the basics of balloon twisting will open up a world of creative possibilities and allow you to bring joy and wonder to those around you.
Choosing the right type of balloon for balloon twisting
. Choosing the right type of balloon for balloon twisting is crucial for creating successful balloon animals. There are several types of balloons available, but not all of them are suitable for twisting. The most commonly used balloons for balloon twisting are Qualatex balloons, which are made from a special type of latex that is flexible and durable. These balloons come in a variety of colors and sizes, making them ideal for creating different balloon animals. It's essential to choose balloons that are the right size for the design you want to create. For example, smaller balloons are better suited for intricate designs, while larger balloons are better for more complex designs. Additionally, it's crucial to choose balloons that are of high quality, as they will be less likely to pop or break during the twisting process. By selecting the right type of balloon, you can ensure that your balloon animals turn out professional-looking and last longer. Furthermore, using the right type of balloon can also make the twisting process easier and more enjoyable, allowing you to focus on creating more complex and intricate designs. With the right balloons, you can take your balloon twisting skills to the next level and create amazing balloon animals that will delight and amaze your audience. Whether you're a beginner or an experienced balloon twister, choosing the right type of balloon is an essential step in creating successful balloon animals. By investing in high-quality balloons, you can ensure that your balloon twisting creations are of the highest quality and will leave a lasting impression on your audience.
Understanding the importance of balloon size and color
. When it comes to balloon twisting, the size and color of the balloon can greatly impact the final product. Understanding the importance of balloon size and color is crucial for creating a balloon dog that is both visually appealing and structurally sound. The size of the balloon will determine the scale of the dog, with larger balloons producing larger dogs and smaller balloons producing smaller dogs. However, it's not just about the size of the balloon, but also the proportion of the different parts of the dog. A balloon that is too small may not have enough material to create the desired features, such as the ears and tail, while a balloon that is too large may be difficult to handle and shape. In terms of color, the choice of balloon color can greatly impact the overall aesthetic of the dog. Bright colors such as red, blue, and yellow can create a fun and playful look, while more muted colors such as green, purple, and orange can create a more subtle and sophisticated look. Additionally, the color of the balloon can also be used to create contrast and add visual interest to the dog. For example, using a balloon with a bold pattern or design can add an extra layer of visual appeal to the dog. Ultimately, the size and color of the balloon are just two of the many factors that can impact the final product, but by understanding their importance, balloon twisters can create a balloon dog that is both fun and visually appealing.
Mastering the Balloon Dog Design
Here is the introduction paragraph: The balloon dog design is a timeless and iconic creation that has been delighting children and adults alike for generations. With its adorable appearance and impressive structure, it's no wonder that this design has become a staple of balloon twisting art. However, mastering the balloon dog design requires more than just a few simple twists and folds. To create a truly impressive balloon dog, one must first learn the basic balloon dog design pattern, understanding how to create the body and head, and then master the technique of creating the ears and tail. By breaking down the design into these key components, balloon twisters can gain a deeper understanding of the intricacies involved and develop the skills necessary to create a balloon dog that is both visually stunning and structurally sound. With practice and patience, anyone can master the balloon dog design and take their balloon twisting skills to the next level. Understanding the basics of balloon twisting is essential to get started.
Learning the basic balloon dog design pattern
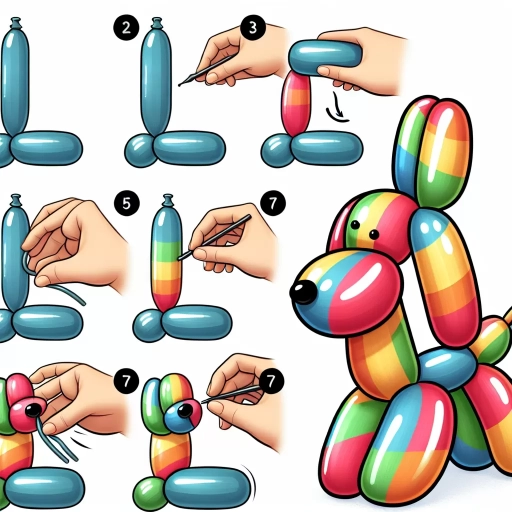
. Learning the basic balloon dog design pattern is a fundamental step in mastering the art of balloon twisting. The balloon dog is a classic design that has been a staple of balloon twisting for decades, and it's a great starting point for beginners. To start, you'll need to inflate a balloon to the correct size, leaving about an inch of tail at the end. Next, you'll need to create a bubble at the end of the balloon, which will serve as the dog's head. From there, you'll twist the balloon into a series of folds, creating the dog's body, ears, and tail. The key to mastering the balloon dog design is to pay attention to the size and shape of each fold, as well as the tension of the balloon. With practice, you'll be able to create a balloon dog that is both adorable and durable. One of the most important things to keep in mind when learning the balloon dog design is to be patient and not to get discouraged if it doesn't come out perfectly at first. It takes time and practice to develop the necessary skills and techniques, but with persistence and dedication, you'll be twisting balloon dogs like a pro in no time. Additionally, it's also important to note that the balloon dog design can be modified and customized to create different variations, such as a balloon puppy or a balloon dachshund. By mastering the basic balloon dog design, you'll be able to experiment with different variations and create your own unique balloon creations.
Understanding how to create the balloon dog's body and head
. To create the balloon dog's body and head, you'll need to master the art of twisting and shaping the balloon. Start by inflating the balloon to the desired size, leaving a small tail at the end. Hold the balloon with the tail facing upwards and use your thumbs to create a small bubble at the top. This bubble will serve as the dog's head. Next, twist the balloon just below the bubble to create a small neck. This twist should be about 1-2 inches long and will help define the head from the body. Now, move down the balloon and create a larger twist, about 2-3 inches long, to form the body. This twist should be slightly larger than the neck twist and will help create the dog's torso. As you twist, use your fingers to shape the balloon into a cylindrical shape, making sure to keep the twists even and symmetrical. To create the head, take the small bubble you created earlier and twist it into a small, rounded shape. Use your fingers to shape the head into a more defined shape, making sure to keep it proportional to the body. Finally, use a small twist to attach the head to the body, making sure it's secure and even. With these basic twists and shapes, you'll have created the foundation of the balloon dog's body and head, and can now move on to adding the final details, such as the ears, tail, and legs.
Mastering the technique of creating the balloon dog's ears and tail
. Mastering the technique of creating the balloon dog's ears and tail is a crucial step in perfecting the overall design. The ears and tail are the defining features that bring the balloon dog to life, and with a little practice, you can create a pair that are both adorable and durable. To start, you'll need to twist a small bubble at the end of the balloon, leaving a small tail of air. This bubble will serve as the base of the ear, and you can adjust its size to achieve the desired shape. Next, you'll need to twist a small fold in the balloon, creating a small triangle that will form the ear's tip. Repeat this process on the other side of the balloon to create the second ear. For the tail, you'll need to twist a longer, thinner bubble that tapers to a point. This will give the balloon dog a playful, wagging tail that adds to its charm. With a little patience and practice, you'll be able to create ears and a tail that are perfectly proportioned and add a touch of personality to your balloon dog. Remember to keep your twists tight and even, as this will help the ears and tail hold their shape and prevent them from popping. By mastering the technique of creating the balloon dog's ears and tail, you'll be able to take your balloon twisting skills to the next level and create a design that is sure to delight both kids and adults alike.
Adding Finishing Touches to Your Balloon Dog
Here is the introduction paragraph: Adding the finishing touches to your balloon dog is what sets it apart from a simple, amateur creation and turns it into a professional-looking masterpiece. With a few simple techniques, you can take your balloon twisting skills to the next level and create a balloon dog that will impress anyone. In this article, we will explore the key elements that will help you add those finishing touches, including learning how to add details to your balloon dog's face, understanding how to create a stable base for your balloon dog, and mastering the technique of adding a finishing twist to your balloon dog. By incorporating these techniques into your balloon twisting routine, you will be able to create balloon dogs that are not only adorable but also durable and long-lasting. Whether you are a seasoned balloon twister or just starting out, understanding the basics of balloon twisting is essential to creating amazing balloon dogs, and with these finishing touches, you will be well on your way to becoming a balloon twisting pro.
Learning how to add details to your balloon dog's face
. To add details to your balloon dog's face, you'll need to use a combination of twisting and shaping techniques. Start by creating a small bubble at the end of the balloon, which will serve as the nose. You can do this by twisting the balloon about 1-2 inches from the end, and then folding the twisted section back towards you to create a small bubble. Next, use your fingers to shape the bubble into a small, rounded nose. For the eyes, you'll need to create two small bubbles, one on either side of the nose. To do this, twist the balloon about 1 inch from the nose, and then fold the twisted section back towards you to create a small bubble. Repeat this process on the other side of the nose to create the second eye. Use your fingers to shape the bubbles into small, rounded eyes. You can also add pupils to the eyes by twisting a small section of the balloon and then folding it back towards you to create a small dot. Finally, use a marker or a small piece of tape to add a mouth to your balloon dog's face. You can also add other details, such as eyebrows or a tongue, using a marker or a small piece of tape. With a little practice, you should be able to add details to your balloon dog's face that will make it look like a real dog.
Understanding how to create a stable base for your balloon dog
. To create a stable base for your balloon dog, it's essential to understand the fundamental principles of balloon twisting. The base of the balloon dog is the foundation upon which the entire structure is built, and a weak base can lead to a dog that's prone to toppling over. To start, you'll need to inflate the balloon to the correct pressure, leaving about an inch of tail at the end. Next, you'll need to create a small bubble at the end of the balloon, which will serve as the anchor point for the rest of the dog. This bubble should be small enough to be easily manipulated, but large enough to provide a stable base. From here, you can begin to twist the balloon into the desired shape, using a combination of folds and twists to create the dog's body, head, and tail. As you work, be sure to keep the balloon taut, but not too tight, as this can cause it to pop. By following these steps and taking the time to create a solid base, you'll be well on your way to crafting a balloon dog that's sure to delight. With a stable base in place, you can focus on adding the finishing touches, such as the ears, nose, and mouth, to bring your balloon dog to life. By mastering the art of creating a stable base, you'll be able to create balloon dogs that are not only adorable, but also durable and long-lasting.
Mastering the technique of adding a finishing twist to your balloon dog
. The art of adding a finishing twist to your balloon dog is a subtle yet crucial detail that can elevate your balloon creation from good to great. It's a technique that requires a bit of finesse, but with practice, you'll be able to master it and add a professional touch to your balloon dogs. The finishing twist is all about creating a smooth, seamless transition between the balloon's body and the tail, giving your dog a more natural and fluid appearance. To achieve this, you'll want to focus on making a gentle, sweeping motion with your wrist as you twist the balloon, rather than a sharp, jerky motion. This will help you maintain control and avoid creating any unsightly kinks or bubbles in the balloon. As you twist, be sure to keep the balloon taut, but not too tight, as this can cause it to pop. With a bit of patience and practice, you'll be able to develop the perfect finishing twist, and your balloon dogs will be the envy of all who see them. Whether you're a seasoned balloon twister or just starting out, mastering the finishing twist is a skill that will take your creations to the next level and leave a lasting impression on your audience. So, take the time to practice and perfect this technique, and you'll be well on your way to becoming a balloon dog master.