How To Sew A Button On Pants
Here is the introduction paragraph: Sewing a button on pants is a simple yet essential skill that can save you from the hassle of dealing with a lost or loose button. Whether you're a seasoned sewer or a beginner, this task can be accomplished with ease by following a few straightforward steps. To ensure a successful outcome, it's crucial to approach the task with a clear understanding of the process. In this article, we'll break down the steps into three key areas: Preparation is Key, The Sewing Process, and Finishing Touches. By understanding the importance of preparation, mastering the sewing process, and adding the final touches, you'll be able to sew a button on your pants with confidence. So, let's start by exploring the first crucial step: Preparation is Key.
Preparation is Key
When it comes to sewing, preparation is key to achieving professional-looking results. Before starting a project, it's essential to take the time to prepare your materials and tools to ensure a smooth and successful sewing experience. This includes choosing the right thread color, selecting the correct needle size, and gathering essential sewing tools. By doing so, you'll be able to avoid common mistakes, save time, and produce a high-quality finished product. In this article, we'll explore the importance of preparation in sewing and provide tips on how to get started. First, let's start with the basics - choosing the right thread color.
Choose the Right Thread Color
When it comes to sewing a button on pants, choosing the right thread color is crucial to ensure a seamless and professional finish. The thread color should match the color of the pants as closely as possible to blend in with the surrounding fabric. If the pants have a subtle pattern or texture, it's best to choose a thread color that complements the dominant color. For example, if the pants have a dark blue background with lighter blue stripes, a dark blue thread would be the best choice. If the pants are a solid color, it's easy to match the thread color exactly. However, if the pants have a complex pattern or multiple colors, it's best to choose a neutral thread color like beige, gray, or white that won't compete with the other colors. Additionally, consider the type of thread to use, such as cotton, polyester, or silk, depending on the type of fabric the pants are made of. Using the right thread color and type will ensure a strong and durable stitch that will withstand wear and tear.
Select the Correct Needle Size
When it comes to sewing a button on pants, selecting the correct needle size is crucial for a secure and long-lasting stitch. A needle that is too small may not be able to handle the thickness of the fabric, leading to a weak stitch that can easily come undone. On the other hand, a needle that is too large may be difficult to maneuver and can cause the fabric to pucker or distort. To choose the correct needle size, consider the type of fabric you are working with. For example, if you are sewing on a pair of heavy-duty work pants, you will need a larger needle size, such as a size 8 or 10. For lighter fabrics, such as cotton or linen, a smaller needle size, such as a size 6 or 7, may be more suitable. Additionally, consider the type of thread you are using. Thicker threads require larger needle sizes, while thinner threads require smaller needle sizes. By selecting the correct needle size, you can ensure a strong and secure stitch that will withstand the wear and tear of daily use.
Gather Essential Sewing Tools
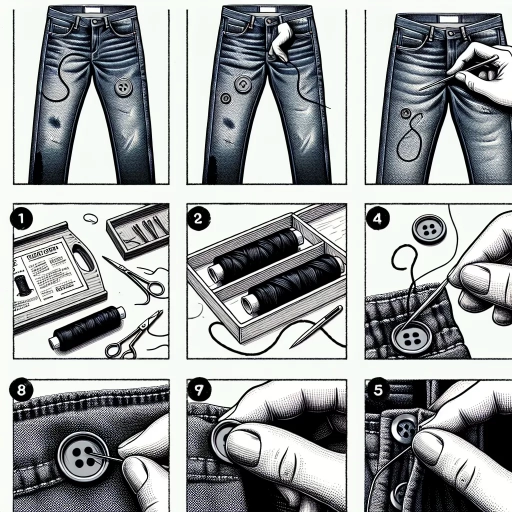
To sew a button on pants, it's crucial to gather essential sewing tools beforehand. Start by collecting a few basic supplies, including a needle, thread, scissors, and a sewing machine (if you plan to use one). Choose a needle that's suitable for the type of fabric your pants are made of, such as a sharp needle for woven fabrics or a blunt needle for knits. Select a thread color that matches the original thread used on your pants, or opt for a contrasting color if you want the repair to stand out. You'll also need a small pair of scissors to cut the thread, and a seam ripper to carefully remove any existing stitching if needed. Additionally, consider investing in a few specialized tools, such as a thimble to protect your fingers from the needle, a tape measure to ensure accurate placement, and a sewing gauge to help you maintain even stitches. Having these essential tools at your disposal will make the sewing process much smoother and help you achieve a professional-looking result.
The Sewing Process
The sewing process is a fundamental skill that requires patience, attention to detail, and practice. When it comes to sewing a button, it's essential to follow a step-by-step approach to ensure a secure and professional finish. To start, you'll need to thread your needle and tie a knot, which will provide a stable foundation for your stitches. Next, you'll position the button and start sewing, taking care to align the button with the fabric and maintain even tension. Finally, you'll secure the button with multiple stitches, making sure it's firmly attached and won't come loose over time. By following these simple steps, you'll be able to sew a button with confidence and achieve a professional-looking result. To begin, let's start with the first step: Thread Your Needle and Tie a Knot.
Thread Your Needle and Tie a Knot
To begin the sewing process, it's essential to start with the basics: threading your needle and tying a knot. This fundamental step may seem simple, but it's crucial for securing your thread and ensuring a smooth sewing experience. To thread your needle, hold the thread between your thumb and index finger, making a small loop at the end. Then, pass the thread through the needle's eye, gently pulling it through until the loop is on the other side. Next, pull the thread tight to remove any slack, and you'll have a secure thread in place. Now, to tie a knot, hold the thread between your thumb and index finger, making a small loop. Pass the thread through the loop, then pull it tight to create a knot. You can also use a knot-tying tool or a small dot of clear nail polish to secure the knot. With your needle threaded and a knot tied, you're ready to start sewing your button onto your pants.
Position the Button and Start Sewing
Position the button and start sewing. Place the button on the correct side of the fabric, usually the right side, and align it with the buttonhole or the mark you made earlier. Make sure it's centered and even. If your button has a shank, position it so that the shank is facing away from you. If your button is flat, you can position it either way. Once the button is in place, bring the needle up through the fabric from the underside, then insert the needle into one of the button holes. Pull the thread gently to secure the button in place. Make a few small stitches to anchor the thread, then begin sewing the button on using a simple running stitch or a whipstitch. Make sure to sew through both the button and the fabric to secure the button firmly in place. As you sew, keep the tension even and not too tight, as this can cause the fabric to pucker. Continue sewing until the button is securely attached, then tie a knot on the underside of the fabric to finish the thread.
Secure the Button with Multiple Stitches
Sewing a button on pants securely requires more than just a few quick stitches. To ensure the button stays in place, it's essential to use multiple stitches. Start by threading your needle and tying a knot at the end. Bring the needle up through the fabric from the underside of the pants, then through one of the button holes. Next, bring the needle back down through the other button hole and into the fabric, creating a small stitch. Repeat this process several times, moving around the button to create a secure attachment. For added security, you can also use a whipstitch or a blanket stitch around the edges of the button. This will help prevent the button from coming loose over time. Additionally, you can use a few small stitches to attach the button to the underlying fabric, rather than just the surface of the pants. This will provide extra stability and prevent the button from shifting or falling off. By using multiple stitches and taking the time to secure the button properly, you can ensure that it will stay in place and function correctly.
Finishing Touches
The finishing touches are the final details that complete a project, making it polished and professional. When it comes to adding the finishing touches, there are several key steps to take to ensure a high-quality outcome. First, it's essential to tie a final knot and trim excess thread to secure the button in place. Additionally, inspecting the button for security is crucial to prevent it from coming loose over time. Finally, making any necessary adjustments will guarantee a perfect fit and a flawless finish. By following these steps, you can add the perfect finishing touches to your project. To start, let's take a closer look at the first step: tying a final knot and trimming excess thread.
Tie a Final Knot and Trim Excess Thread
To tie a final knot and trim excess thread, start by holding the thread taut with one hand and using the other hand to create a small loop. Pass the thread through the loop to form a knot, then pull it tight to secure it. Repeat this process one more time to create a second knot, which will add extra security to the stitch. Once the knots are in place, use scissors to carefully trim the excess thread as close to the knot as possible. Be careful not to cut too close, as this can cause the knot to come undone. With the excess thread removed, the button should now be securely attached to the pants, and the stitching should be nearly invisible. This final step completes the process of sewing a button on pants, and with a little practice, you should be able to achieve professional-looking results.
Inspect the Button for Security
Inspect the button for security by checking if it's securely attached to the fabric. Make sure the stitches are tight and evenly spaced, and that the button isn't loose or wobbly. If the button is attached with a shank, ensure that the shank is securely fastened to the fabric and that the button is not coming loose. If the button is attached with a loop or a ring, check that the loop or ring is securely attached to the button and the fabric. Additionally, inspect the button for any signs of wear or damage, such as cracks, chips, or discoloration. If the button is damaged, it may be necessary to replace it to ensure the security of the garment. By inspecting the button for security, you can ensure that it will remain securely attached to the pants and function properly.
Make Any Necessary Adjustments
Once you've completed the sewing process, take a step back and evaluate your work. Make any necessary adjustments to ensure the button is securely attached and evenly spaced. Check that the stitches are tight and not loose, and that the thread is not visible from the outside of the pants. If needed, add a few more stitches to reinforce the attachment. Also, make sure the button is centered and aligned with the other buttons on the pants. If it's not, you can carefully remove the stitches and reposition the button. Additionally, inspect the surrounding fabric for any wrinkles or creases that may have formed during the sewing process. If necessary, use a hot iron to smooth out the fabric and create a crisp finish. By making these final adjustments, you'll be able to achieve a professional-looking result that will make your pants look like new again.