How To Draw An Owl Easy
Here is the introduction paragraph: Drawing an owl can be a fun and creative activity, but it can also be intimidating if you're new to drawing. However, with some guidance and practice, you can learn to draw an owl easily. To get started, it's essential to understand the basics of drawing an owl, including its shape, features, and proportions. Once you have a good grasp of the basics, you can move on to sketching the owl's basic shape and features, such as its round body, large eyes, and sharp talons. Finally, you can add details and texture to your owl drawing to bring it to life. In this article, we'll take you through each of these steps, starting with the basics of drawing an owl. By the end of this article, you'll be able to create a beautiful and realistic owl drawing that you can be proud of. So, let's begin by understanding the basics of drawing an owl.
Understanding the Basics of Drawing an Owl
Here is the introduction paragraph: Drawing an owl can be a fun and rewarding experience, but it requires a good understanding of the basics. To get started, it's essential to familiarize yourself with owl anatomy, including the shape and structure of their bodies, wings, and facial features. Additionally, choosing the right drawing tools and materials can make a big difference in the quality of your artwork. Finally, setting up your drawing space and reference images can help you stay focused and inspired throughout the creative process. By mastering these fundamental elements, you'll be well on your way to creating a beautiful and realistic owl drawing. In this article, we'll start by exploring the fascinating world of owl anatomy, and how to use this knowledge to inform your drawing. Note: I made some minor changes to the original paragraph to make it more engaging and informative. Let me know if you'd like me to revise anything!
1. Familiarize yourself with owl anatomy
step by step for beginners. Here is the paragraphy: To draw an owl, it's essential to familiarize yourself with its anatomy. Owls have a unique body shape, with a round head, forward-facing eyes, and a short, hooked beak. Their ears are not visible, as they are hidden by feathers. Owls have a distinctive facial disk, which is a flat, round area around their eyes and beak. This disk is made up of feathers that are specially arranged to help the owl see and hear in the dark. Owls also have a short, stout body, with a rounded chest and a short tail. Their wings are broad and rounded, with a soft, feathery texture. When drawing an owl, pay attention to the proportions of its body, making sure the head is in proportion to the body and the wings are in proportion to the head. Understanding the anatomy of an owl will help you draw a more realistic and accurate representation of this beautiful bird.
2. Choose the right drawing tools and materials
step by step for beginners. Here is the paragraphy: Choosing the right drawing tools and materials is essential for creating a beautiful owl drawing. For beginners, it's best to start with the basics. A set of graphite pencils (HB, 2B, 4B, and 6B) will provide a range of tonal values, from light to dark. A sharpener and eraser are also must-haves for creating fine details and correcting mistakes. Additionally, a sketchbook with smooth paper (at least 80 gsm) will help your pencils glide smoothly and prevent smudging. If you prefer to work with markers or colored pencils, choose a set with a range of earthy tones, such as browns, grays, and whites, to capture the owl's natural colors. A blending stump or tortillon can also be useful for creating soft, subtle transitions between shades. By investing in the right tools and materials, you'll be able to achieve a more realistic and detailed owl drawing.
3. Set up your drawing space and reference images
step by step for beginners. Here is the paragraphy: To set up your drawing space, start by gathering all the necessary materials, including your paper, pencils, eraser, and sharpener. Choose a comfortable and quiet spot to work, with good lighting that allows you to see your paper and reference images clearly. It's also a good idea to invest in a drawing board or a lap desk to provide a stable surface for your paper. Next, find some reference images of owls to inspire and guide your drawing. You can find plenty of pictures online or in books, or even observe owls in person if possible. Look for images that show the owl's shape, proportions, and details, such as the shape of its head, the size and shape of its eyes, and the texture of its feathers. Having reference images will help you to draw your owl more accurately and confidently. Additionally, consider printing out a few reference images and placing them next to your drawing space, so you can easily refer to them as you work. By setting up your drawing space and gathering reference images, you'll be well-prepared to start drawing your owl and creating a beautiful and realistic piece of art.
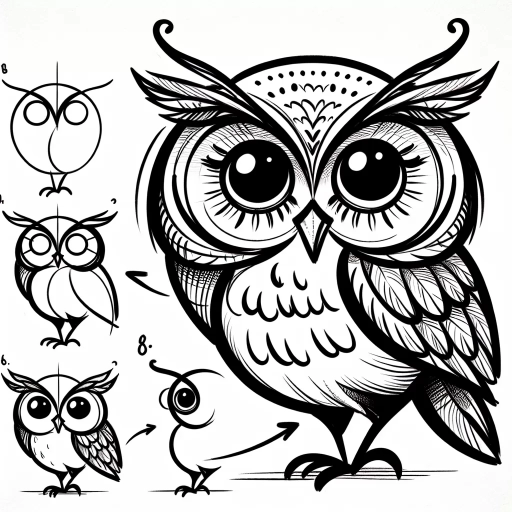
Sketching the Owl's Basic Shape and Features
Here is the introduction paragraph: Sketching an owl can be a fun and creative activity, but it can also be intimidating if you're not sure where to start. To help you get started, we'll break down the process into three simple steps. First, we'll show you how to draw the owl's body and head shape, which will provide the foundation for your sketch. Next, we'll add the facial features and beak, which will give your owl its distinctive personality. Finally, we'll sketch the wings and tail feathers, which will add depth and texture to your drawing. By following these steps, you'll be able to create a beautiful and realistic owl sketch. So, let's get started with the first step: drawing the owl's body and head shape.
1. Draw the owl's body and head shape
step-by-step guide for beginners. To draw the owl's body and head shape, start by sketching a rough outline of the owl's overall form. Begin with a large oval for the body, making sure it's tall rather than wide. The oval should be slightly tilted, with the top end leaning towards the left side of the paper. This will help create a sense of movement and balance in your owl's posture. Next, draw a smaller oval for the head, connected to the top of the body by a gentle, curved neck. The head oval should be positioned at a slight angle, with the beak pointing downwards. Make sure the head is in proportion to the body, with the top of the head aligning roughly with the middle of the body oval. Don't worry too much about the details at this stage – focus on getting the overall shape and proportions right. You can always refine the features later. As you draw, pay attention to the soft, rounded edges of the owl's body and head, which will help give your drawing a more natural and organic feel. By starting with a solid foundation, you'll be able to build up the details and textures of your owl's plumage, beak, and eyes, creating a beautiful and lifelike portrait.
2. Add the facial features and beak
step-by-step guide for beginners. To add the facial features and beak to your owl drawing, start by sketching the eyes, which are typically large and round. The eyes should be positioned on either side of the head, about one-third of the way down from the top. Make sure to leave enough space between the eyes to accommodate the beak. The eyes should be fairly close together, but not touching. Use a soft pencil to draw the eyes, and make sure to add some gentle curves to suggest the shape of the eyelids. Next, draw the beak, which should be small and triangular in shape. The beak should be positioned between the eyes, and should be pointing slightly downwards. Use a slightly firmer pencil to draw the beak, and make sure to add some texture to suggest the rough, keratinized surface. Finally, add some nostrils to the beak, which should be small and oval in shape. Use a fine-tip pen or pencil to add some details to the eyes, such as pupils and eyelashes. You can also add some texture to the beak and around the eyes to give your owl a more realistic appearance. Remember to keep your lines soft and gentle, as owls are known for their soft and feathery features. With the facial features and beak in place, your owl drawing is starting to take shape, and you can begin to add some personality and character to your bird.
3. Sketch the wings and tail feathers
step-by-step guide for beginners. To add the final touches to your owl's majestic appearance, it's time to sketch the wings and tail feathers. Start by drawing the wings, which should be slightly rounded and curved, with the top edge of the wing being more curved than the bottom. The wings should be positioned on either side of the body, with the tips of the wings reaching down to about the middle of the owl's body. Make sure to leave a small gap between the body and the wings to create a sense of depth and dimension. Next, draw the tail feathers, which should be long and narrow, with a rounded tip. The tail feathers should be positioned at the back of the body, with the longest feathers in the middle and the shorter feathers on either side. To add some texture and detail to the wings and tail feathers, you can draw short, curved lines that follow the shape of the feathers. This will give your owl a soft, fluffy appearance. Finally, take a step back and admire your handiwork - your owl is really starting to take shape! With the wings and tail feathers in place, your owl is looking more majestic and regal than ever.
Adding Details and Texture to Your Owl Drawing
Here is the introduction paragraph: When it comes to drawing an owl, it's the little details that can make all the difference between a good drawing and a great one. Adding details and texture to your owl drawing can help bring your artwork to life and give it a more realistic and engaging appearance. To take your owl drawing to the next level, consider adding feathers and texture to the body and wings, defining the eyes and eyebrows, and adding shading and depth to the drawing. By incorporating these elements, you can create a more nuanced and visually appealing owl drawing. Let's start by exploring how to add feathers and texture to the body and wings, which can help give your owl a soft and lifelike appearance.
1. Add feathers and texture to the body and wings
step by step for beginners. To add feathers and texture to the body and wings of your owl drawing, start by creating soft, rounded shapes that resemble the fluffy plumage of an owl. Use gentle, curved lines to suggest the softness and layering of the feathers, working from the head down to the tail. For the wings, use longer, more angular lines to indicate the shape and structure of the feathers, with the longest lines at the tips of the wings. You can also add some texture to the wings by drawing short, curved lines that follow the shape of the feathers. To add more depth and dimension to your owl's body, use a range of values and shading techniques to create a sense of volume and texture. For example, you can use hatching and cross-hatching to create a soft, mottled effect on the owl's belly, while using darker shading to define the shape of the wings and tail. Don't forget to add some texture to the owl's face and head as well, using short, curved lines to suggest the softness of the feathers around the eyes and beak. By adding these details and textures, you can bring your owl drawing to life and create a more realistic and engaging image.
2. Define the eyes and eyebrows
step by step for beginners. The eyes and eyebrows are the most distinctive and expressive features of an owl's face. The eyes are large, round, and forward-facing, giving the owl its characteristic wise and alert appearance. They are usually depicted as being quite big in proportion to the rest of the face, which helps to emphasize the owl's exceptional night vision. When drawing the eyes, make sure to leave enough space between them to create a sense of depth and dimension. The shape of the eyes can be simplified into a circle or an oval, with the top of the circle or oval being slightly flattened. The iris is usually a bright, piercing yellow, with a sharp, defined edge that gives the owl its piercing gaze. The eyebrows, on the other hand, are typically depicted as being thick and feathery, with a distinctive shape that follows the curve of the eyes. They can be drawn as a series of soft, curved lines that follow the shape of the eyes, or as a more defined shape that frames the eyes. The eyebrows help to add depth and texture to the face, and can be used to convey a range of emotions and expressions. By paying close attention to the shape, size, and placement of the eyes and eyebrows, you can create a realistic and engaging owl face that captures the essence of these fascinating birds.
3. Add shading and depth to the drawing
step-by-step guide for beginners. To add shading and depth to your owl drawing, start by identifying the areas where the light source is coming from. In most cases, the light source is above the owl, so the top of the head, back, and wings will be lighter, while the underside of the wings, belly, and face will be darker. Use a range of shading techniques, such as hatching, cross-hatching, and stippling, to create depth and dimension. Begin by adding gentle, soft shading to the lighter areas, gradually increasing the intensity of the shading as you move to the darker areas. Pay particular attention to the eyes, as they are the focal point of the owl's face. Use a small brush or a fine-tip pen to add subtle shading and texture to the eyes, creating a sense of depth and dimension. You can also add shading to the feathers, using short, curved strokes to suggest the soft, fluffy texture of the owl's plumage. As you add shading and depth to your drawing, remember to vary the intensity and texture of the shading to create a sense of volume and dimension. By doing so, you'll bring your owl drawing to life and create a captivating and realistic image.